EasyManua.ls Logo

quadient iX-1 User Manual

quadient iX-1
2 pages
To Next Page IconTo Next Page
Page #1 background imageLoading...
Page #1 background image
2
1
4
3
2
1
4
3
f
1 2
ABC DEF
JKL
GHI
MNO
3
4 5 6
TUVPQRS WXYZ
7 8 9
#/:
C 0
.
1st Letter
No service
20/01/22
Mem: None
Acct.00000
$00.000
00 lb
01.0 oz
Need help? Contact us at: www.myquadient.com or call 1.800.636.7678
c
How to replace your iX-1
Remove the meter
Disconnect the Weighing Platform
Unpack the box
Disconnect the internet cable
Remove print head packaging
Disconnect the power cable
Remove the ink cartridge
Unplug the weighing platform
connector from the scale port
located on the back of the iX-1.
Remove the weighing platform
(d) from the mailing system (a).
Unplug the LAN cable from
the internet cable port
located on the of the iX-1 (e).
Unplug the power adapter
cable connector from the
back of your iX-1.
Open the front cover, then
pull on the left side of the
blue lever to unlock the
cartridge.
Pull the cartridge towards
you to disengage it.
Turn the iX-1 on its back and
open the meter cover located
on the bottom of the system.
Remove the meter (b) and
close the cover.
Remove the replacement unit
from the box and place the
original unit into the box to
return.
iX-1 mailing
system base
a
LAN
cable
e
Ink
cartridge
c
Postage
meter
b
Power adapter
and cable
f
Weighing
platform
d
Open the front cover.
Remove the protective
packag ing, then close the
front cover.
Prepaid
return
label
g
Because the iX-1 is so reliable, we can x most problems over the phone.
If we cannot x your problem, we will send a replacement system. Once you receive your
replacement system, complete the steps below to replace and return your damaged system.
3 7
4
8
2 6
1 5
Press to move the
current ink cartridge into the
replacement position.
Next, press the scroll up button
to select ink cartridge, then
press .
Activate ink cartridge replacement
Press the key.










e
b
a
d
a
d
Question and Answer IconNeed help?

Do you have a question about the quadient iX-1 and is the answer not in the manual?

quadient iX-1 Specifications

General IconGeneral
Brandquadient
ModeliX-1
CategoryDigital Mailing system
LanguageEnglish

Summary

How to Replace Your iX-1: Initial Steps

Activate Ink Cartridge Replacement

Follow on-screen prompts to select ink cartridge and move it to the replacement position.

Remove Ink Cartridge

Open cover, unlock blue lever, and pull cartridge out to disengage it from the system.

Disconnect Power Cable

Unplug the power adapter cable connector from the back of the iX-1 unit.

Disconnect Weighing Platform

Unplug the weighing platform connector and remove it from the mailing system base.

Disconnect Internet Cable

Unplug the LAN cable from the internet cable port located on the back of the iX-1.

Remove Meter

Turn unit on its back, open meter cover, remove meter, and close cover.

Unpack Replacement Box

Remove the replacement unit and place the original unit into the box for return.

Remove Print Head Packaging

Open the front cover, remove protective packaging, and then close the front cover.

How to Replace Your iX-1: Final Steps

Install Ink Cartridge

Open slot, insert ink cartridge, secure blue lever, and close the cover.

Install Meter

Turn unit on back, open meter cover, insert meter vertically, and close cover.

Connect Weighing Platform

Plug weighing platform connector into the back port and place platform on top.

Connect Internet Cable

Plug LAN cable into the back port, then connect the other end to a wall jack or router.

Connect Power Cable

Plug power cable into adapter, adapter into unit, and unit into wall outlet.

Confirm Ink Cartridge Installation

Follow screen prompts on the iX-1 control panel to confirm cartridge replacement.

Add Postage Funds

Use keypad to select 'add funds' and enter the desired amount of postage.

Return Original Unit

Prepare the box, affix the return label, and ship the original unit within ten days.
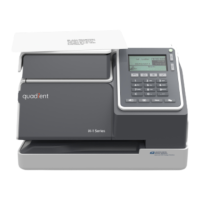
Related product manuals