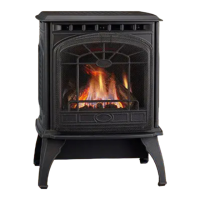
GARNET DIRECT VENT ROOM HEATER
250-6443B October 7, 2003 Page 5
GARNET DIRECT VENT ROOM HEATER
250-6443B October 7, 2003 Page 6
OVERVIEW OF INSTALLATION TO OPERATION
• Familiarize yourself with this Owner's Manual and the Safety Notices located in this manual,
and posted on the gas appliance.
• Remove and unpack the following components:
The Log Set is taped to the top of the stove.
• Inside the firebox will be the Component Bag.
• Unbolt the appliance from the pallet.
• Remove the top and then the face of the stove. The face is removed by lifting straight up.
• Remove the glass door by opening the latches located on both the left and right sides at the
top of the glass. Pull towards you and separate latch from notches. Lift the glass out of the
two notches at its base and carefully set aside.
• Convert to LP if necessary. (Use Conversion Kit included with appliance).
• Install Blower if purchased. (Part #844-9370).
• Finalize your installation decisions and requirements:
• Refer to Dimensions on page 7.
• Refer to Clearances to Combustibles on page 7.
• Refer to Horizontal and Vertical termination requirements on pages 20-32.
• Install damper if necessary for your venting plans, see page 24. (In the Commonwealth
of Massachusetts, the word damper shall be replaced with the words flue restrictor.)
• Refer to Vent Kits pertinent to your installation on page 14.
• Contact your local building inspector for code requirements in your area.
• Run thermostat lines to TH & TPTH connectors on valve, if applicable, see page 9.
• Set unit in place and install venting per your installation requirements.
• Install Log Set and lava rock. See instructions on page 10 of this manual.
• Connect the gas line. See page 33.
• Plug in blower, if purchased.
• Leak test gas line to manual shut-off valve. See page 34.
• Re-attach the glass door.
• Re-attach the face.
• Follow Lighting Instructions, page 35, to light the appliance. (A copy is attached to a beaded
chain on the lower right hand side of the appliance).
• Adjust gas control knob to "ON" (Following Lighting Instructions page 35).
• Set Thermostat or turn control panel switch to the "ON" position.
• Check flames and adjust shutter position, if necessary. See page 39.
• Familiarize yourself with the maintenance requirements of the stove. See pages 37 & 38.
• Familiarize yourself with the Troubleshooting section of this manual, page 41.