Warning:Maintainapermanent
watch
Alwaysmaintainapermanentwatch,this
willallowyoutorespondtosituations
astheydevelop.Failuretomaintaina
permanentwatchputsyourself,yourvessel
andothersatseriousriskofharm.
Warning:FCCWarning(Part
15.21)
Changesormodicationstothisequipment
notexpresslyapprovedinwritingby
RaymarineIncorporatedcouldviolate
compliancewithFCCrulesandvoidthe
user’sauthoritytooperatetheequipment.
Declarationofconformity
RaymarineUKLtd.declaresthatthisproductis
compliantwiththeessentialrequirementsofR&TTE
directive1999/5/EC.
TheoriginalDeclarationofConformitycerticate
maybeviewedontherelevantproductpageat
www.raymarine.com.
ComplianceStatement(Part15.19)
ThisdevicecomplieswithPart15oftheFCCRules.
Operationissubjecttothefollowingtwoconditions:
1.Thisdevicemaynotcauseharmfulinterference.
2.Thisdevicemustacceptanyinterferencereceived,
includinginterferencethatmaycauseundesired
operation.
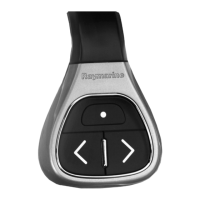
Installationandset-up
Installationandset-upoftheremotecontrolunit
involvesthefollowing:
•Insertingthebatteries.
•Pairingtheremotecontrolunitwithacompatible
multifunctiondisplay.
•ConguringtheUPandDOWNbuttons.
•Mountingtheremotecontrolunittoasteeringwheel
(ifrequired).Alternativelyalanyardissuppliedfor
wearingtheremotecontrolunitaroundyourneck.
•CustomizingtheSHORTCUTbutton(optional).
Insertingandreplacingbatteries
1.Removethescrewsonthebackpaneltorevealthe
batterycompartment.
2.Ensuretheribbonispositionedushagainstthe
bottomofthebatterycompartment,asshowninthe
diagramabove.Gentlyinsert2xAAAAbatteries
intothecompartment.Ensurethatyouobserve
thecorrectpolarity,asindicatedinthebattery
compartment.
3.Ensuretheribbonisaccessibleoncethebatteries
areinplace.Replacethebackcoverandtighten
screws,ensuringthattheribbondoesnotget
trappedinthecasing.
Note:Awarningmessageisdisplayedonthe
multifunctiondisplaywhentheremotecontrol
unitbatteriesarerunninglow.Afterreplacingthe
batteriesyoumustholddownanybuttononthe
remotefor2secondstoreconnectwiththedisplay.
Iftheremotewillnotbeusedforaprolonged
period,removethebatteriestoavoidleakageor
unnecessarypowerdrain.
Pairingtheremoteandconguringthe
UPandDOWNbuttons
Theremotecontrolunitmustbe“paired”withthe
multifunctiondisplaythatyouwanttocontrol.Onyour
multifunctiondisplay,withthehomescreendisplayed:
1.SelectSet-up.
2.SelectSystemSettings.
3.SelectWirelessConnections.
4.SelectBluetooth→On.
5.SelectNewBluetoothConnection.
Apop-upmessagewillbedisplayedtoconrmthat
thedeviceyouareconnectingtoisdiscoverable.
6.SelectOktoconrm.
7.Onyourremotecontrolunit,holddowntheUP
andDOWNbuttonstogetherfor10seconds.
8.SelectOKtocleartheon-screenmessage.
Alistofdiscovereddevicesisdisplayed.
9.Selecttheremotecontrolunitinthelistofdevices.
10.Whenprompted,pressthearrowbuttononyour
remotethatyouwishtobeconguredastheUP
button.Theotherarrowbuttonwillautomaticallybe
conguredastheDOWNbutton.
Ifthepairingwassuccessfula“PairingSuccess”
messagewillbedisplayed.Ifa“PairingFailure”
or“PairingTimeout”messageisdisplayed,repeat
steps1to9.
3
 Loading...