- 6 -
EN
5.3.1 Standby mode
The appliance will go into standby mode if no button is pressed or it stands idle for more than three minutes.
7KHGLVSOD\ZLOOEHGLPPHGZKHQWKLVKDSSHQV7ROHDYHWKHVWDQGE\PRGH
Press any parameter key.
Turn the control knob.
Press the control knob.
Couple the mixing bowl to the appliance.
The previously used programme and its mixing parameters are shown again.
7LS6HWWLQJWKH9DFXXP
Tests with various investment materials have shown that the best mixing results (smooth, homogeneous casting re-
sults) are obtained at the maximum vacuum setting. As a rule, this also applies to plasters. In individual instances,
independent tests have shown that – under extremely high vacuum – the partial pressure in the mixing bowl can
sink to a point where bubbles due to boiling can form in certain plasters. Then reduce the vacuum setting.
5.4 Mixing Process
Always read the safety data sheets supplied by the manufacturers when mixing investment materials!
:HDUWKHDSSURSULDWHSHUVRQDOSURWHFWLYHHTXLSPHQWDVDQGZKHQUHTXLUHG
2EVHUYHPD[LPXPPDUNRQPL[LQJERZO'RQRW¿OOWKHPL[LQJERZORYHUWKHPD[LPXPPDUN
7KLVOLPLWLVYDOLGIRUSRZGHUVDQGOLTXLGVPHDVXUHGEHIRUHPL[LQJ
,IWKHPL[LQJERZOLVRYHU¿OOHGWKHVXFWLRQ¿OWHUV\VWHPFDQEHFRPHVRLOHG
$WWHPSWLQJWRPL[VPDOOTXDQWLWLHVLQODUJHERZOVZLOOUHVXOWLQLQDGHTXDWHPL[LQJ
1. Select an appropriate mixing bowl size.
2. Mix powder and liquid as instructed by the manufacturer. Allow plaster to sit for
approx. 15-20 sec.
3. Using a spatula, lightly mix the materials together or use the premix function
(refer to Sec. 6.4).
4. Install the appropriate paddle.
0DNHVXUHWKHERZOULPDQGFRYHUULP)¿JDUHFOHDQ
5. Select the desired program.
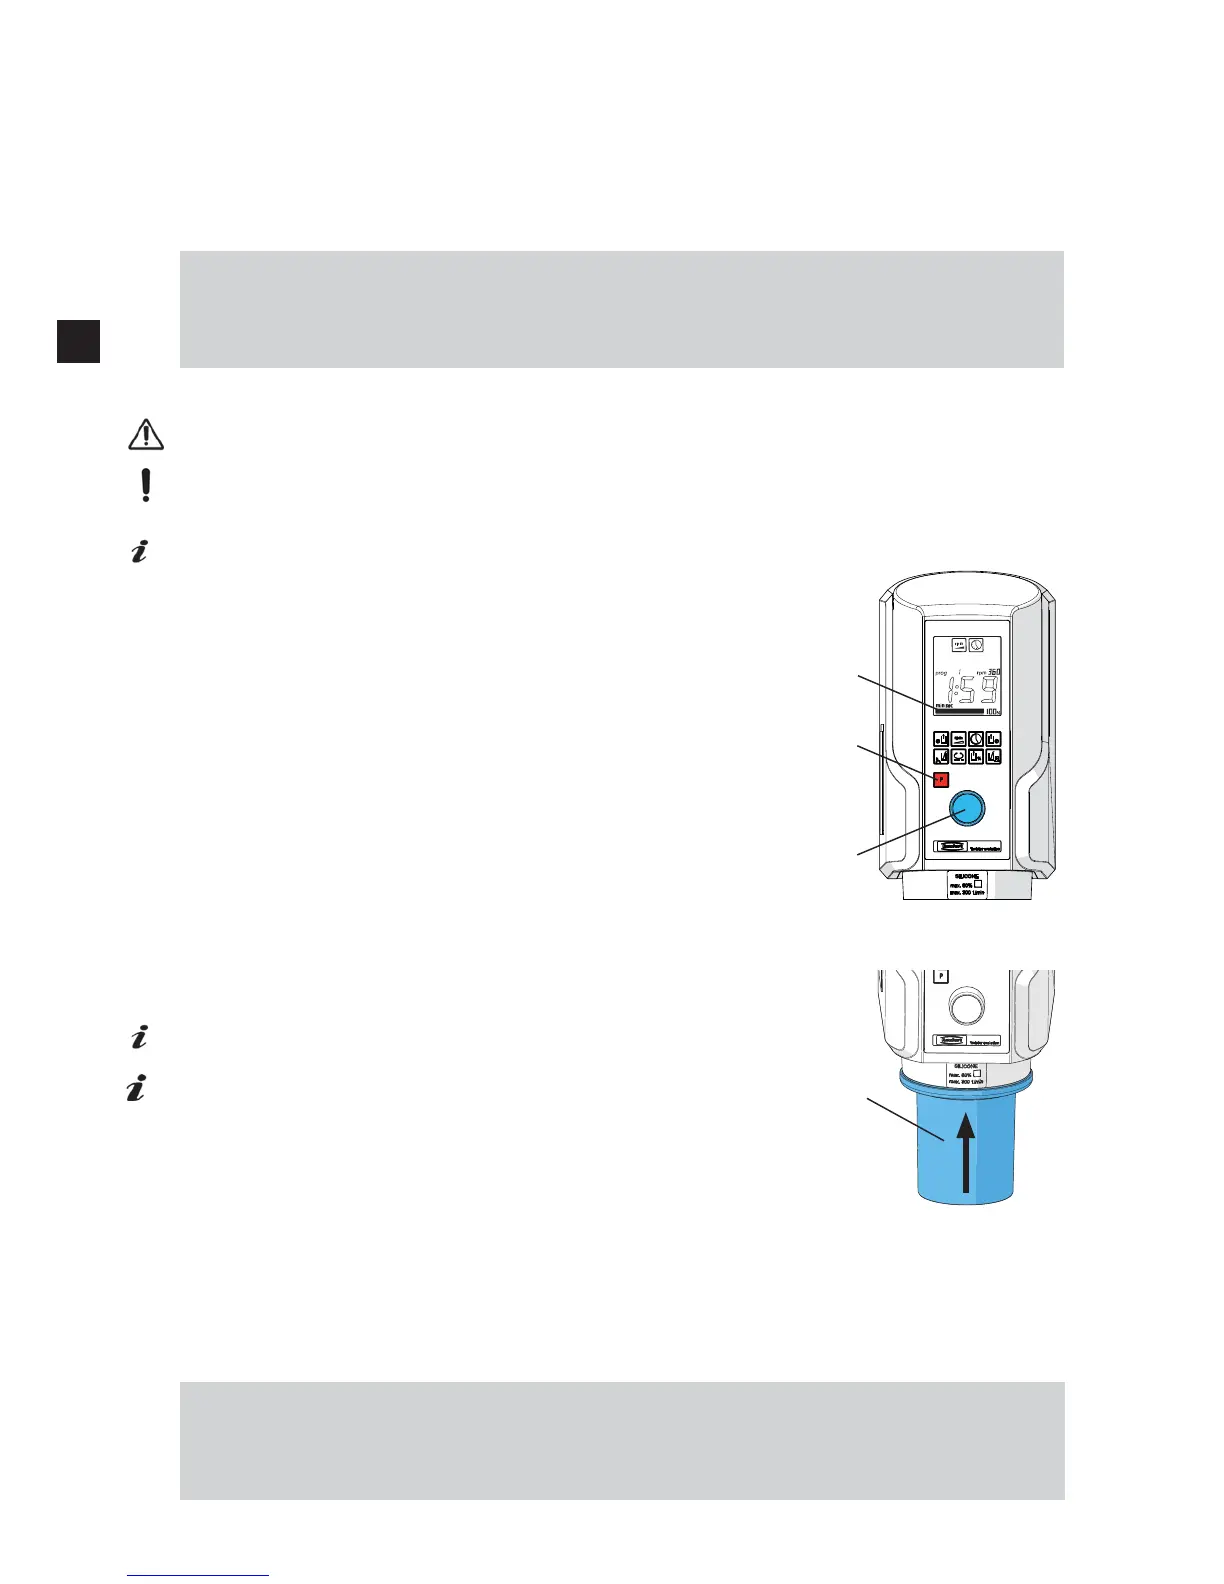
Press the programming key, „P“ (2).
Select the desired program by turning the control knob (1).
7KHIROORZLQJZLOOEHVKRZQIURPWKHVHOHFWHGSURJUDPPH¿J
Symbols of the used parameter
Mixing time
Speed
Vacuum
6. Couple the mixing bowl (15) to the device.
:KHQWKHERZOLVDGGHGWKHPRWRUUXQVEULHÀ\LQRUGHUWRHQJDJHWKHSDGGOH
7. Vacuum generation starts automatically.
Do not let go until the bowl stays in place alone and vacuum level bar has passed
WKHKDOIZD\PDUN¿J
,IWKHVHWYDFXXPLVWKHSXPSZLOOVZLWFKRIIZKHQLWLVDFKLHYHG7KH
SXPSFDQUHVWDUWEULHÀ\LQRUGHUWRUHDFKWKHVHWYDFXXPOHYHOH[DFWO\
7ZLVWHUHYROXWLRQYHQWXULRQO\
7KHUHGXFHGYDFXXPOHYHOLVDFKLHYHGWKURXJKDQRSHQHGE\SDVV7KLVLV
ZK\LWVRXQGVVLPLODUWRZKHQYDFXXPLVDFKLHYHG
8. Once the minimum vacuum has been achieved (the appliance beeps), the mixing
program begins automatically.
The remaining mixing time (countdown) is displayed during the mixing process.
9. The appliance beeps once the mixing program has been completed.
The time which has elapsed since the end of the mixing cycle is shown in the
display.
10. Aerate bowl
Hold the bowl!
Press the control knob (1).
The bowl will be released in a few seconds.
11. Remove the mixing bowl.
7LS
Only mix the same type of material in a given bowl. Residue form previous mixing processes can have a negative
LQÀXHQFHHJVLOLFRQIDLOVWRKDUGHQHWF
We recommend a separate bowl for each type of material (plaster, investment, silicon).
Use the adhesive labels enclosed to the mixing bowl.
2
25
1
¿