mini-pro Quick Start
PIP
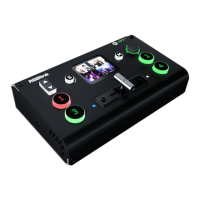
mini-pro defaults to single-screen switching. If you need to use PIP, push button【M】to return
to the main menu, then find【PIP】, and tap the icon to enter the PIP setting interface.
After entering the PIP setting interface, you can add a picture-in-picture preset by tapping the
"+" on the right, as shown in the figure below, and you can delete the preset by pressing【Delete】.
Through【Adjust】, you can enter the detailed operation interface of the PIP preset.
The first line is the name of the PIP preset, which can be edited on XPOSE mini; the next line is
the switch of the PIP preset, which is turned on by default, so that the PIP preset can be viewed in
real time on PST screen.
PIP Layout Setting
Layout offers 8 layout options for picture-in-picture. Click the arrow on the right to enter layout
interface and choose the layout needed.
PIP Layer Setting
After layout selection, it will enter the visual picture-in-picture operation interface, as shown in
the figure below. You can select the corresponding layer by tapping the corresponding main or
sub-screen, and then directly push the signal button to select the signal source for the
corresponding layer.
When each layer is selected, the layer will display 6 control points:
A. Adjust the layer proportionally , that is, the image will not be deformed
B. Adjust the position of the layer
C. Crop top of the layer
D. Crop bottom of the layer
E. Crop left of the layer
F. Crop right of the layer
After layer is selected as the figure below, it can also be quickly moved directly by the joystick,