Do you have a question about the Rinnai Convector 417 and is the answer not in the manual?
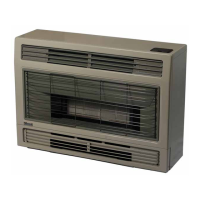
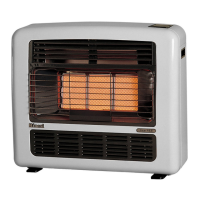
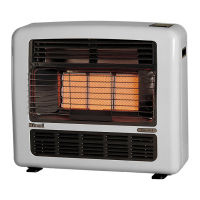
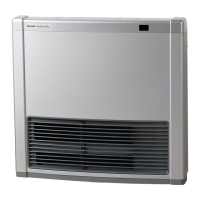
Identifies components visible from the front of the heater, including the louvre and ignition button.
Details the various lamps, temperature controls, and buttons on the heater's control panel.
Shows the location of the gas inlet, air filters, and power cord on the rear of the unit.
Instructions for checking the heater for damage and correct gas type after unpacking.
Covers mandatory installation according to regulations and crucial ventilation needs.
Advises against contact with combustible materials and specifies clearance needs.
Warns about potential carpet and vinyl discolouration from warm air and suggests mat use.
Specifies room size requirements and connection of the heater to gas and power.
Step-by-step guide on how to start the heater, including indicator lights.
Details how the thermostat modulates burner and fan to maintain set room temperature.
Explains the LED indicators for room and set temperatures and fan speed changes.
Instructions on how to safely turn off the heater, including fan cooling.
How to activate the mode and its energy-saving temperature reduction mechanism.
Conditions under which the economy mode does not operate, like low heat or undersized rooms.
Explains the filter lamp indicates dust and advises cleaning the air filters promptly.
Instructs to clean both air filters weekly with a vacuum cleaner.
Cuts gas supply when the heater overheats due to blocked filters or louvres.
Protects electrical circuits; requires authorised replacement if blown.
Cuts gas supply during gas failure, requiring re-ignition procedure.
Cuts gas supply on low oxygen levels, requiring ventilation before re-lighting.
Cuts gas supply if the heater is knocked over or jolted.
Gas valves close on power failure; manual operation needed upon restoration.
Advises unplugging before cleaning with a damp cloth and avoiding solvents or aerosols.
Emphasizes weekly cleaning of air filters to maintain airflow and heater efficiency.
Outlines the 2-year guarantee terms for parts and labour, excluding normal wear and tear.
Notes Australian Gas Association approval and provides space to record retailer and purchase details.
Provides a systematic guide to identify and resolve common operational problems with the heater.
Details type, input, gas control, burner, test point pressure, ignition, power supply, and dimensions.
Provides contact details for Rinnai New Zealand Ltd. for service inquiries.
The Rinnai Convector 417 (RCE-417) is a forced convection unflued room heater designed for efficient and even heat distribution. It operates on either Natural Gas (N.G.) or Propane, with an input of 17 MJ/h for both gas types. The heater features an integrated electronic gas control system and utilizes a Rinnai Ceramic plate burner.
Before installation, it's crucial to check for any damage to the heater. If damaged, contact your supplier for advice. Verify that the heater is labeled for the correct gas type; if in doubt, consult your local gas authority. The appliance must be installed in accordance with local gas authority regulations, NZS 5261 Installation Code for Gas Burning Appliances and Equipment, and any other relevant statutory regulations. Installation, servicing, and removal must be performed by an authorized person.
The Convector 417 is designed for rooms no smaller than 42.5m³. It comes with a flexible hose and a bayonet-type plug-in fitting for easy connection to your bayonet floor fitting. Proper room ventilation is essential when using this heater. It is explicitly stated that the appliance should NOT be installed in a bedroom or bathroom. Furthermore, it must be kept at least 50mm clear of walls and other combustible materials, such as curtains, which may need to be restrained. This appliance is not designed to be built-in. If you move house, always check the gas type in your new location with the local gas authority.
When in operation, the heater requires specific clearances: 50mm from the sides, 50mm from the top, and 750mm from the front. To prevent discolouration of carpets or soft vinyl surfaces due to warm air discharge, a mat extending approximately 750mm in front of the appliance should be placed underneath it.
To ignite the heater, first plug it into both the gas supply and the power point. Then, depress the ignition button slowly and firmly. Upon releasing the button, the 'Temperature Level' lamps will illuminate, the spark will ignite the main burner, and the convection fan will start. If the heater fails to ignite within 15 seconds, the spark will stop, and the 'Temperature Level' lamps will flash. In this case, turn the heater off and repeat the ignition process. The first time the heater is plugged in, you may need to repeat the ignition operation due to air in the hose. Once the main burner is lit, the combustion indicator will glow, and the spark will stop. A smell of burning dust may be noticeable during the first use or after a long period of inactivity, which is normal.
The heater features an automatic thermostat that modulates the burner and fan to maintain the selected room temperature. The temperature control buttons (UP/DOWN) allow you to adjust the desired setting, indicated by the 'Temperature Level' lamps. The temperature range is approximately 12°C (LO) to 36°C (HI). After ignition, the heater will run on high for 1 to 2 minutes regardless of the set temperature. The positioning of the heater can affect temperature control.
The control panel's L.E.D. display indicates the room temperature. The current room temperature is shown by a flashing L.E.D., while the set temperature is indicated by a steady L.E.D. Once the set temperature is reached, the flashing L.E.D. disappears, and the room temperature is indicated by a steady L.E.D. The fan speed will adjust as the heater modulates to match the room temperature.
Pressing the 'Economy' button activates 'Economy Mode,' indicated by a glowing green lamp. In this mode, 30 minutes after the room temperature reaches the preset temperature, the heater reduces the temperature by 1°C. After another 30 minutes, it reduces the temperature by a further 1°C, serving as an energy-saving feature. 'Economy Mode' does not operate when the heater is running only on low or if the heater is under capacity for the room size.
To turn off the heater, depress the ignition button again. The switch will return to the off position. After use, disconnect the gas hose. It is important NOT to turn off the heater by unplugging it from the power point, as the convection fan continues to run until the heater is cool. The fan may restart after a few minutes to remove any residual heat.
The Rinnai Convector 417 incorporates several safety features:
The Convector 417 requires minimal maintenance.
Rinnai products are covered by a 2-year guarantee: free parts and labour for the first year, and parts only for the second year. This guarantee is in addition to any consumer guarantees. General cleaning, maintenance, and wear and tear are not necessarily covered, and calls for these issues may be chargeable. The Rinnai Convector 417 has Australian Gas Association Approval Number: 4911.
| Brand | Rinnai |
|---|---|
| Model | Convector 417 |
| Category | Gas Heater |
| Language | English |