This document outlines the operation and installation of the Rinnai Electric Fire Heater, a domestic heating appliance designed to provide comfort and enjoyment. It emphasizes the importance of reading the manual thoroughly to understand the requirements, features, and operation of the appliance before use. The heater is intended for domestic heating applications only and not for non-domestic or commercial use.
Function Description
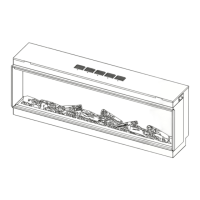
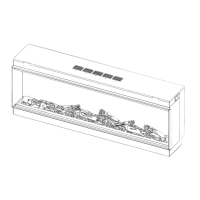
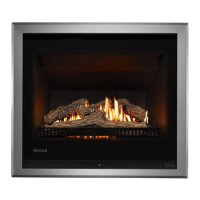
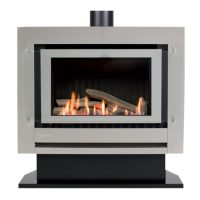
The Rinnai Electric Fire Heater is an electric fireplace designed to simulate the appearance of a real fire while providing heat. It can be operated in three ways: manually via buttons on the appliance, using a remote control handset, or through a dedicated iOS/Android app with Wi-Fi connectivity. The appliance offers various modes and settings to customize the flame effect, heat output, and overall ambiance.
Usage Features
Manual Control:
The appliance features several buttons for manual operation:
- On/Off: Powers the appliance on or off. A pushed-in button indicates power is on.
- Wi-Fi On/Off: Toggles Wi-Fi connectivity. An illuminated LED indicates Wi-Fi is on. Holding this button for 3 seconds enters device pairing mode.
- Standby: Turns on the appliance with the last used settings but without any heat. It also places the appliance into standby mode, turning off all features.
- Heat Mode: Cycles through heat settings:
- 1 press: Cool blow
- 2 presses: Low heat setting
- 3 presses: High heat setting
- 4 presses: No heat/no cool blow
- Preset Mode: Cycles through 6 pre-set fire modes (and up to 3 user-defined pre-sets if programmed). Holding this button for 3 seconds turns off the audible beep feature.
Remote Control:
The remote control handset provides comprehensive control over the appliance's features. It requires 2 x AAA batteries, and the battery level is indicated by a column of bars on the temperature display. To set up the remote, hold the Standby button on the appliance until two beeps are heard, then release. Press the Standby button on the remote until one beep is heard, confirming connection. The remote control houses the thermostat, so it must be kept in the same room as the appliance for accurate heat regulation.
Remote control buttons and their functions:
- Button 1: Preset Mode: Repeatedly press to cycle through 6 pre-set fire modes (and up to 3 user-defined pre-sets). Users can save personalized fire creations by selecting flame color, brightness, fuel bed color, brightness, and downlight color, then holding the Preset Mode button for 3 seconds, selecting a slot number (7-9) with the Minus (-) and Plus (+) buttons, and holding Preset Mode again to confirm.
- Button 2: Standby: Turns on the appliance with the last used settings (no heat) or places it into standby mode, turning off all features.
- Button 3&9: Minus (-) & Plus (+): Used to navigate through on-screen menus and adjust settings.
- Button 4: Flame Speed: Enters the flame speed menu ("SPd" on LCD). Use Minus (-) and Plus (+) to adjust speed (1 bar = slowest, 5 bars = fastest).
- Button 5: Flame Colour: Cycles through flame color options. Use Minus (-) and Plus (+) to adjust brightness (1 bar = dimmest, 5 bars = brightest). Options include: Flame off, Red, Orange, Yellow, Green, Light Blue, Dark Blue, Violet, White, and Multi-colour change.
- Button 6: Fuel Bed Colour: Cycles through fuel bed color options. Use Minus (-) and Plus (+) to adjust brightness (1 bar = dimmest, 5 bars = brightest). Options include: Flame off, Red, Orange, Yellow, Green, Light Blue, Dark Blue, Violet, White, and Multi-colour change.
- Button 7: Timer Mode: Cycles through timer options (0.5, 1, 2, 3, 4, 5, 6, 7, 8, 9 hours) to automatically turn off the appliance after a set period.
- Button 8: Fuel Bed Downlight: Cycles through fuel bed downlight color options. Use Minus (-) and Plus (+) to adjust brightness (1 bar = dimmest, 5 bars = brightest). Options include: Light off, Red, Orange, Yellow, Green, Light Blue, Dark Blue, Violet, White, and Multi-colour change.
- Button 10: Heater Mode: Cycles through heat output options: Cool blow, Low heat, High heat, and No heat/standby. When in heater mode, use Minus (-) and Plus (+) to select the desired room temperature. The heater will not activate if the room temperature is already higher than the selected temperature. To switch between °C/°F, hold Minus (-) and Plus (+) for 3 seconds.
- Open Window Detection: An eco-feature that detects a rapid drop in room temperature (e.g., from an open window), displaying "OPn" and turning off the heater. It will return to normal operation if the room temperature rises or the remote is operated manually.
- Button 11: Sound Effect: Opens the sound effect menu. Options include Sound effect on and Sound effect off. Use Minus (-) and Plus (+) to adjust volume (1 bar = quietest, 5 bars = loudest).
- Button 12: Ambient Lighting: (Not available)
- Button 13: Eco Mode: Activates Eco mode, which reduces the brightness of all lighting modes and limits heat output to a low setting, reducing energy consumption. Press again to exit Eco mode.
Wi-Fi Connectivity:
The appliance can be controlled via the TUYA SMART APP (available on iOS and Android). To pair the device:
- Start the app and click "Add Device," then select "Small Home Appliance," and "Heater (Wi-Fi)."
- Ensure the appliance is powered on, then press and hold the Wi-Fi button on the appliance until 3 beeps are heard. The button and fuel bed will flash.
- Follow in-app instructions to input home network details. The device must be connected to the same home network as the appliance.
If pairing fails after 4 attempts, contact Rinnai for service. A Wi-Fi Operation Manual is available on the Rinnai website.
Installation Types:
The appliance can be installed in various ways:
- Wall Mounted: Uses a wall bracket secured to the rear of the appliance. The bracket is removed, fixed to the wall, and then the appliance is lifted onto it. Bottom mounting brackets are then secured to the wall.
- Shelf Mounted: Uses adjustable shelf support brackets to fit shelf material thicknesses from 15-24mm.
- Feature Wall: Requires a stud wall with a supporting header, ensuring the weight of the finished wall does not rest on the appliance. Small mounting brackets can be used to secure it to a timber frame.
Aspect Type:
The appliance supports three visual aspects:
- One-Sided (Front) Aspect: The appliance arrives with metal side panels fitted for a front-only view.
- Two-Sided (Corner) Aspect: To achieve a corner view, remove 7 screws securing one metal side panel, then attach 2 top/bottom side glass edge trims and 1 side glass edge trim using the removed screws.
- Three-Sided Aspect: Repeat the two-sided aspect procedure on the opposite side of the appliance.
Finishing:
- Magnetic Side Decorative Panels: Two magnetic panels are supplied for 2-sided, 3-sided, or corner aspects. They are positioned against the side of the appliance, behind the side glass edge trim.
- Log And Ember Arrangement: The decorative fuel logs can be arranged freely on the fuel bed for a unique appearance. It is recommended to position logs across the fuel bed first, experimenting with angles and overlapping. After arranging logs, scatter glass embers to cover all visible areas of the fuel bed, including underneath and behind the logs. Finally, scatter vermiculite granules over the glass embers for good coverage.
Maintenance Features
Cleaning:
The appliance requires minimal maintenance.
- Regularly clean with a dry cloth. Do not use detergents, abrasive cleaners, or furniture polish.
- Clean the glass with a lightly damp cloth, ensuring it is fully dried with a lint-free cloth.
- Regularly (monthly or more frequently) vacuum the heater vent area with a brush attachment to maintain efficiency.
Repairs:
- Repairs MUST be carried out by a qualified person, such as an electrician.
- Never dismantle the appliance or tamper with electrical connections and components, as this is highly dangerous and voids the warranty.
- Do not modify the appliance from its original specifications.
- If the power cord or plug is damaged, it MUST be replaced by Rinnai or a Rinnai appointed service agent.
Troubleshooting Checklist & Resetting the Thermal Cut Out:
The appliance is fitted with an Electronic Safety Control (E.S.C) that switches off the fire if it overheats (e.g., when covered). If the flame effect continues but the heater stops, the E.S.C has activated.
To reset the E.S.C:
- Disconnect power supply from the plug socket outlet. Switch off the appliance via the On/Off switch on the Manual Control. Leave off for 10-15 minutes.
- Remove any obstructions to the fan heater outlet or fan blades.
- Reconnect power supply and switch on the appliance; the E.S.C will reset.
- Ensure the appliance is functioning correctly. If the E.S.C activates again, a qualified electrician should check the appliance and wiring.
A troubleshooting chart is provided to help determine if a service call is required, addressing issues like the appliance not turning on, remote control not working, or no heat.
Disposal Guidelines:
The appliance contains potentially hazardous materials and should not be disposed of as household waste. Local regulations may require special collection and treatment. Confirm with your local municipal council for disposal options. Disposing of the appliance in natural surroundings can endanger health and the environment due to hazardous substances leaking into groundwater and the food chain.
Safety Warnings:
- Always read all instructions before use.
- Comply with precautions to avoid dangerous situations and ensure optimum performance.
- Failure to follow instructions can result in malfunction, property damage, personal injury, or death.
- DANGER: Indicates an imminently hazardous situation resulting in personal injury or death.
- WARNINGS: Indicates a potentially hazardous situation that could result in personal injury or death.
- CAUTIONS: Indicates a potentially hazardous situation that could result in minor or moderate injury or damage, or alerts against unsafe practices.
- Keep batteries out of reach of children. Do not mix old and new batteries, use different types, heat or expose to flame, take apart, short circuit, attempt to recharge alkaline batteries, or use damaged batteries. Dispose of used batteries safely. Remove batteries if the controller is not used for long periods.
- Do not install where curtains or combustible materials could come into contact or close proximity.
- Do not place articles on or against the heater to avoid overheating.
- Do not sit on the heater.
- Do not place clothing, hand towels, or similar over the appliance to dry.
- Do not spray aerosols near the appliance while operating, as most aerosols contain flammable gas.
- Do not use or store flammable materials, liquids, etc., near the appliance.
- Do not use in areas where flammable dust particulates may cause an explosion.
- Do not use as a sauna heater.
- Do not leave unattended while in operation.
- CAUTION: Surfaces get VERY HOT when operated; DO NOT TOUCH ANY PART OF THE APPLIANCE WHILE IT IS TURNED ON or for a period after shut down to avoid burns.
- Not intended for use by persons (including children) with reduced physical, sensory, or mental capabilities or lack of experience/knowledge unless supervised or instructed by a responsible person.
- Young children should be supervised to ensure they do not play with the appliance.
- Do not allow children or persons with reduced capabilities to sleep directly in front of the heater.
- Do not allow children to 'post articles' into the louvres.
- Do not modify the appliance, as this creates a dangerous situation and voids the warranty.
- Do not use if dropped or if there are visible signs of damage.
- Do not use in small rooms occupied by persons not capable of leaving on their own, unless constant supervision is provided.
- Keep textiles, curtains, or other flammable material a minimum distance of 1m from the air outlet to reduce fire risk.
Installation Requirements:
- Must be installed in accordance with manufacturer's instructions.
- Check for damage and missing parts upon unpacking. Contact supplier if damaged.
- Ensure the 3-pin plug remains accessible after installation.
- Heater MUST NOT be located below an electric socket outlet.
- Hard-wiring or installation of other electrical wiring, power outlets, and switches MUST be performed by a licensed electrician.
- Do not connect to mains power until installed in its final location.
- Do not handle parts with wet or damp hands.
- Do not immerse in water or any liquid.
- Do not place liquid or wax containers on the heater.
- Ensure power supply voltage and frequency match the appliance's dataplate ratings.
- Do not use power boards, double adaptors, or extension leads.
- Ensure the power cord is not squashed, kinked, or in contact with hot or sharp surfaces. Do not route the power lead in front of the appliance.
- The wall where the appliance is installed and any fixings used must be strong enough to hold the appliance's weight. Plasterboard alone is not considered structural. Adequate wooden supporting members or wall strengthening may be required.
- Ensure all minimum clearance requirements are met.
- Allow sufficient access for operation, servicing, and removal.
- Block off any wall cavities above the heater to avoid heat loss and poor heating performance. If installing in an existing fireplace or chimney, block off space above and around the heater to prevent heat loss and drafts, which can cause the appliance to cut out.