28
Sampling Menu
Creating a Multisample (Create
Multisample)
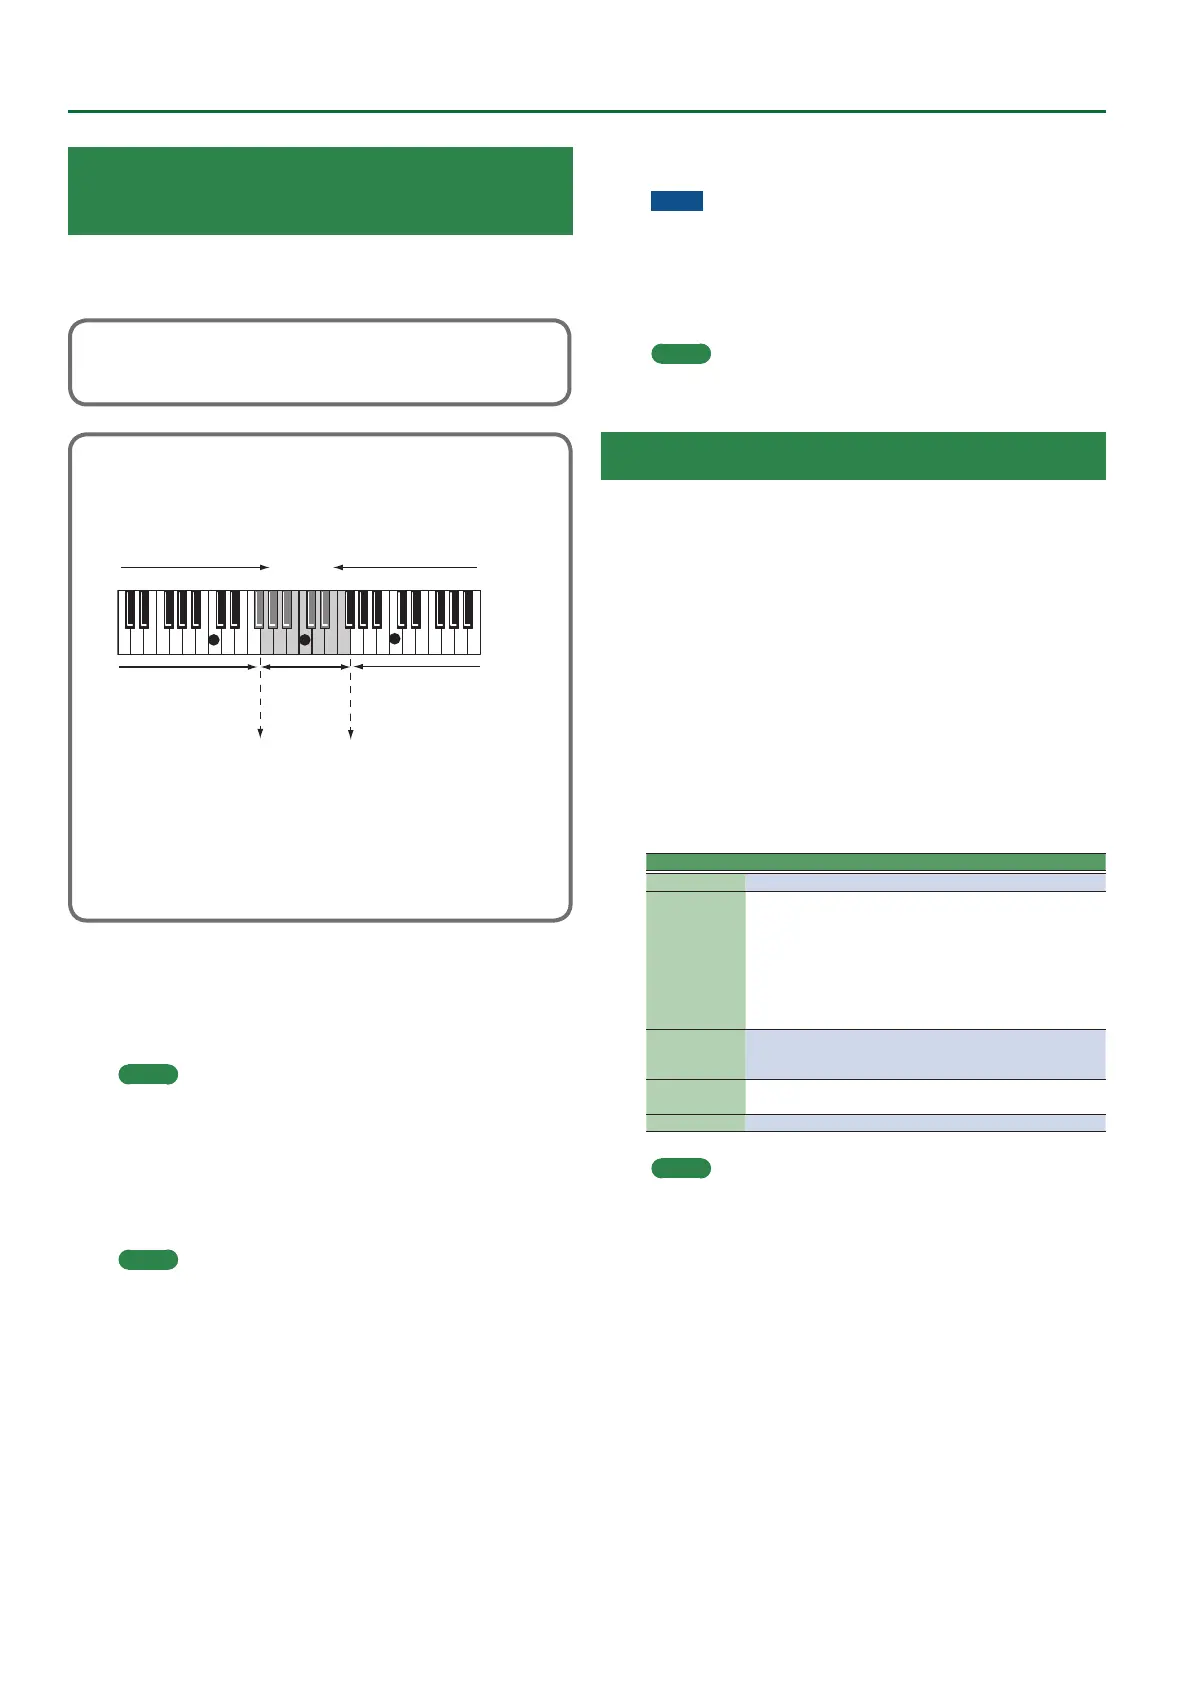
A “multisample” is a set of dierent samples assigned to each note
of the keyboard. One multisample lets you assign up to 128 samples
that are split (divided) across the notes of the keyboard.
You can’t listen to a multisample unless it’s assigned to a tone. When creating a
multisample, you start by selecting multiple samples to create the multisample,
and then assign the multisample to a tone for use.
If, for example, only one note (e.g., the sound of the C4 key) is sampled from a
wide-ranging instrument such as a piano, and assigned to the entire range of
keys, it will sound unnatural when played signicantly below or above its origi-
nal pitch. If the instrument is sampled at several dierent pitches and assigned
to dierent ranges of the keyboard, this unnatural eect can be minimized.
128 split
(128 key)
sample No.0001
original key
C3
sample
No.0002
original key
C4
sample No.0003
original key
C5
7 : original key
split point split point
In the Create Multisample function, the split points are automatically deter-
mined according to the original key of each sample.
Before you begin this process, you should set the original key of each sample to
the range where you want it to be assigned.
1. Press the [Sampling] button.
The Sampling Menu screen appears (you can also access this via the
Menu).
2. Press the [R1] (Sample List) button.
The Sample List screen appears.
MEMO
By using the direct buttons to select a sample and pressing the
[F3] (Preview) button, you can audition that sample.
3. Press the [Option] button.
The Sample Option screen appears.
4. Use the direct buttons to select “Create Multisample.”
5. Use the direct buttons to select samples.
MEMO
You can select multiple samples.
If you choose [F1] (Select All), all samples are selected. Press the
button again to clear the selection.
6. Press the [Enter] button.
The multisample is created.
A screen appears in which you can name the multisample.
&
“Assigning Names” (Owner’s Manual: p. 16)
If you decide to cancel, press the [Exit] button.
7. Press the [F5] (Exec) button.
8. Use the direct buttons and function buttons to select
the save-destination.
9. Press the [Enter] button.
A conrmation message appears.
10. To save, select “ Ye s .”
If you want to change the save-destination, select “No” to return to
the page where you can specify the save-destination.
NOTE
If there is a multisample in the save-destination, the original
multisample is overwritten.
The multisample is created, and the multisample list appears.
Use the multisample to create a user tone or user drum kit (
p. 29, p.
33
).
MEMO
You can access the multisample list via the Sampling Menu
screen.
Multisample Editing
1. Press the [Sampling] button.
The Sampling Menu screen appears (you can also access this via the
Menu).
2. Press the [R2] (Multisample List) button.
The Multisample List screen appears.
3. Use the direct buttons to select the sample that you
want to edit.
4. Press the [Option] button.
The Multisample Option screen appears.
5. Use the direct buttons to select “Edit.”
The Multisample Edit screen appears.
6. Use the keyboard or the cursor buttons to select the
Sample (Key) that you want to edit.
You can perform the following operations.
Operation Explanation
Split K J Changes the split point.
Org Key
Changes the original key.
A window appears, allowing you to change the original key.
Use the Value [-] [+] buttons to change the setting.
If you change the original key, the change is saved in the
sample when you write the multisample. If you exit without
saving, the setting reverts to the previous key.
Note that if the same sample is used by other multisamples,
they will also be aected by the change.
Erase
Deletes the selected sample from the multisample.
* Although the sample will no longer be referenced by the multisam-
ple, the sample itself will remain.
Assign
Assigns the sample to the selected key.
Select the sample to be assigned from the sample list.
Select You can specify a region by pressing two keys.
MEMO
You can play the sample or multisample from the keyboard while
you edit it. In this case, the sample or multisample sounds as if
it is assigned to the UP1 part. The sound is aected by the eect
settings of the UP1 part, the Split setting, and the on/o status of
other parts.
7. To save the multisample, press the [Write] button.
A screen appears in which you can name the multisample.
&
“Assigning Names” (Owner’s Manual: p. 16)
If you decide to cancel, press the [Exit] button.
8. Press the [F5] (Exec) button.
9. Use the direct buttons and function buttons to select
the save-destination.
10. Press the [Enter] button.
A conrmation message appears.
11. To save, select “ Ye s .”
If you want to change the save-destination, select “No” to return to
the page where you can specify the save-destination.

 Loading...