EXR-5/EXR-3
47
7. Recording your music
Your EXR-5/EXR-3 contains a 16-track Recorder you can use for
recording your own songs.
Basic song recording
Let us first look at the most straight-forward way of recording
your renditions with Arranger backing.
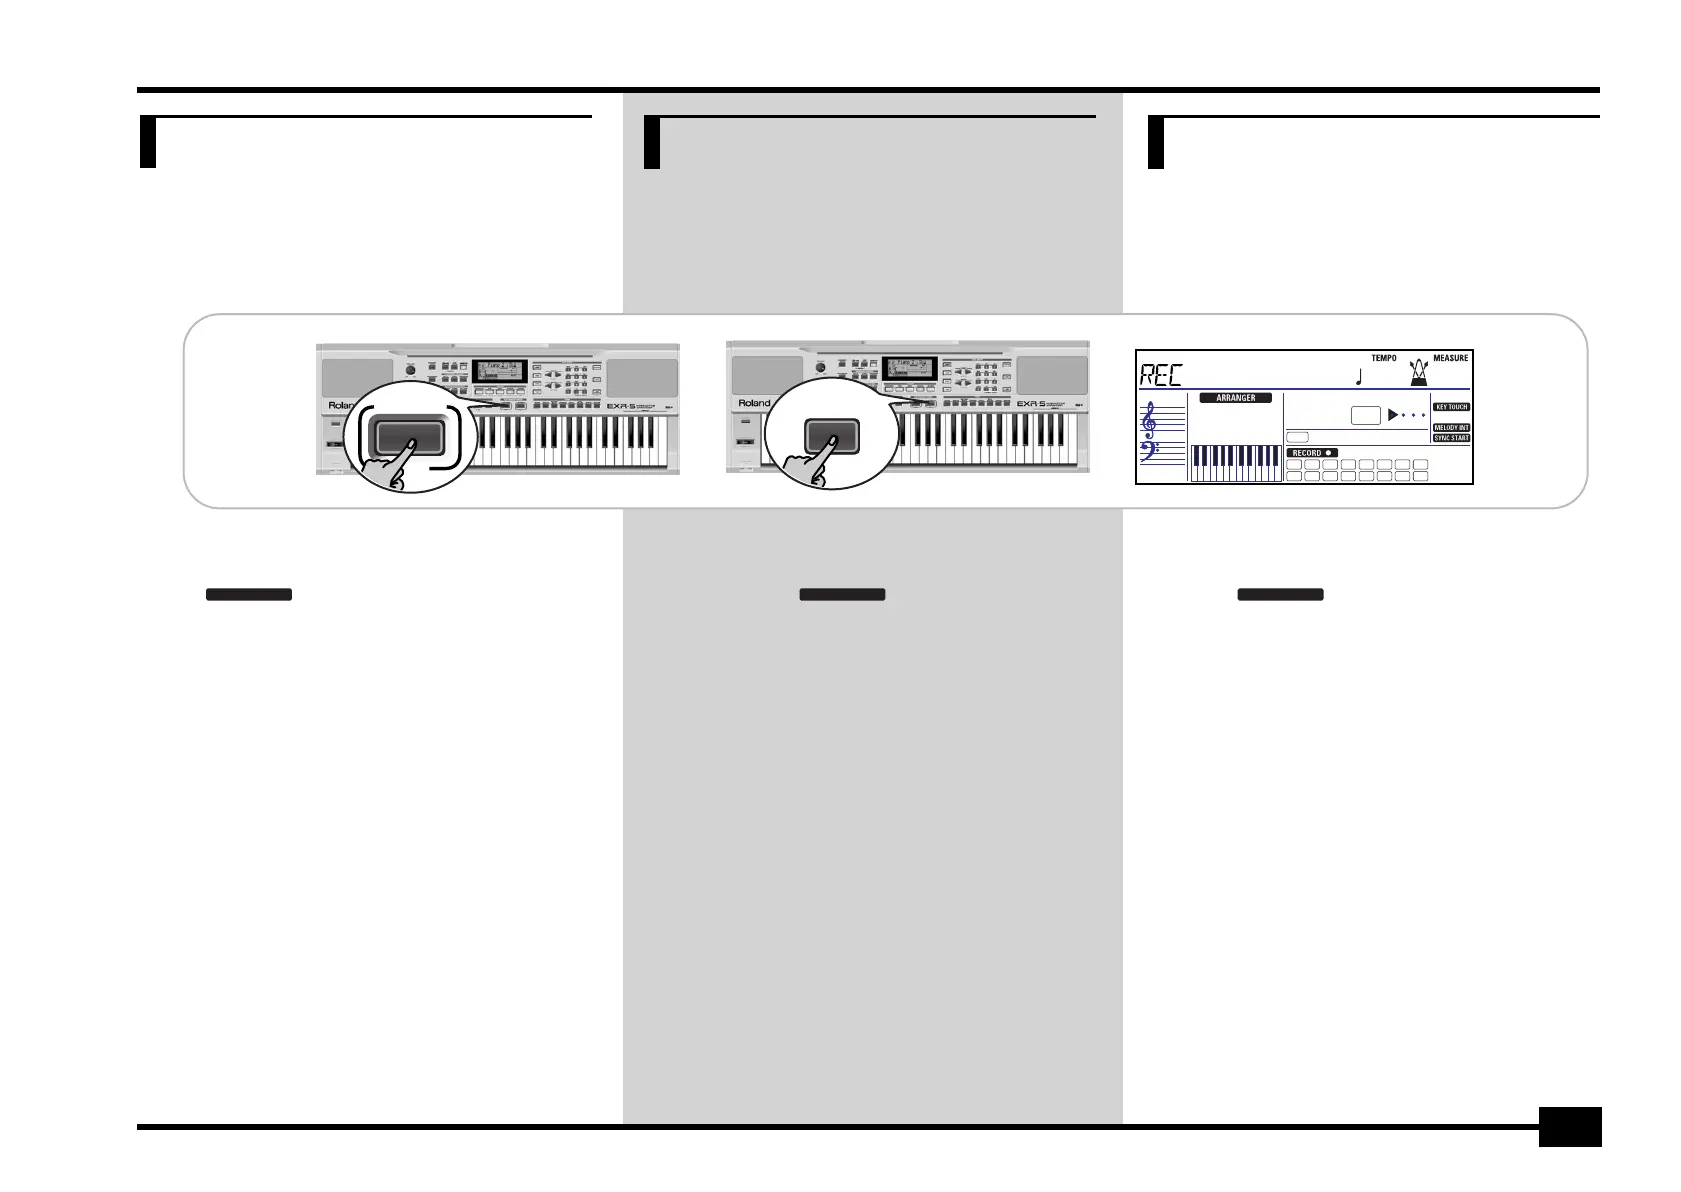
(1) Press the [ARRANGER/BAND] button.
The icon appears. You can now use your left
hand for transposing the Arranger’s key in realtime.
(2) Press the [STYLE] button and select a Music Style (or select
a Music Assistant memory).
(3) Select the desired Arranger division by pressing [INTRO],
[ORIGINAL] or [VARIATION].
(4) Press the [START÷STOP] button.
(5) Use [TAP¥TEMPO] or the [–]/[+] buttons to set desired
tempo.
(6) Press [START÷STOP] again to stop Arranger playback.
(7) Assign the desired Tone to the right half of the keyboard.
Press [TONE] and use the FAMILY & SELECT [√][®] buttons, the
numeric buttons or the buttons in the TONE section. See also
page 61.
(8) Press the [REC≈∏] button.
The display should look as shown above (if it doesn’t, use the
FAMILY [√][®] buttons (“REC MODE”) to select REC All):
ARRANGER
7. Grabar su música
El EXR-5/EXR-3 dispone de un Grabador de 16 pistas que puede
utilizar para grabar sus propias canciones.
Grabación básica de canciones
Miremos primero la manera más directa de grabar sus interpre-
taciones con el acompañamiento Arranger.
(1) Pulse el botón [ARRANGER/BAND].
Aparece el icono . Puede utilizar su mano
izquierda para transponer la tecla del Arranger a tiempo real.
(2) Pulse el botón [STYLE] y seleccione un Estilo musical (o
seleccione una memoria Music Assistant).
(3) Seleccione la división Arranger deseada pulsando [INTRO],
[ORIGINAL] o [VARIATION].
(4) Pulse el botón [START÷STOP].
(5) Utilice [TAP¥TEMPO] o los botones [–]/[+] para ajustar el
tempo deseado.
(6) Pulse [START÷STOP] de nuevo para detener la reproducción
del Arranger.
(7) Asigne el Tone deseado a la mitad derecha del teclado.
Pulse [TONE] y utilice los botones FAMILY & SELECT[√][®], los
botones numéricos o los botones de la sección TONE. Con-
sulte también página 61.
(8) Pulse el botón [REC≈∏].
La pantalla debería mostrar lo anterior (en caso contrario,
utilice los botones FAMILY [√][®] (“REC MODE”) para seleccio-
nar REC All):
ARRANGER
7. Enregistrer votre jeu
L’EXR-5/EXR-3 comporte un enregistreur (Recorder) 16 pistes
qui vous permet d’enregistrer vos propres morceaux.
Fonctions de base d’enregistrement
Voyons d’abord la méthode la plus directe pour enregistrer votre
jeu avec l’accompagnement de l’arrangeur.
(1) Appuyez sur le bouton [ARRANGER/BAND].
L’icône s’affiche. Vous pouvez à présent trans-
poser la tonalité de l’arrangeur en temps réel avec votre main
gauche.
(2) Appuyez sur le bouton [STYLE] et choisissez un style musi-
cal (ou sélectionnez une mémoire Music Assistant).
(3) Choisissez la division voulue de l’arrangeur en appuyant
sur [INTRO], [ORIGINAL] ou [VARIATION].
(4) Appuyez sur le bouton [START÷STOP].
(5) Utilisez [TAP¥TEMPO] ou les boutons [–]/[+] pour régler le
tempo voulu.
(6) Appuyez à nouveau sur [START÷STOP] pour arrêter la repro-
duction de l’arrangeur.
(7) Assignez le son voulu à la moitié droite du clavier.
Appuyez sur [TONE] et utilisez les boutons FAMILY & SELECT
[√][®], les boutons numériques ou les boutons de la section
TONE. Voyez aussi page 61.
(8) Appuyez sur le bouton [REC≈∏].
Voici à quoi devrait ressembler l’écran (si ce n’est pas le cas,
utilisez les boutons FAMILY [√][®] (“REC MODE”) pour choisir
REC All):
ARRANGER
ARRANGER
BAND
● REC
INTRO
FULL
BAND
=
1
9
2
10
3
11
4
12
5
13
6
14
7
15
8
16
ORCHESTRATOR BEAT
ALL
120 001
EXR-5_3_GBEF Page 47 Thursday, October 30, 2003 2:00 PM
 Loading...