2
Additional Explanation
Panel Descriptions
[NUMERIC] button
When this button is on (lit), you can use the [0]–[9] buttons to enter
numeric values.
* You can use this button only in the PATCH screen and PERFORM
screen.
[ENTER] button
Used to execute an operation.
List display
You can move the cursor to a parameter and press the [ENTER] button
to see a list of that parameter’s values.
You can select a value from the list that’s shown.
(Example)
In the PATCH screen, move the cursor to the patch number and press
the [ENTER] button to see the patch list.
Press the [EXIT] button to return to the previous screen.
Patch Mode
5
If you press the same category button in succession, the patch changes as follows
each time you press the button.
Each time you press the button, the rst patch of the two sub-
categories is selected.
If a user patch is saved
Each time you press the button, the rst patch of sub-category
1
0
sub-category 2
0
user
0
sub-category 1 … is selected.
If a user patch is saved
Each time you press the button, the rst patch of
preset
0
user
0
preset … is selected.
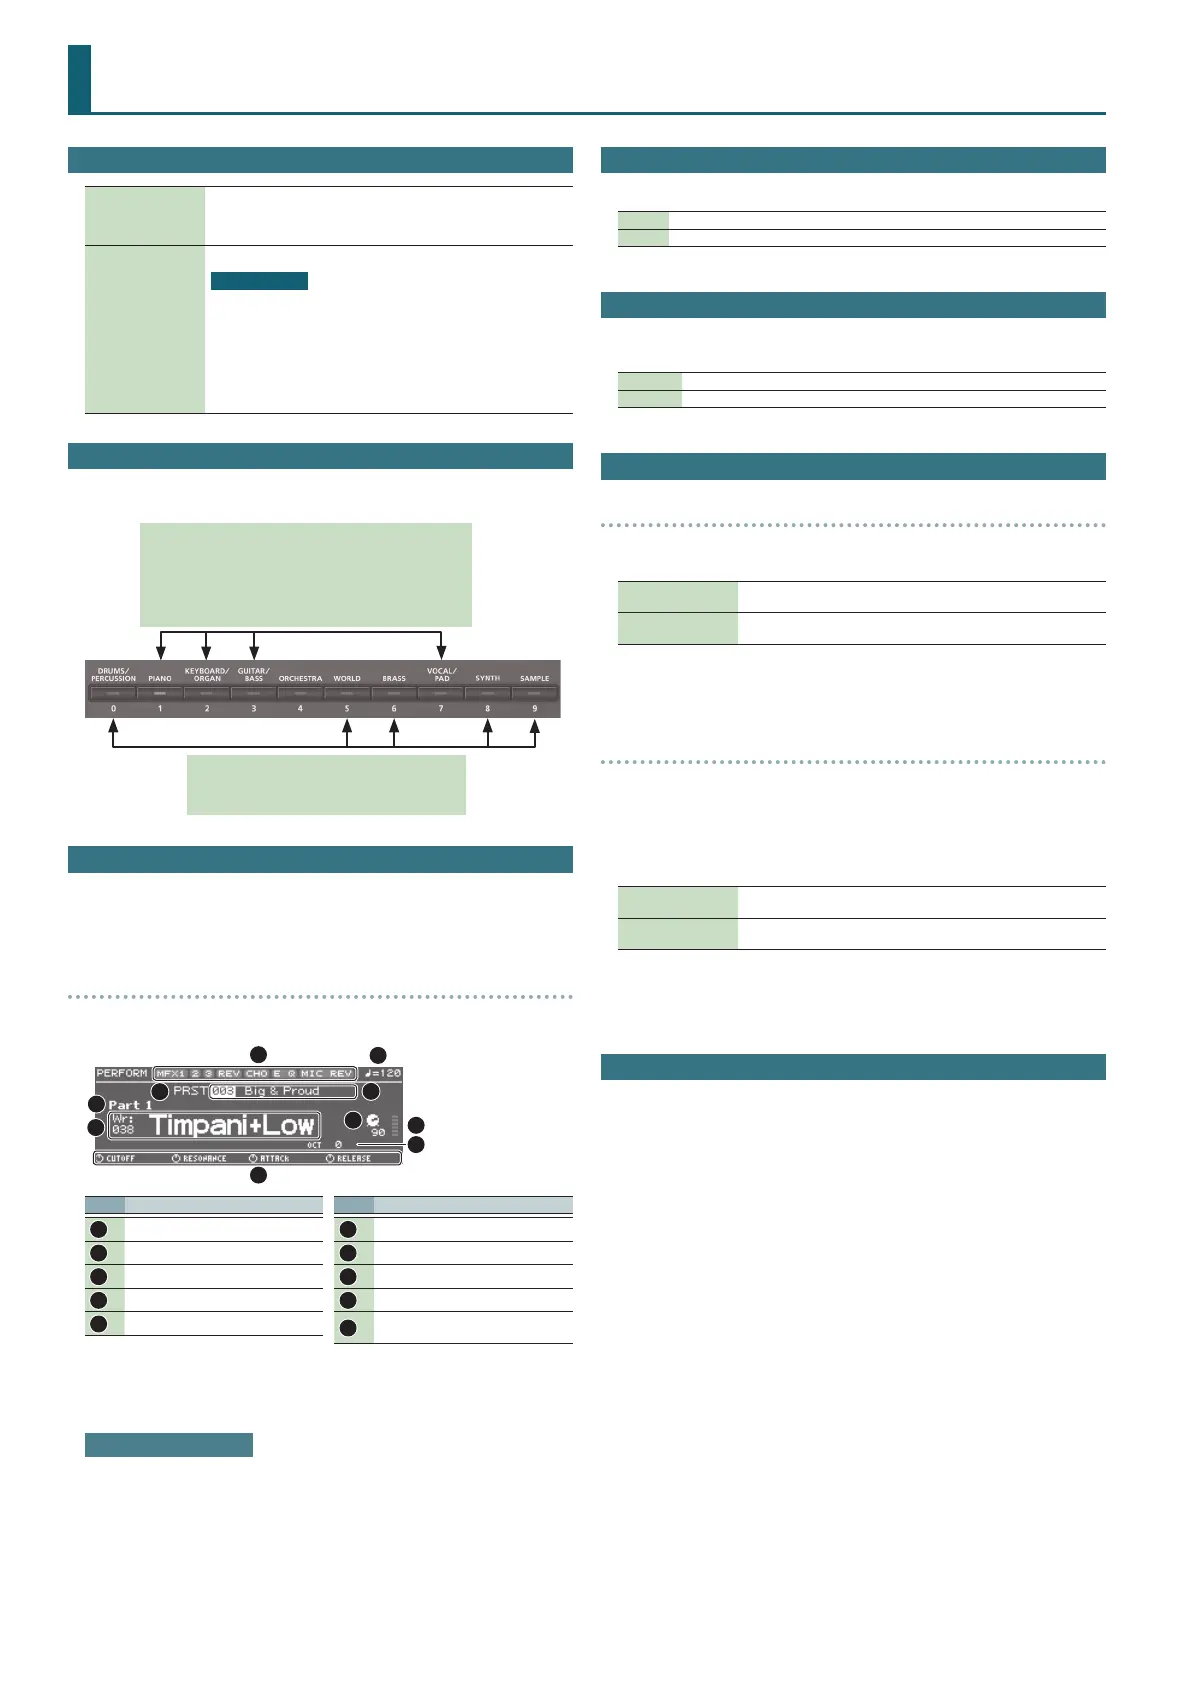
Performance Mode
5
You can use pads [1]–[8] to select the applicable part (current part).
5
Pressing a pad [1]–[8] selects part 1–8.
5
Hold down the [SHIFT] button and press pad [1]–[8] to select part 9–16.
16-part mode
5
Within Performance mode, the state in which neither split, dual, nor super layer is
selected is called “16-part mode.”
1
2
3
4
5
6
7
8
10
9
No. Explanation
1
Eect on (lit)/o (unlit)
2
Tempo
3
Performance bank
4
Performance number/name
5
Current part
No. Explanation
6
Category number/Patch name
7
Level of the current part
8
Level meter
9
Octave Shift setting
10
Parameters that can currently be
adjusted by the control knobs
When you play the keyboard, you’ll hear the current part and the parts whose
keyboard switch (p. 19, p. 20, p. 22) is on.
Adjusting the volume
You can use the [UPPER] LEVEL slider and [LOWER] LEVEL slider to adjust the part 1
and part 2 volume (LEVEL).
Key Touch
5
Depending on the KEY TOUCH setting, the [KEY TOUCH] button is lit or unlit.
Lit When the Velocity setting is “REAL”
Unlit When the Velocity setting is “1–127”
Sample Import
5
When importing a sample, the OPTIMIZE window might appear depending on the
user memory usage status.
OK Memory is optimized, and then the sample import is executed.
CANCEL Sample import is cancelled.
Editing a Patch/Drum Kit
PATCH EDIT
5
In the PATCH EDIT screen when editing each tone, you can use pads [1]–[8] to
perform the following operations.
Pads [5]–[8]
Turn each tone on (pad lit) or o.
When a tone is on, a “
(
” symbol appears.
Pads [1]–[4]
Make the pad(s) light to specify the tone(s) that you want to edit.
You can also make multiple pads light to select multiple tones.
5
In the PATCH EDIT screen, press the [MENU] button to open the INIT MENU window.
Select “PATCH” or “TONE” and then press the [ENTER] button to initialize the selected
patch or tone.
DRUM KIT EDIT
5
A drum kit consists of a percussion instrument sound (tone) assigned to each key.
The tone that’s assigned to each key consists of a combination of up to four waves.
Drum Kit Edit lets you edit the settings of the tone that’s assigned to each key.
5
In the DRUM KIT EDIT screen, when editing the four waves that make up the tone
assigned to the selected key, you can use pads [1]–[8] to perform the following
operations.
Pads [5]–[8]
Turn each wave on (pad lit) or o.
When a wave is on, a “
(
” symbol appears.
Pads [1]–[4]
Make the pad(s) light to specify the wave(s) that you want to edit.
You can also make multiple pads light to select multiple waves.
5
In the DRUM KIT EDIT screen, press the [MENU] button to open the INIT MENU
window. Select “DRUM” or “TONE” and then press the [ENTER] button to initialize the
selected drum kit or the tone of the selected key.
Editing a Performance
5
“PERFORMMANCE EDIT” lets you edit while viewing a list of the settings of all parts,
and “PART EDIT” lets you edit each part of the performance individually.
* PERFORMANCE EDIT and PART EDIT have the same parameters in common.
5
In the PERFORM EDIT or PART EDIT screen, you can use pads [1]–[8] to select the
part that you want to edit. If you hold down the [SHIFT] button and press a pad [1]–
[8], a part 9–16 is selected.
5
In the PERFORM EDIT screen, press the [MENU] button to open the INIT MENU
window. Select “PERFORM” or “PART” and press the [ENTER] button to initialize the
selected performance or part.