Do you have a question about the Roland TR-6S and is the answer not in the manual?
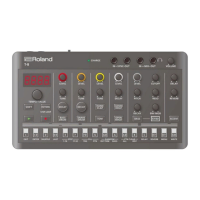
Overview of TR-6S top panel controls, including knobs, buttons, and pads for pattern creation and playback.
Explanation of common control buttons like VOLUME, SHIFT, CLEAR, PTN SELECT, TR-REC, STEP LOOP, SUB, VARIATION, INST REC, START/STOP.
Details on adjusting instrument tone character with TUNE, DECAY, CTRL knobs, MASTER FX, and Level fader.
Details on using instrument select buttons (BD-OH) for editing, pattern recording, and step loop functions.
Explanation of common controls like Display, VALUE knob, KIT, INST, SAMPLE, COPY, UTILITY, EXIT, FILL IN/TRIG, SHUFFLE, TEMPO, TAP buttons.
Identification of the PHONES jack on the front panel of the TR-6S.
Information regarding battery installation and safety precautions for the bottom panel.
Step-by-step guide on how to install batteries in the TR-6S, including precautions.
Instructions for turning the TR-6S on and off, and formatting an SD card.
Procedure for powering on the TR-6S and connected equipment.
Steps for safely powering off the connected system and the TR-6S.
Guide to formatting an SD card for use with the TR-6S, including screen operations.
Overview of the TR-6S rear panel connections, including power switch, MIDI connectors, and USB port.
Description of the power switch function for turning the TR-6S on and off.
Details on connecting MIDI devices using the MIDI OUT and MIDI IN connectors.
Information on connecting the TR-6S to a computer via USB for MIDI and audio.
Details about the SD card slot for saving and loading data, including precautions.
Instructions for connecting the TR-6S to an amp or monitor speakers via the OUT jacks.
Explanation of what a pattern is, including its structure and variations.
Definition of motion, explaining how knob and switch movements are recorded.
Explanation of what a kit is, referring to the collection of instruments.
Description of the PTN SELECT screen for selecting and playing patterns.
Explanation of the TR-REC screen for creating patterns by specifying steps.
Details on the STEP LOOP screen for looping selected steps during pattern playback.
Information about the SUB screen for inputting sub steps or flams.
Description of the VARIATION screen for switching pattern variations (A-H).
Explanation of the INST REC screen for real-time pattern recording.
Details on the INST PLAY screen for playing instruments using pads.
Steps for selecting and playing patterns using the PTN SELECT button and pads.
How to specify the number of steps for a track, affecting pattern length.
Procedure for clearing the last step setting of a specific track.
How to automatically generate a random pattern and save it.
Step-by-step guide for copying patterns to different locations.
Instructions for deleting patterns using the PTN SELECT and CLEAR buttons.
How to clear all steps of a specific variation (A-H).
Procedure for clearing all steps of a specific track within a variation.
Guide for copying variations between patterns and variations.
How to adjust reverb and delay settings for instruments.
Instructions for turning the master effect on/off and adjusting its depth.
Steps for assigning parameters to the CTRL knob for instrument control.
Detailed guide on assigning parameters to the CTRL knobs for various instruments.
How to assign different functions to the CTRL knob for each instrument.
Steps for adjusting the tempo of the pattern using the TEMPO button.
How to set the tempo by tapping the TAP button.
Using the Nudge function to adjust the timing of notes for patterns.
How to reload knob or fader values to their saved state.
How to record and play back knob movements as motion data.
Instructions for clearing motion data for a specific step in a track.
How to clear motion data for a specific sequence or the entire track.
How to name a pattern, including character input methods.
Details on setting the kit for a pattern, including SW and Number parameters.
Explanation of pattern settings like Tempo, Scale, and Flam Spacing.
Guide to saving patterns, kits, and system settings using the WRITE function.
Steps for copying patterns and kits to different destinations.
Instructions for deleting patterns using the PTN SELECT and CLEAR buttons.
How to clear all steps of a specific variation.
Procedure for clearing all steps of a specific track within a variation.
How to reload a pattern or kit to its saved state.
How to input weak beats in step recording using pads.
Procedure for inputting alternate sounds for instruments in step recording.
How to specify accents for steps in step recording.
Instructions for deleting recorded steps from a track.
How to perform and record sub steps and flams using pads.
Guide for playing and recording weak beats.
How to play and record alternate sounds for instruments.
How to perform sub steps and flams using the pads.
Guide for performing weak beats using the pads.
How to perform alternate sounds for instruments using the pads.
How to perform rolls (sixteenth, thirty-second, sixty-fourth notes) using pads.
How to make a step's loop playback continue even after releasing the pad.
Instructions for canceling step loop mode.
How to select and edit kit settings, including selecting kits and saving them.
How to group multiple instruments to specify layered sound with a single note.
Guide for copying kits to different locations.
How to select an instrument's tone, including categories and tone types.
Procedure for searching for instrument tones by type and selecting them.
How to modify parameters like Tune, Decay, and CTRL for an instrument's tone.
How to export a pattern to an SD card, including naming the file.
Steps for exporting a kit to an SD card, including file naming.
How to import a pattern from an SD card, including backup and export files.
Steps for importing a kit from an SD card, including selecting the file and destination.
Guide to importing user samples from an SD card for use as instrument tones.
Information on supported audio file formats and specifications for importing.
How to assign an imported user sample to an instrument within a kit.
How to edit the settings for user samples, including gain, category, and name.
Steps for deleting user samples from the TR-6S.
How to rename a user category for organizing imported samples.
Guide to optimizing the user sample area for efficient use.
How to specify overall settings, such as LCD contrast.
Procedure for reloading saved patterns or kits.
Steps for managing user samples.
How to adjust LED illumination settings.
How to make settings related to tempo and synchronization.
How to make settings related to MIDI communication.
How to turn the local switch on or off.
How to initialize the device or back up data.
How to format an SD card.
How to display the system version.
How to return the TR-6S to its factory-set state, including target selection.
Guide to backing up data (patterns, kits, settings) to an SD card.
How to restore data from an SD card to the TR-6S.
How to connect the TR-6S to a computer via USB for MIDI and audio.
How to manage the SD card via a computer in storage mode.
How to use the TR-6S as a MIDI controller for computer software.
Shortcut keys for switching between modes like PTN SETTING, KIT EDIT, INST, and SAMPLE.
Shortcut keys for recording, editing, and clearing motion data.
Shortcut keys for inputting sub steps, weak beats, alternate sounds, and dynamics.
Shortcut keys for recording patterns and playback operations.
Shortcut keys for adjusting tempo and fine-tuning timing with Nudge.
Shortcut keys for copying patterns, kits, instruments, and variations.
Shortcut keys for reloading patterns, variations, tracks, and controllers.
Shortcut keys for changing instrument category and grouping instruments.
Shortcut keys for assigning parameters to the CTRL knob.
| current draw | 500 mA |
|---|---|
| battery capacity | 1, 900 mAh |
| ni-mh battery configuration | AA, HR6 x 4 |
|---|---|
| alkaline battery configuration | AA, LR6 x 4 |
| ni-mh battery life | Approximately 5.5 hours |
| alkaline battery life | Approx. 4.5 hours |
| dimensions | 224 (W) x 132 (D) x 61 (H) mm |
|---|---|
| dimensions (inches) | 8-13/16 (W) x 5-3/16 (D) x 2-3/8 (H) |
| weight (including batteries) | 705 g |
| weight (including batteries in pounds) | 1 lb 9 oz |