Do you have a question about the Roland VERSELAB MV-1 and is the answer not in the manual?
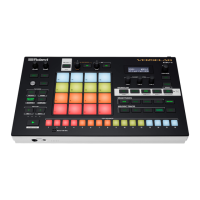
Describes the top surface controls and layout of the VERSELAB MV-1.
Details the project settings screen for creating or loading projects.
Displays various information and controls, including the VALUE dial and EXIT button.
Covers controls for vocal effects, processor, and microphone input.
Explains the use of the 16 pads for creating phrases and selecting sections.
Features controls for inputting phrases and editing song structures.
Describes the CTRL knobs for editing settings and recording motions.
Outlines the different modes for creating songs: SEQ, SECTION, SONG, MIXER, MIXDOWN.
Lists and explains the buttons for selecting individual tracks like KICK, SNARE, VOCAL.
Details the PHONES jacks and the built-in MIC on the front of the unit.
Describes all rear panel connectors including DC IN, USB, MIDI, LINE IN, MIC, LINE OUT.
Illustrates the hierarchical structure of a Project, Song, Tracks, and Clips.
Visualizes the relationship between tracks, sections, and clips.
Explains the different track types (Tone, Drum Kit, Looper) and their clip contents.
Defines a project as the management unit for creating songs, saved on the SD card.
Defines a clip as a collection of data used by a track, containing settings like name, length, and tone.
Explains tracks as places for performance data, detailing the four track types: Tone, Drum Kit, Looper, Vocal.
Defines a section as a collection of seven tracks, allowing creation of up to 16 sections for song structure.
Defines a song as sections arranged in order, playable with the VOCAL track.
Defines a vocal take as recorded audio for vocals or backing vocals, stored as a vocal sequence.
Explains workflows as step-by-step processes for creating songs using SEQ, SECTION, SONG, MIXER, MIXDOWN modes.
Guides through the process of creating a new song, from project creation to saving.
Outlines the steps for loading, editing, and mixing demo songs.
Provides step-by-step instructions to load a demo project and play it back.
Explains how to load preset clips from the SD card and edit their tones/phrases.
Details how to rearrange sections and change their lengths within a song.
Guides on recording vocals using the built-in mic or external mic.
Explains how to export the song and vocals as a WAV file.
Instructions on loading a project from the SD card and editing it.
Steps to save the current project to the SD card, including naming.
Guide on how to create a new project for a new song.
How to set project parameters like master tune and pad illumination colors.
Instructions on how to protect a project from overwriting or deletion.
Steps to delete projects stored on the SD card.
How to select sections for editing and previewing.
Explains how to set the length (in measures) for each section.
Steps to copy performance data and tones from one section to another.
How to swap performance data and tones between sections.
Instructions on how to name each section individually.
How to delete all contents from a section.
How to set the pad illumination colors for each section.
How to select tracks like KICK, SNARE, VOCAL.
How to adjust volume, equalizer, and other parameters for each track.
How to change track types (Tone, Drum Kit, Looper, Vocal) to suit needs.
How to select clips used for each track.
How to change the tone or sample used by a clip.
How to adjust settings related to sequencer playback for clips.
How to rename a clip.
How to copy the tone and phrase from one clip to another.
How to swap contents between clips.
How to delete all contents from a clip.
Steps to load clips from the SD card to a track.
Steps to import clips from another project into the current one.
Steps to save clips to the SD card.
Explains how tones are used with different track types.
Information about sample files (.wav) format and placement.
Information about sound files (.SDZ/.SVZ) and Roland Cloud.
Step-by-step guide to changing the tone used by a clip.
How to change the drum kit and drum instruments for a clip.
How to change the drum instrument used within a clip.
How to adjust volume, reverb, playback range, and other tone settings.
How to apply multi-effects to tones and samples.
How to use pads as a keyboard or for drum kits.
How to play pads with 16 levels of velocity.
How to play phrases with triplets, repeated notes, and arpeggios.
How to set and play chords using the pads.
How to use pads to select song sections.
How to input notes step-by-step using the pads.
How to record performances in real-time by playing the pads.
How to edit note length, velocity, and timing for each step.
How to set clip length and note step settings.
How to set song tempo, count-in, and metronome settings.
How to correct timing during song playback.
How to correct timing during recording.
How to assign parameters to the CTRL knobs for recording motions.
How to specify whether a motion plays back for each clip.
How to delete recorded motions for a clip.
How to record CTRL knob operations as motions.
How to edit recorded motion values for specific steps.
How to use Motion Designer to create linear motions that change over time.
Steps to configure external input and sampling settings.
How to select mic input source, phantom power, and external level.
How to set recording trigger, source, and measurement parameters.
Detailed steps for recording audio, adjusting volume, and editing the sample.
Steps to load a recorded or imported sample into a tone or drum instrument.
How to set INST 1 and INST 2 tracks to the "looper" type.
Notes on internal memory usage for samples and looper clips.
Steps to record audio to create a sample for the looper.
How to load samples used by projects or saved on the SD card.
How to play back samples in a loop on INST 1 or INST 2 tracks.
How to set volume and time stretch for sample playback.
How to specify sample playback region, time stretch, and other settings.
How to apply multi-effects to samples for sound processing.
How to specify clip length and sample playback direction.
Steps to arrange sections to match the song structure.
How to make song settings like volume, key, and scale.
How to change the key of each section in a song.
How to use song templates to automatically arrange sections for song creation.
Steps to input audio for vocal takes using built-in or external mic.
How to load samples to create a vocal take.
How to adjust vocal start timing and add backing vocals.
How to adjust the start and end points of a vocal sequence.
How to delete a vocal sequence from a vocal take.
How to adjust volume, playback range, and rename vocal takes.
How to set vocal take playback range, volume, and effects.
How to rename a vocal take.
How to mute vocal takes during song playback.
How to delete unwanted vocal takes.
Explains vocal processor effects like pitch shift, tone adjustment, and harmonies.
How to apply effects to vocal takes during playback.
How to record audio with effects applied directly to a vocal take.
How to switch between different vocal effects patches.
How to configure mixer and effects for the VOCAL track.
How to adjust volume, stereo position, and equalizer for vocal takes.
How to use multi-effects and compressors for the VOCAL track.
How to apply mastering effects like multiband compressor, EQ, and limiter.
Steps to mix down the song and vocal takes into a WAV audio file.
How to assign clip-related parameters to CTRL knobs for control.
Steps to format the SD card, erasing all data.
Settings related to pads, MIDI, and knob operations saved in internal memory.
How to return system settings to their factory defaults.
How to check memory usage for user samples and loopers.
How to optimize looper memory for efficiency.
How to delete samples loaded into tones, drum instruments, and vocal takes.
How to connect the unit to a computer via USB to manage SD card contents.
Lists shortcut key combinations for accessing various screens and modes.
Lists shortcut key combinations for step operations in Sequencer and Song phases.
Lists shortcut key combinations for pad operations in various workflows.
Lists shortcut key combinations for editing parameters and controller values.
Details the sound generator type and available track types.
Lists all available connectors and power supply options.
Provides the physical dimensions and weight of the unit.
Lists the accessories that come with the product.
| Sound Engine | ZEN-Core |
|---|---|
| Polyphony | 128 Voices |
| Scenes | 128 |
| Sampling | Yes |
| Pads | 16 |
| Audio Inputs | 1 x 1/4" TRS (mic) |
| Audio Outputs | 2 x 1/4" (L/R) |
| MIDI I/O | In/Out |
| USB | 1 x Type-C |
| Storage | SD card slot |
| Connectivity | Bluetooth |
| Dimensions | 13.9 x 9.1 x 2.4 inches |