EasyManua.ls Logo

Rotary SPO12 Standard User Manual

Rotary SPO12 Standard
72 pages
To Next Page IconTo Next Page
Page #1 background imageLoading...
Page #1 background image
I
N
S
T
A
L
L
A
T
I
O
N
I
N
S
T
R
U
C
T
I
O
N
S
I
N
S
T
A
L
L
A
T
I
O
N
I
N
S
T
R
U
C
T
I
O
N
S
SPO12
Standard/Hummer/Sprinter
Two Post Surface Mounted Swing Arm Frame Engaging Lift
Standard (500/700 Series) Capacity: 12,000 lbs.
Hummer (5W0/7W0 Series) Capacity: 12,000 lbs.
Sprinter (5A0/7A0 Series) Capacity: 9,000 lbs.
IN20272
Rev. AC 5/22/2019
© May 2019 by Vehicle Service Group. All rights reserved. CO10473
IMPORTANT
Reference ANSI/ALI ALIS,
Safety Requirements for
Installation and Service of Automotive Lifts
before installing lift.
OPERATING CONDITIONS
Lift is not intended for outdoor use
and has an operating ambient temperature
range of
41°-104°F (5°-40°C)
Español Página 25
Le Français La page 49
Question and Answer IconNeed help?

Do you have a question about the Rotary SPO12 Standard and is the answer not in the manual?

Rotary SPO12 Standard Specifications

General IconGeneral
BrandRotary
ModelSPO12 Standard
CategoryLifting Systems
LanguageEnglish

Summary

1. Lift Location and Setup

Lift Height

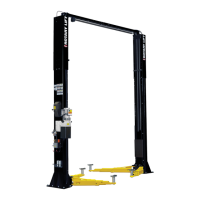
Details overall lift height and clearance requirements for specific models.

Overhead Mounting Bracket Installation

Instructions for installing mounting brackets to column extensions.

2. Latch Cable Guides Installation

3. Column Extensions Installation

4. Lift Setting and Column Plumbness

Star Washer Grounding and Mounting

Critical note on star washer placement for grounding the overhead limit switch.

5. Concrete and Anchoring

Surface Stability Warning

Warning against installing the lift on unstable surfaces like asphalt.

Column Shimming and Plumbness

Instructions for using shims to ensure columns are plumb and checking torque.

6. Overhead Assembly

7. Single and Three Phase Lifts

8. Overhead Assembly Installation

9. Power Unit Installation

Power Unit Overtightening Caution

Warning about potential damage from over-tightening power unit locknuts.

10. Hoses and Fittings

Fitting Overtightening Caution

Warning about damage and leakage from over-tightening fittings.

11. Equalizing Cables

12. Locking Latch Cable

Cable Guide Tie-off

Instructions for securing the cable guide to the column extension with wire ties.

13. Electrical Connections

Voltage Operation Caution

Warning against operating the motor with voltage below 208V.

Circuit Protection Requirements

Requirement for separate circuits, fuses, or breakers for each power unit.

Motor Frequency Compatibility

Note that 60Hz motors cannot run on 50Hz without modification.

14. 3Ø Control Box Installation

15. Oil Filling & Bleeding

Fill-Breather Cap Caution

Warning about ordering replacement if the fill-breather cap is lost or broken.

16. Overhead Switch Check

17. Arms & Restraints Installation

Restraint Gear Orientation

Note on identifying the correct orientation of the restraint gear.

Restraint Gear Installation Aid

Tip on pulling up the pin-ring to facilitate restraint gear installation.

18. Adapter Extension Rack Installation

19. Door Bumper Installation

20. Latch Cable Adjustment

21. Pressure Test Procedure

22. Equalizer Cable Tension Adjustment

23. Latch Release Decal Placement

24. Pinch Point Decal Placement

25. Wheel Spotting Dish Installation

26. Final Operational Checks

Related product manuals