[ 9 ]
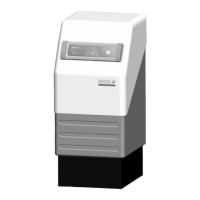
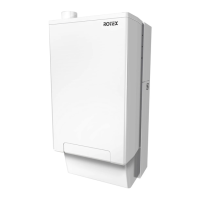
The following provides an explanation of the
individual components in line with the number-
ing in Fig. 2.1.1, 2.1.2 and 2.2.1. (The safety
components are identified with ):
Pos. 1: Cold water inlet
For the connection, observe the safety
regulations in accordance with EN 806 and
DIN 1988 [or local regulations].
The connecting pressure should not exceed 6
bar and must, under no circumstances, be
higher than 10 bar. Where required, install a
pressure reducer. If a DHW circulation line is
required, install that immediately above the
cold water connection (fit a non-return valve,
see Fig. 5.3.1).
Pos. 2: Hot water outlet
Where operating temperatures can exceed
60 °C, install an anti-scalding protection
(e.g. DHW mixer installation) (see Fig. 5.3.1).
Pos. 3, 4: DHW primary exchanger
The heat exchanger for heating the DHW
(DHW HE - pos. 19) is factory fitted and
connected. It receives its flow from the top to
the bottom to create a countercurrent for the
highest possible DHW output.
Pos. 5, 6, 39: Heating flow (5) and return
(6) with shut-off valves (39).
During operation, the shut-off valves (pos. 39)
must remain open (handle turned in line with
the pipe run).
Shut them only to carry out work on the
system (handle turned 90° to the pipe run).
Pos. 7, 8: Solar flow (7) and return (8)
For the optional connection of a ROTEX Solaris
system (only GSU) for solar DHW heating and
central heating backup. Observe the separate
ROTEX Solaris manual.
Pos. 9: Balance line
For the optional connection of a ROTEX Solaris
system (only GSU) with cylinder extension or
cascade control. Observe the separate
ROTEX Solaris manual.
Pos. 10, 11: Flue gas (10) and ventilation
air (11)
For the connection of a concentric balanced
flue pipe — see chapter 3.
Pos. 12: Sensor well for DHW cylinder
sensor
The sensor well (internal diameter 16 mm) is
factory-fitted with the cylinder sensor for the
boiler control. When connecting a Solaris
system, fit the associated cylinder sensor here.
Please note the depth of immersion. Use only
sensors with bias spring. Observe the separate
ROTEX Solaris manual.
Pos. 13: Sensor well for Solaris return
temperature sensor
At this point, the cylinder temperature of the
solar zone in the inlet area of the solar circuit
is measured. Observe the separate ROTEX
Solaris manual.
Pos. 14, 14a and 15: Condensate safety
overflow (14) and condensate drain (15)
Drain for removing the condensate created
during the combustion (condensing operation)
— connection either at the back (14) or at the
front (14 a). The operation must proceed
without faults. Route the condensate drain
hose (on-site provision) with a constant slope
to the drainage system. Check the condensate
drain annually for contamination and
unrestricted flow.
During operation, the cylinder (pos. B) must
constantly be filled with water (or
condensate). The unpressurised cylinder can
be filled via the hose ferrule supplied and a fill
hose.
Pos. 16: Condensate pipe
Any condensate created in the condensing
boiler and the flue pipe is routed via the
condensate pipe into the cylinder, where it is
neutralised and then drained away via the
condensate overflow (pos. 14 or 14 a) and the
condensate drain (pos. 15) into the drainage
system.
Pos. 17: Boiler body
Heat released through the combustion is trans-
ferred inside the aluminium boiler body from
the flue gas to the heating water.
Pos. 18: DHW heat exchanger (DHW HE)
In the DHW HE, the DHW is heated to its
selected temperature according to the
instantaneous water heater principle. The
replenishing cold water is initially routed to
the bottom of the cylinder to cool down the
solar zone (pos. E) as far as possible. On its
spiral path upwards, the DHW continuously
absorbs the heat of the unpressurised cylinder
water (pos. C), resulting in a distinct
temperature stratification inside the cylinder.
Pos. 19: Heat exchanger for cylinder
heating (CH HE)
For heating up the DHW zone — see also pos.
3 and 4.
With the GSU, the SL HW ends approx. 40 cm
above the cylinder floor. Only the DHW zone
above will be heated by the boiler. The
cylinder volume below that point will only be
heated in solar applications.
With the GCU, the SL HW is drawn right down
to the cylinder floor. That ensures that the
entire cylinder volume is heated by the boiler,
ensuring a higher DHW standby volume.
Pos. 20: Heat exchanger for solar central
heating backup (HB HE) – only GSU
The HB HE is fitted via a flange at the bottom
of the boiler body. It is constantly supplied
from the heating return. If the temperature in
the solar zone (pos. E) is higher than that of
the heating return, the latter will be heated by
the former. A gravity flow is created in the
heating backup zone (pos. F) that enables a
continuous heat transfer.
Pos. 21: Thermal insulation sleeve
for HB HE – only GSU
For the thermal separation of the heating
backup zone (pos. F) and the DHW zone
(pos. D). This prevent the cooling down
of the DHW zone.
 Loading...