Do you have a question about the Sabio CM1 and is the answer not in the manual?
Covers servicing, medical interference, flammable materials, and explosive atmospheres.
Includes handling, temperature limits, cleaning, and moisture avoidance.
Warns about potential data loss and recommends backups.
Includes USB and Ethernet cables for connecting the CM1.
Contains System CD for software and Power Supply for operation.
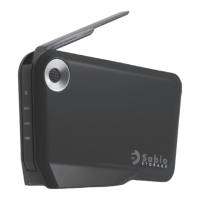
Diagram illustrating the CM1 device, highlighting its antenna, power button, and various ports.
Connect power adapter and Ethernet cable to the CM1 and router.
Set network switch to 'AP', power on, and monitor indicator lights.
Install the CM1 Utility from the system CD on your computer.
Launch utility, search for CM1, and navigate its interface.
Log in with default credentials and navigate to System Setting.
Access Maintenance screen to format the internal hard disk drive.
Acknowledge warning and start disk formatting.
Check CM1 System Information and Application Status after formatting.
Change CM1 switch to 'Client Scan' and extend antenna.
Use 'Setting' to scan, select, and connect to a wireless access point.
Select SSID, enter security key, apply settings, and reboot for wireless operation.
Save settings, reboot, and power cycle for wireless relocation.
Access shared folders like Home, Public, and Share via the CM1 Disk interface.
Open CM1 utility, log in, and click 'Web Folder'.
Right-click folders to map them as local drives for direct access.
Use 'Command K' in Finder and enter IP or product name to connect.
Log in with 'admin' credentials and use CM1 folders on Finder.
Ensure iTunes server is ON and select music folders for sharing.
CM1 serves music files; ensure they are in Share/Music for iTunes detection.
Enables external access using router configuration and DDNS services.
Register for DynDNS, verify email, and fill in account details.
Create hostname, select domain, service type, and enter public IP address.
Review cart, add hostname, and proceed to checkout for activation.
Click 'Activate Services' to confirm and activate the hostname.
Requires UPnP enabled router; check manufacturer for setup.
Set up port forwarding rules, e.g., port 80 for CM1.
Log into CM1, go to Account Settings, and select the DDNS tab.
Enter DynDNS details into CM1, save settings, and reboot for remote access.