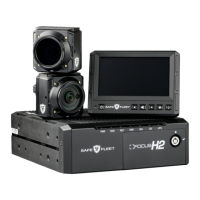
The Safe Fleet FOCUS H2 is an in-car video system designed for law enforcement, utility, and military communities, offering high-definition (1080p) video recording and Edge computing capabilities. This system is engineered to provide real-time analytics without relying on high-bandwidth cloud connections, recognizing the significant benefits this offers to law enforcement agencies.
Function Description:
The FOCUS H2 system serves as a comprehensive in-car video recorder, capturing video evidence and integrating with various vehicle systems and peripherals. It supports multiple cameras, including front and rear cameras, and incorporates wireless microphone technology for audio recording. The system's design emphasizes robust data management, communication, and storage, aiming to deliver scalable solutions for agencies of all sizes. The Edge computing feature allows for on-device processing of data, reducing latency and reliance on external networks for critical analytics.
Important Technical Specifications:
- Video Resolution: 1080p (High Definition)
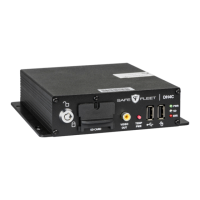
- CPU: FOCUS H2 CPU (P/N: FOCUS-12-01)
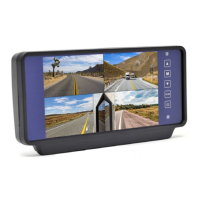
- Monitor: H2 Monitor (P/N: FOCUS-12-02)
- Front Camera: (P/N: FOCUS-15-06-C-02)
- Rear Camera: (P/N: FOCUS-15-03-U-02)
- GPS: (P/N: FOCUS-04-14)
- Power Harness: (P/N: FOCUS-04-03)
- I/O Cable: (P/N: FOCUS-04-04)
- Drive Key & Removable Drive: (P/N: FOCUS-04-06)
- Monitor Extension Cable: (P/N: FOCUS-06-01-C)
- Front Camera Extension Cable: (P/N: FOCUS-05-03-C)
- Rear Camera Extension Cable: (P/N: FOCUS-05-11-C)
- CPU Mount: (P/N: FOCUS-04-02)
- Front Camera Mount: (P/N: FOCUS-05-14)
- Rear Camera Mount: (P/N: FOCUS-05-09)
- Monitor Mount (Universal): (P/N: FOCUS-06-05)
- Digital Input (DI) Port Function:
- Electrical Current Limitation: < 5mA
- Electrical Operating Voltage: 8~12V
- Digital Output (DO) Port Function:
- Electrical Current Limitation: < 2A
- Electrical Operating Voltage: 0~24V
- DO Relay Contacts: 10 amp Max
Usage Features:
The FOCUS H2 is designed for ease of installation and operation within a vehicle.
- CPU Mounting: The CPU can be mounted using a dedicated bracket, with options for carriage bolts (if a rack is present) or self-tapping screws (if no rack is present). Two mounting options (forward holes and mid holes) are available for the CPU in the bracket.
- Monitor Mounting: The monitor can be attached to a swivel mount backing plate and then secured to the vehicle using self-tapping screws. Universal and vehicle-specific mounts are available for various Ford Explorer Utility and Tahoe models.
- Camera Mounting:
- Front Camera: Installs near the visor clip, with options for "Pan/Tilt" (allowing user adjustment) or "Fixed" (preventing user movement) positions. It uses a carriage bolt and various washers/nuts for secure installation. Upper and lower mounting positions are available based on agency policy.
- Rear Camera: Mounts on the cage, ensuring correct orientation with the part number sticker facing up. It uses self-drilling screws for the mounting plate and a hex head screw with a lock washer for the camera mount.
- Wiring:
- Power Harness: Connects the CPU to the vehicle's power system (ground, positive battery terminal, and ignition source). An inline fuse holder is included for safety. Arrows on connectors ensure proper orientation.
- Monitor Wiring: Uses a black extension cable connecting the monitor pigtail to the CPU's "LCD" port. Connectors are threaded for secure attachment.
- Front Camera Wiring: Uses a brown extension cable connecting the front camera pigtail to the CPU's "CAM 1" port. Connectors are threaded for secure attachment, with a flat side for proper orientation.
- Rear Camera Wiring: Uses a red extension cable connecting the rear camera pigtail to the CPU's "CAM 2" port. Connectors are threaded for secure attachment, with a flat side for proper orientation.
- I/O Cable: Connects to the CPU's "I/O" port. The black wire with a yellow stripe attaches to a 12V output signal from the lightbar. Digital inputs and outputs are configurable via the Command Center Back office.
- Peripherals:
- GPS: The GPS receiver should be placed near a window with an upward-facing position for optimal satellite connection. It connects to a USB port labeled "GPS" on the CPU. An extension cable is provided if needed.
- Wireless Microphone: The system supports up to two wireless microphones in addition to the in-car microphone. Microphones turn on when camera 1 starts recording and off when it stops.
- Microphone Assembly: Involves installing the battery and antenna.
- Microphone Receiver Installation: The receiver should be mounted as high as possible to clear the firewall for maximum range, avoiding metallic structures.
- Microphone Receiver Connection: Connects to the CPU's 15-pin "WMIC" port using a microphone cable (red heat shrink end inserted into CPU).
- Microphone Syncing: Microphones are synced by touching their contacts to the receiver's register contacts. A confirmation tone indicates successful synchronization. Syncing a second microphone to the same receiver will replace the first.
- Fixed Mount Antenna (for Wireless Upload): Two antennas are required for proper wireless operation. They should be mounted on the trunk lid or roof, at least one foot away from the rear windshield, light-bar, or other antennas. The low loss cable should be routed away from high-frequency/voltage equipment and connects to the back of the CPU via an RP SMA Male connector.
- Monitor Calibration: Upon first bootup, the monitor requires calibration. Users tap calibration targets on the LCD. If calibration times out, the device must be power cycled. Recalibration instructions are available online if the screen is misaligned.
Maintenance Features:
- CPU LED Indicators: Provide visual status updates for various system components:
- PWR (Amber): System powered ON.
- HDD (Green): Hard drive activity.
- REC (Red): Recording in progress.
- STBY (Green): System ready to power ON.
- IGN (Blue): Ignition ON.
- CB (Green): Car battery detected.
- UPS (Red): UPS battery in use (power disconnected).
- IGN and STBY LEDs are off when ignition is off.
- Wireless Microphone Charging: Microphones come with car and wall charging power cords to ensure they are fully charged for use.
- Documentation and Warranty: Additional copies of the installation guide, other documentation, and product warranty information are available on the Safe Fleet Community website (https://community.safefleet.net).
- Technical Support: Available via phone (1.800.336.8475) and email (SFLESupport@safefleet.net).