VB 3
car radio & music player
AIN FEAT
RE
• 18 programma
e FM ra
io stations an
MP3 p
ay
ac
• c
oc
an
arge easy-to-rea
isp
ay • optimize
viewing ang
e • USB/SD/MMC compati
i
ity • music an
ou
-
oo
playback • also recognizes MP3
les located in subdirectories • quick track search • advanced track memory • song intro / repeat / shu
e play • intuitive control • 3.5 mm AUX input
or
ortable devices • 4 x 45 W Hi-Fi s
eaker out
ut • 2 x RCA external am
li
er/subwoo
er out
ut • ISO connecto
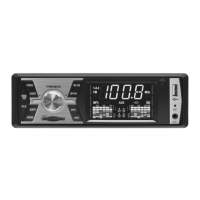
ETU
ONTROLS AND CONNECTOR
i
ure 1
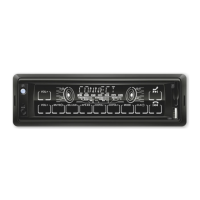
i
ure 3
RADI
ENELE
TSZ
ND/A
M1-FM2-FM3
an
se
ection / Auto station searc
an
stor
2
/PA
a
io program memor
1P
a
ac
/ Paus
3. 2
INT
adio program memory
rack intro
.
WR
M
D Volume / Power on and o
/ Mode switching
.
+10
a
io program memory
Forwar
s
i
10 trac
s
5/-10
a
io program memor
everse s
i
10 trac
s
B – Connector for USB stora
L
Time
isp
a
/ c
oc
a
justment
/RDM
a
io program memor
huffl e pla
bac
1
/RPT
a
io program memor
rac
repea
D/MM
memória
árt
a-a
jza
1
.
uto / Manual tunin
Previous and
ast reverse
13.
uto / Manual tunin
Previous and fast reverse
.
I
PLAY
ulti-
unctional colour LCD display
.
T
eset to
actory de
aults
1
tereo input socket for 3.5mm
ack
IN
ntenn
s
c
e
2
CA
T Audio output for connectin
external amplifi er or active subwoofe
SO IN
OUT Socket acceptin
ISO connector pair (power and speaker connections
.
M1-FM2-FM3 3 FM bands 3 x 6 presets
or storing radio station
.
LFANUMERIC Volume / Frequency / Time / Track number, Elapsed time / Mode
.
M radio station
requency uni
.
P
P3
le playback in progres
.
U
3.5 mm audio in
ut selected
.
SB
SB signa
source se
ecte
.
D
emory card selecte
.
U-METER
ual VU meter displa
e
ore using the product
or the
rst time, please read the instructions
or use below and retain them
or later re
erence. The original instructions were written in the Hungarian language.
This appliance is not intended for use b
persons (including children) with reduced ph
sical, sensor
or mental capabilities, or lack of experience and knowledge, unless the
have been given supervision or instruction
oncerning use o
the appliance by a person responsible
or their sa
ety. Children should be supervised at all times to ensure that they do not play with the appliance
A
ter unpacking, please, check the device
or possible transport damages. Keep the packaging away
rom children, i
it contains bags or other potentially dangerous components
ESETTING THE UNIT
The microprocessor data requires resetting in situations where the power supply is lost or the unit (including its display) acts erratically. In order to do so, press the
ST (RESET) button at the right edge o
the
ront
panel using a ball-point pen. This will clear all stored data and return the unit to factory default condition. This operation is required after installation, before switching on the unit for the fi rst time, and when the
vehicle’s batter
is replaced.
PTIM
M DISPLAY VIEWING ANGL
The large displa
has been designed so that the maximum contrast and viewing qualit
is available slightl
off set sidewa
s, aff ording the driver and front passenger the best view. The white characters thus appearing
in front of the black background provide excellent legibilit
.
WERING THE
NIT
N AND
FF
r
rotating
no
PWR
M
to power t
e unit on. It switc
es on an
automatica
y switc
es to t
e mo
e
istene
to most recent
y.
Since voltage surges can occur when the vehicle’s engine is started, onl
turn on the unit a
ter the engine has been started. Turn o
the unit be
ore stopping the engine. To switch the unit o
, keep pressing the
otating
no
WR
M
FF
appears on the displa
).
A
ter switching on, the volume setting last used be
ore switching o
will be e
ective.
D
STING V
L
ME
se t
e rotatin
no
t
set t
e
esire
v
me
eve
The volume can be adjusted in a range o
00 to 32. Unless an adjustment is made within 2 seconds, the unit will automaticall
revert to the previous
unction
ELECTI
N
F SIGNAL S
RCE
epeatedl
press the rotatin
knob (PWR / MOD)
riefl
to select the desired signal source: TUNER / USB / SD / AUX
On switching on the unit, the track pla
ed prior to switching o
will continue pla
ing unless the device containing it has been removed.
If both the USB and SD sockets are empt
, onl
the TUNER and AUX mode can be selected.
• If there are external devices connected to both the USB and SD sockets, the PWR / MOD button can be used to select between them. The use of SD cards is preferred on account of their secure and protected location on the unit.
A
ter connecting, the external unit connected last will be the one that will start pla
ing.
The s
mbol corresponding to the active signal source illuminates after USB or SD devices are inserted.
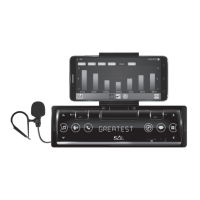
igure 2
 Loading...