EasyManua.ls Logo

Sea Eagle 9 - User Manual

Sea Eagle 9
16 pages
Print Icon
To Next Page IconTo Next Page
Loading...
Sea Eagle Motormount Boat
Sea Eagle 9 (SE9)
Instruction & Owner’s Manual
For video instructions visit SeaEagle.com/Instructions or scan the QR code below!
Sea Eagle Boats Inc.
19 N. Columbia Street, Suite 1
Port Jefferson, NY 11777
1-800-748-8066
September 2019
Question and Answer IconNeed help?

Do you have a question about the Sea Eagle 9 and is the answer not in the manual?

Summary

Manufacturers Certifications

Sea Eagle Warranty

Details the 3-year warranty against manufacturing defects and procedures for damaged items.

Decals, Stickers & Registration

Contact Us

Provides contact information for customer support and business hours.

SAFETY

Boating Safety Tips

Key recommendations for safe boating practices and personal conduct on the water.

Safety Equipment

Guidance on selecting appropriate safety gear for various water conditions.

Important Safety Items

Lists essential items to carry for passenger safety and comfort.

OPERATING YOUR SEA EAGLE

Rating

Specifies the maximum capacity and motor rating for the SE9 model.

Motor Selection

Discusses choosing between gas and electric motors for the SE9.

Gas Powered Motor Considerations

Details pros, cons, and operational limits of gas motors on the SE9.

Electric Trolling Motor Benefits

Explains advantages and operational parameters of electric trolling motors.

Battery Selection

Guidelines for choosing a suitable 12V battery, including types and amp hour ratings.

Battery Features and Safety

Important safety precautions and features related to boat batteries and connections.

Capacity Ratings and Dimensions

Technical specifications including person capacity, weight limits, and boat dimensions.

Motor Safety and Reboarding

Critical safety advice concerning motors, propellers, and reboarding procedures.

SETUP: VALVES & PUMP

One-Way Air Valve Installation

How to install and use the one-way air valves and inflation monitor.

A42 Foot Pump Operation

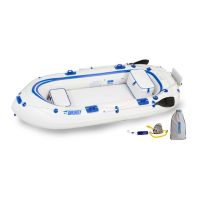
Instructions for operating the foot pump for inflation.

INFLATION & ASSEMBLY

Motor Mount Set Assembly

Guidance on assembling and attaching the optional motor mount set.

Boat Inflation and Floor Installation

Steps for unfolding, inflating the floor, and securing the boat.

Securing Motor Mount Bolts

How to properly secure the bolts for the motor mount assembly.

Chamber Inflation Process

Instructions for inflating main chambers and the backup chamber.

Inflatable Seat Installation

Steps for attaching valves and inflating the inflatable seats.

Fishing Inflatable Seat Placement

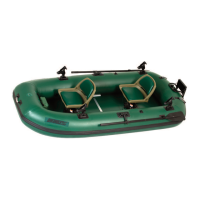
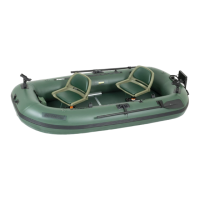
Optimal placement and use of the fishing seat.

Rowing Inflatable Seat Use

Proper use and benefits of the rowing seat.

AB254 Oar Set Assembly

Instructions for assembling the oars and using them with the boat.

DEFLATION & FOLDING

Deflation Procedure

Correct order for deflating chambers to prevent trapped air.

Folding the Boat

Methods for folding the boat after deflation for storage.

STORAGE

Storage Tips

Advice on covering, location, and temperature for effective storage.

TROUBLESHOOTING

Leak Detection Methods

Techniques for identifying leaks, including visual and auditory checks.

Valve and Diaphragm Checks

Inspecting valve threads, caps, and diaphragms for obstructions or damage.

REPAIRS

Repair Kit Usage

How to use the included repair kit materials for patching punctures.

Pinholes and Small Punctures

Procedures for fixing small holes and pin-sized leaks.

Patching Technique

Detailed steps for applying patches, including glue drying times.

Patching Tips

Additional advice for successful patch application and removal.

Accessories (OPTIONAL)

WaterSnake Venom 34 Trolling Motor

Description of the WaterSnake Venom 34 trolling motor.

Personal Flotation Devices (PFDs)

Information on available USCG-approved life jackets and vests.

3 M Marine Cleaner & Restorer

Details on the cleaner and restorer for boat surfaces.

EZ Cart Wide Transport

Features and benefits of the EZ Cart for transporting the boat.

See-me Safety Light

Information on the Coast Guard approved LED safety light.

Honda 2.3 L Gas Motor

Details on the Honda 2.3L gas motor for the SE9.

Overview

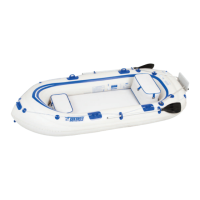
The Sea Eagle Motormount Boat, specifically the SE9 model, is a versatile inflatable watercraft designed for leisure, fishing, and general recreation. With over 50 years of experience in designing and selling inflatables, Sea Eagle ensures quality and stands behind its products with a 3-year warranty against manufacturing defects. The boat is NMMA certified for sales in the United States, complying with U.S. Coast Guard Regulations and American Boat and Yacht Council (ABYC) standards.

Function Description:

The Sea Eagle Motormount Boat is primarily designed for water recreation, offering a stable and enjoyable experience on various bodies of water. Its inflatable design allows for easy transport and storage, making it a convenient option for boaters. The boat can be propelled by oars, an electric trolling motor, or a small gas motor, providing flexibility in how it's operated. It features multiple air chambers for safety and buoyancy, including a dedicated floor chamber and three side chambers, along with inflatable seats. The "displacement hull" design means it pushes through water rather than planing, making it efficient at lower speeds.

Usage Features:

  • Motor Compatibility: The SE9 can accommodate an electric trolling motor or a small gas motor up to 3 horsepower. Electric trolling motors like the Watersnake Venom 34 or Minn Kota Endura 30 are recommended for their low cost, light weight, ease of storage, low maintenance, quiet operation, and suitability for waters prohibiting gas motors. Gas motors offer increased range and power against headwinds but come with higher initial and maintenance costs. A 20-inch long shaft is ideal for gas motors, though a 15-inch short shaft can be used if the motor mount is set low.
  • Battery Selection (for electric motors): A 12-volt deep cycle marine lead-acid, lithium-ion, or electric vehicle battery with 20-120 Amp Hours (Ah) is suitable. A Group 24 lead-acid battery (around 50 lbs, 75 Ah) is recommended for its balance of weight and charge capacity. It's crucial to use a battery box, such as the Minn Kota Power Center, for safety, which often includes a built-in circuit breaker. A circuit breaker or fuse is required by the Coast Guard to protect against reverse polarity and shorts.
  • Inflation and Assembly: The boat features one-way air valves for easy inflation. It's crucial to use Sea Eagle recommended pumps, as high-pressure air compressors designed for tires (e.g., 32 PSI) can damage the boat, which operates at a much lower pressure (1 PSI). The boat has four air chambers: one for the floor and three for the sides (numbered 1-3). Inflation progress for chambers 1 and 3 can be monitored using the included clear plastic "Inflation Monitor" gauge, matching the numbered lines printed on the boat. The floor should be inflated until very firm.
  • Motor Mount Installation (Optional): The motor mount set includes rods, a motor mount block, and hardware. The rods are inserted through grommets on the boat, and brackets are placed on the rods. The wooden motor mount block is then attached to the brackets using bolts and knobs.
  • Seating Options: Two types of inflatable seats are available: a 13-inch Fishing Inflatable Seat, optimized for motor operation or fishing, typically placed in the aft position, and a 4-inch Rowing Inflatable Seat, which provides a lower, more comfortable position for rowing. Seats can be secured using D-rings and straps.
  • Oar Set: The AB254 Oar Set features blades that insert into the shaft with a button-lock mechanism. The oars can be conveniently stowed on the sides of the boat using the blue carry handles as oarlocks. Drip rings should be slid onto the oar shaft to act as stoppers.
  • Safety Features: The boat includes grab lines on the sides and front for reboarding. If a gas motor is used, a propeller safety guard is recommended. If the motor has a kill switch, the driver must attach the kill cord to themselves (preferably to a life jacket) and regularly test its function. Wireless kill switches are also available.
  • Deflation and Folding: Deflation should occur in reverse order of inflation (chamber 3, then 2, then 1, and finally the floor) to prevent air from being trapped. After deflation, the boat can be folded compactly for storage by pulling one side completely over the other, then folding the aft end, front end, and finally in half.

Maintenance Features:

  • Storage: When storing the boat outdoors, it should be raised off the ground and covered to protect it from sunlight, rain, leaves, berries, and bird droppings. It's essential to check for and remove any water from the chambers to prevent mold. The storage area should be rodent-proof. Avoid storing the boat in direct sunlight, attics, or metal sheds to prevent excessive heat exposure. In freezing temperatures, do not drop or unroll the boat until it reaches room temperature. The boat can also be stored inflated, supported along its length. After storage, inspect for loose items, damage, and leaks.
  • Troubleshooting Pressure Loss: If the boat loses pressure, it may not necessarily be a leak. Temperature changes (e.g., inflation in heat, cooling at night, or launching in cold water) can cause air contraction. If temperature is not a factor, a leak check is needed.
  • Leak Detection:
    • Visual Inspection: Carefully inspect the boat, including the underside, for any visible damage.
    • Auditory Inspection: Listen for hissing or sputtering noises to pinpoint air escaping.
    • Valve Check: Ensure both the inner valve and outer cap are firmly screwed together, checking for crossed threads or debris (sand, dirt) that might break the seal. For dented O-rings, gentle heating with a hairdryer can help ease the dent.
    • Soapy Water Test: Inflate the suspected leaking chamber to full pressure. Apply a generous amount of soapy water (liquid dish soap mixed with clear water) with a hand towel or large sponge. Bubbles, hissing, sputtering, or spraying water will indicate a leak. Spray bottles are generally not effective for this test.
  • Repairs: The boat comes with a repair kit including patching material and PVC glue.
    • Pinholes: For small punctures (less than 1/8 inch), apply a small drop of glue and allow 24 hours to cure.
    • Patching: For larger punctures or cuts, trace a patch (e.g., penny-sized) on the patching material and the boat. Cut the patch. Apply glue to both the patch and the boat, allowing 15 minutes to dry until tacky. If the glue layer is thin, apply a second coat. Apply the patch to the boat and smooth with a finger or tool (spoon, utility knife handle). For best results, heat the patch with a hairdryer for 10-20 seconds and smooth.
    • Patching Tips: Always deflate the chamber before patching. Keep patch size to a minimum, as larger patches are harder to seal. Overlap damage by about 1/2 inch for larger repairs. Do not apply patches while glue is wet. Avoid covering a leaking patch with another patch; remove old patches by heating and peeling. Allow at least an hour for field repairs, and overnight for other repairs. Never use a heat gun. Clamps and weights are not needed.
  • Accessories and Glue: Do not use glue on D-Rings, Scotty™ Glue On Mounts, or other glue-on accessories, as the stretchable PVC material of the SE9 cannot accommodate this, which can cause stress and damage to the boat.

Sea Eagle 9 Specifications

General IconGeneral
Weight Capacity1200 lbs
Material38 mil Polykrylar (K80 PVC)
Weight50 lbs
Capacity1200 lbs
SeamHigh-frequency welded
Length11 ft
Width4 feet
Exterior Length11 ft
Exterior Width4 feet
Chambers4
Beam4 feet
Air Chambers4

Related product manuals