12
The bottom chimney length(s) must protrude into the living space
so that proper clearances are maintained from the stove pipe
connector to the lower side of the ceiling (see Chart 3 in the back
of these instructions for more details). Do not offset the CF
Sentinel chimney below the Cathedral Ceiling Support Box.
Install additional chimney lengths with locking bands until the
required height above the roof is achieved. NOTE: As previously
mentioned, when a chimney is suspended below the box, locking
bands and joints must be fastened using two (2) #6 x 1/2"
stainless steel sheet metal screws (as per Figure 4).
Cathedral Ceiling
Support Installation
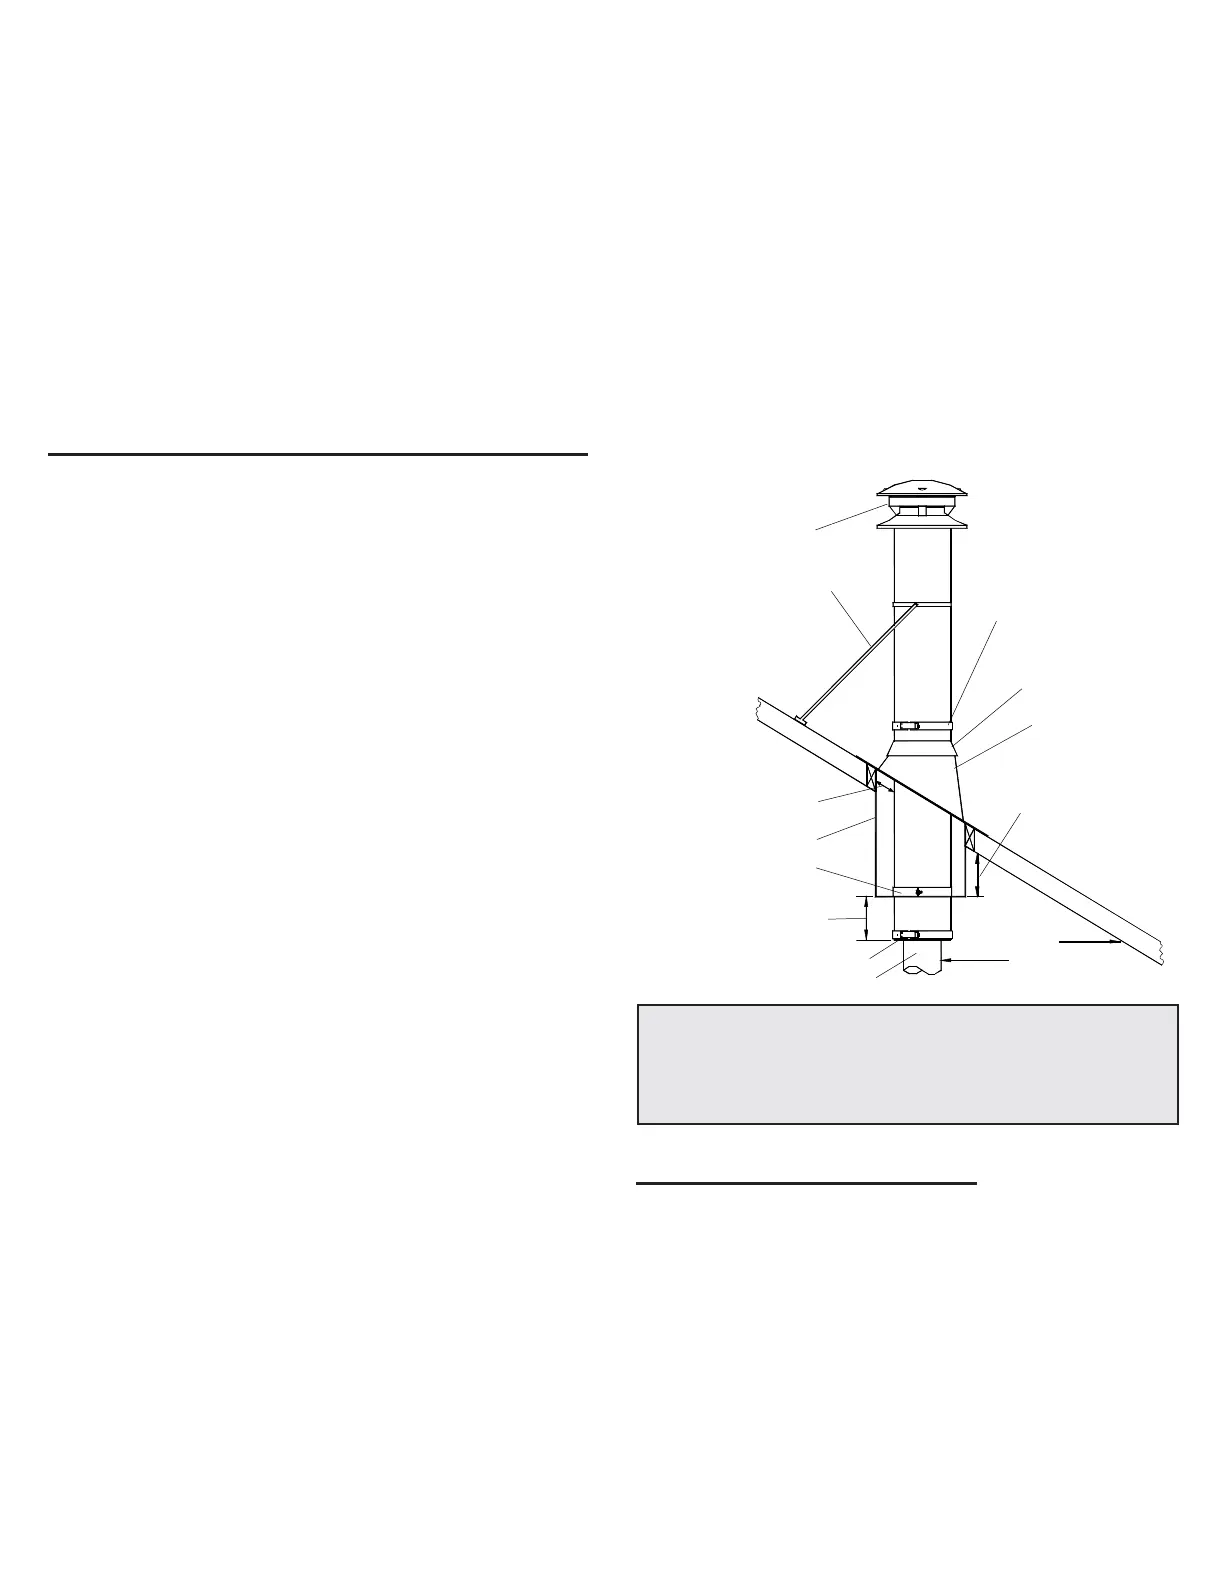
FIGURE 23
Storm Collar
Roof Brace Kit
Round Top
Roof Flashing
Smoke Pipe Adaptor
CF Sentinel chimney to be a
minimum distance of 4"
(101.6mm ) below Support Box
Support Band
ROOF SUPPORT (URSA)
50mm (2") Minimum Air
Space Clearance
Decorative Adapter
Cathedral Support Box
Install the Support Band on the chimney length at the desired
position by assembling the support bands using the 2 carriage
bolts and nuts. NOTE: A minimum of 4" of an insulated
chimney length must protrude below the Cathedral Support
Box for stability (see Chart 3 at the back of these instructions
for more details). Snug nuts to bolts, do not over-tighten so that
the band deflects the chimney outer casing. Secure the band to
the chimney outer casing by screwing the eight (8) stainless
steel sheet metal screws through the draw band and into the
outer casing (for ease of attachment use a 3/32" hole). Lower the
chimney length down through the opening in the bottom of the
Support Box, so that the Support Band makes contact with the
bottom of the Support Box (See Figure 23). NOTE: The male end
NOTE: If the chimney penetrates an overhang (soffit) cut an
opening with 2" clearance all around and install a Joist Shield on
the under side of the overhang. If the attic is open to the overhang,
close off the access with suitable building materials ensuring that
a 2" (50mm) air space is maintained. From above install a roof
flashing and storm collar by following the Roof Flashing installa-
tion section. If the overhang is not deep enough to allow the
chimney to be fully installed within the overhang, it will be
necessary to cut away the overang. Ensure that a 2" (50mm)
clearance all around the chimney is respected. Framing and
flashing the sides of the opening will be required. Install a Wall
Band at this level.
To complete a proper Cathedral Ceiling Support installation, the
following parts are required:
- Cathedral Ceiling Support: - Includes a painted black support
box, a two-piece support band, 4 painted ceiling trim angles (2
short, 2 long), decorative sleeve, smoke pipe adapter and
hardware package.
- Roof Flashing Assembly:- Required when the chimney pen-
etrates a roof.
- Suitable lengths of chimney: - The chimney diameter should
be sized to suit the appliance.
- Round Top:- To exclude rain and/or leaves into the chimney.
The CF Sentinel Cathedral Ceiling Support will support a total of
15 feet (4.6m) of chimney, of which 10ft (3m) can be supported below
the box. When a chimney is suspended below the box, the locking
bands and joints must be fastened using two (2) #6 x1/2" stainless
steel sheet metal screws (drill 3/32 holes) as per Figure 23.
CATHEDRAL CEILING SUPPORT (CCB)
The Cathedral Ceiling Support Box is manufactured to an overall
outer dimension of 1/8" (6mm) less than the minimum dimensions
specified in the Framing Details section (Table 1) and 17-1/2"
(444mm) in height.
After framing in your opening to the dimensions specified in the
Framing Details section, slide the Cathedral Support box into the
joist opening. Once the box is at the desired level, ensure that
the box is level and nail the box to the framing using three 2" spiral
nails or #8 x 1-1/2" wood screws per side. The excess material
sticking above the roof can either be trimmed off before attaching
the box to the framing or, after it is installed, the corners can be cut
and the excess material folded down and secured onto the roof
deck.
Decorative Adapter
May be installed flush on
the lowest side of the
ceiling
Follow appliance
instructionsfor
proper connector
clearance
NOTE: To stop cold air infiltration into the dwelling you
can install the optional Universal Shielding
Insulation (SUSI) into the Cathedral Ceiling Support.
See separate installation instructions
packaged with the SUSI.
of each chimney length must be pointing upwards as per the arrow
on the chimney label.
Install the 4 painted ceiling trim angles with the supplied fastening
screws to finish off the Support Box at the ceiling level.
5. Install lag screws or anchors and tighten pivot nuts. When all
bolts and straps are secured in place around the chimney, the
chimney will be stabilized against horizontal displacement.
The Universal Roof Support Assembly (URSA) is designed to
provide support and may be used on a floor, above a ceiling or roof
and adjusts to any roof pitch. It may also be used above an offset
to support the offset or as a supplementary support when the
chimney or vent height exceeds that of the primary support.
Where permitted, it will provide support above freestanding
appliances and open cathedral ceiling installations.
The Universal Roof Support Assembly (URSA) accommodates
most models of chimneys with outer diameters ranging from 7"
through 13".
The URSA will support up to 30’ (9.0m) of chimney of which 20’
(6.9m) may be suspended beneath it.
 Loading...