Wireless & Sensing Products
Development Kit User Guide Rev.1.0
UG.DEV.SX1280-1.W.APP February 2017
5 of 15
Semtech
2. First Use
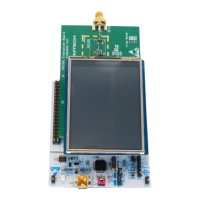
Connect the SX1280 Development Kit 2.1.
1. Plug the mini-USB / USB cable into the mini-USB socket of the SX1280 Development Kit
2. Plug the mini-USB / USB cable into the USB socket of your PC
The SX1280 Development Kit will power on and connect to your PC.
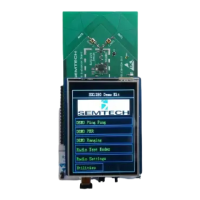
Welcome Display 2.2.
The welcome screen with the top menu is visible upon power-on.
You can access the following test modes:
-
DEMO Ping Pong
This performs a bidirectional range test between a pair of radio units.
- DEMO PER
- This performs a unidirectional packet error rate test between user-defined
Master and Slave units.
-
DEMO Ranging
This performs a ranging test between user-defined Master and Slave units.
Additionally, you can access the Radio Test Modes, which provide access to the basic operating modes of the radio.
The
Radio Settings allow you to modify the communication and modem settings used in the demos.
The
Utilities menu provides information about the peripherals and version of the installed firmware.
How to Navigate with the Touch Screen 2.3.
In the kit the following conventions are adopted:
- Menus, functions and configuration of settings are indicated in Green
- Data that cannot be modified is indicated in White
- Result data from tests are indicated in Yellow
Figure 3: Welcome Display