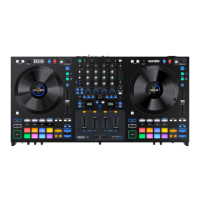
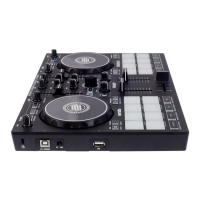
12. FX 1–6: Press one of these buttons to activate or deactivate the corresponding software effect shown in the
Serato software FX 1 and FX 2. Pressing the buttons will activate one effect at a time, or pressing and holding
the buttons will activate multiple effects at once.
13. Effects Toggle: Move this toggle switch away from you to activate the software effects—the toggle will latch to
that position. Pull the toggle back to the center position to deactivate the effects.
Pull and hold this toggle toward you to activate the software effects momentarily, and release the toggle to
deactivate the effects—the toggle will return to the center position.
14. Deck Cue: Press this button to send this deck’s pre-fader signal to the cue channel for monitoring. When
engaged, the button will be lit. To cue multiple channels simultaneously, press the Deck Cue buttons for both
decks.
15. Deck Fader: Move this fader to adjust the volume level of the corresponding deck.
16. Crossfader: Move this fader to mix between the decks.
17. Search: The length of this strip represents the length of the entire track. Place your finger on a point along this
sensor to jump to that point in the track. The LEDs above the strip indicate the approximate location of the
playhead in the track.
18. Scroll/Load / Instant Doubles: Turn this knob to browse through lists and press it to select an item or load the
currently selected track to the deck. Press this knob twice quickly to load the same track to both decks (“instant
doubles”).
19. Back / Load Prep: Press this button to view the previous screen in the software. Hold Shift and press this button
to load the currently selected track to the Prepare Crate.
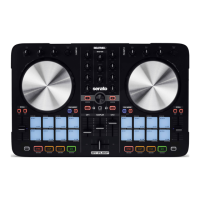
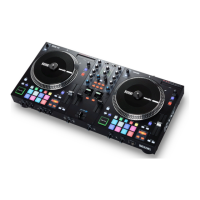
20. High Torque Direct Drive Platter: A powerful motor turns this aluminum platter with speed position dots. Use the
Motor Torque switch on the rear panel to adjust the torque of the platters Note: The platter itself should not be
held in position for sustained periods while powered to rotate.
21. Control Disc with Slipmat: This 7.2″ (18.2 cm) disc controls the audio playhead in your DJ software. Place the
included slipmat under the Control Disc (or a different slipmat can be used, if preferred).
Note: The Control Disc can be user replaced by attaching the Quick Release Adapter to your own modified
disc. The replacement disc must have three 6 mm holes, and the included disc should be used as a reference.
22. Quick Release Adapter: This secures the Control Disc to the platter. It comes attached to the top of the Control
Disc. To remove the Control Disc or slipmat from the platter, hold in the button on the side of the Quick Release
Adapter while lifting the disc off the spindle. After placing the disc back on the spindle, pinch the top of the
spindle while slowly rotating the disc until you hear it click. It locks when the groove in the spindle lines up
directly opposite to the button on the side of the Quick Release Adapter.
23. Stop Time: Controls the rate at which the platter slows to a complete stop (“brake time”).
24. Slip / Motor Off: Press this button to enable or disable Slip Mode. In Slip Mode, you can jump to Hot Cue Points,
trigger Loop Rolls, or use the platters, while the track’s timeline continues. In other words, when you stop the
action, the track will resume normal playback from where it would have been if you had never done anything
(i.e., as if the track had been playing forward the whole time). Press and hold Shift and press this button to
activate or deactivate the corresponding platter’s motor. This will not affect the track’s playback.
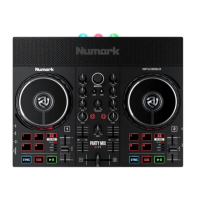
25. Censor / Reverse: Press and hold this button to activate Censor, which temporarily reverses the playback of the
track. Release the button to resume normal playback from where it would have been if you had never engaged
the Censor function (i.e., as if the track had been playing forward the whole time). Press Shift and press this
button to activate Reverse, which will reverse the playback of the track. Press the button again to resume
normal playback from wherever the audio playhead stops.
26. Pitch Fader: Move this fader to adjust the speed (pitch) of the track. You can adjust its total range with the Pitch
Range buttons.
27. Pitch Range / Keylock: Press one of these buttons to adjust the range of the Pitch Fader to±8%, ±16%, and
±50%. Press and hold Shift and then press this button to activate or deactivate Keylock: the key of the song will
lock to whatever position the pitch fader is at when Keylock is activated. This feature allows you to change the
speed of the song without changing the key.
28. Pitch Bend -/+: Press and hold one of these buttons to momentarily reduce or increase (respectively) the speed
of the track.
29. Shift: Press and hold this button to access secondary functions of other controls on ONE.
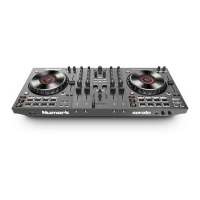
30. Cue / Previous: When the Deck is paused, you can set a Temporary Cue Point by moving the platter to place
the playhead at the desired location and then pressing the Cue Button. During playback, you can press the Cue
Button to return the track to this Temporary Cue Point. (If you did not set a Temporary Cue Point, then it will
return to the beginning of the track.) If the Deck is paused, you can press and hold the Cue Button to play the
track from the Temporary Cue Point. Releasing the Cue Button will return the track to the Temporary Cue Point
and pause it. To continue playback without returning to the Temporary Cue Point, press and hold the Cue
Button, then press and hold the Play Button, and then release both buttons. Press and hold Shift and then
 Loading...