Installation
8
Removing the transport bolts
CAUTION
DAMAGE TO THE APPLIANCE OR INJURY POSSIBLE
The appliance is secured for transport with
transport bolts. Transport bolts that are not
removed can damage the drum during operation
of the washer, the appliance will vibrate, and it will
be much noisier during spin cycles if the transport
bolts are not removed before use. Be sure to
remove all 4 transport bolts completely before
first use. Keep the transport bolts. If a pedestal
was purchased with the appliance, it must be
installed first, prior to removing the transport
bolts. Please consult the pedestal installation
instructions.
In order to prevent transport damage during later
transport, be sure to re-install the bolts before
transport.
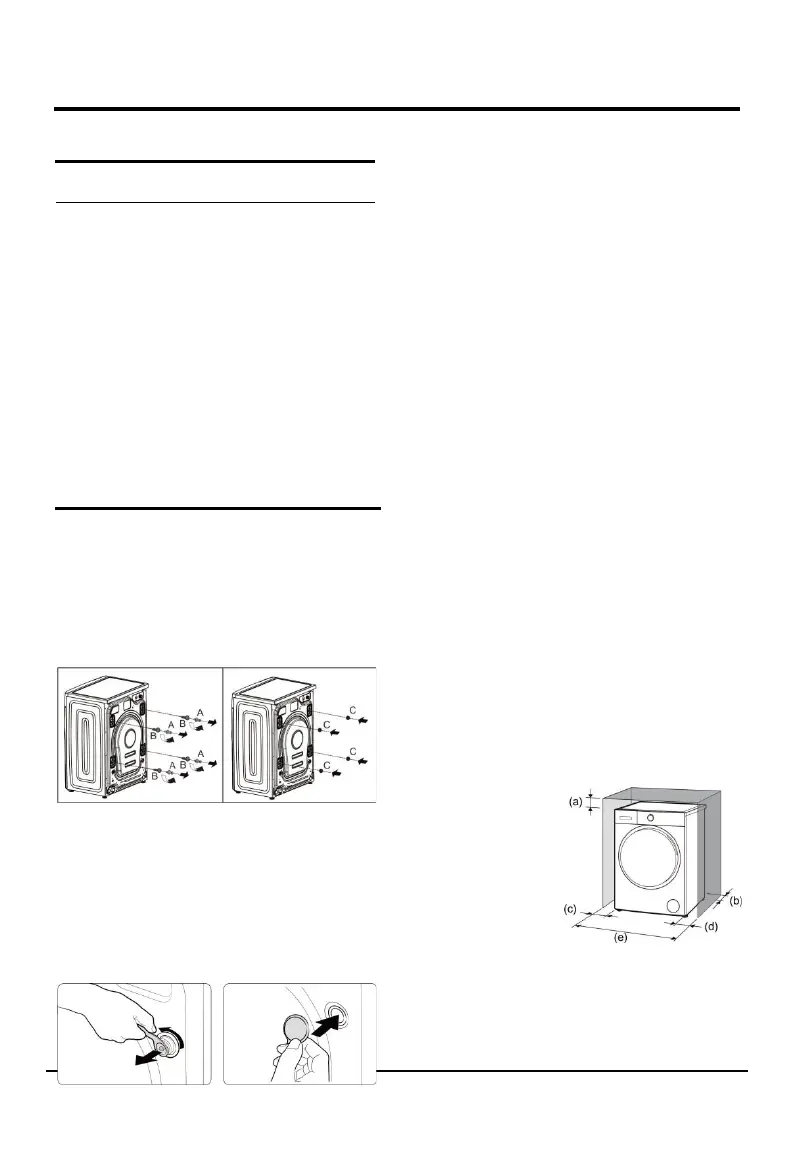
1. Undo the four transport bolts A by the wrench
(supplied) and remove them.
2. Remove the four spacer tubes B. During the
removal of the bolts occasionally spacer tubes fall
inside the machine, these can be remove by tilting
the machine forward and recovering them from
the floor or inside the base of the machine.
3. Cover the open transport bolt holes with the four
cover caps C which will find in the plastic bag
containing the accessories.
Keep all the parts in safe place: you will need them
again if the washer needs to be moved to another
location.
NOTE
Transport the washer for the prevention of
breakage as below:
- The transport bolts are reinstalled.
- The power cord is secured to the back of the
washer.
Choosing the right location
● Locations requirement
- The machine should be installed on the solid and
flat floor, never put the machine on the soft carpet
or on the wood floor. Do not install the machine
on the homemade plinth, if the installation
location cannot be changed, the plinth must be
improved as required, such as enlarge the size,
secure with brackets. Never put the machine on
the separate brackets. It is possible the machine
moves a little by the factors of overloading,
situation of the plinth (wet) and so on, so it will on
risk the machine falls down from the plinth after
working for a period of time.
- Keep the environment dry and vented.
- The appliance must be installed and operated in a
room with the drain
- Never put small appliance, such as microwave
oven; and/or jar cooker, on the machine.
- Keep the machine away from the flaming
equipment, such as candle; cooking stove;
liquefied gas container etc.
- Never put the pressure containers on the machine.
- Never put the machine over the opening of an
uncovered drainage.
●
Clearance requirement
- Install the appliance with easy access to the power
plug and socket.
- Install the appliance where there is enough space
around it.
(a) 3cm or more
above
(b) 5cm or more
behind
(c) 5cm or more on
the left side
(d) 5cm or more on
the right side
(e) 70cm or more
1 CAUTION: Do not let metallic portions of the
appliance come into contact with metal sinks or
other appliances.