~-m.
SF=7750
@ Installthe copier near the wall ouffet.
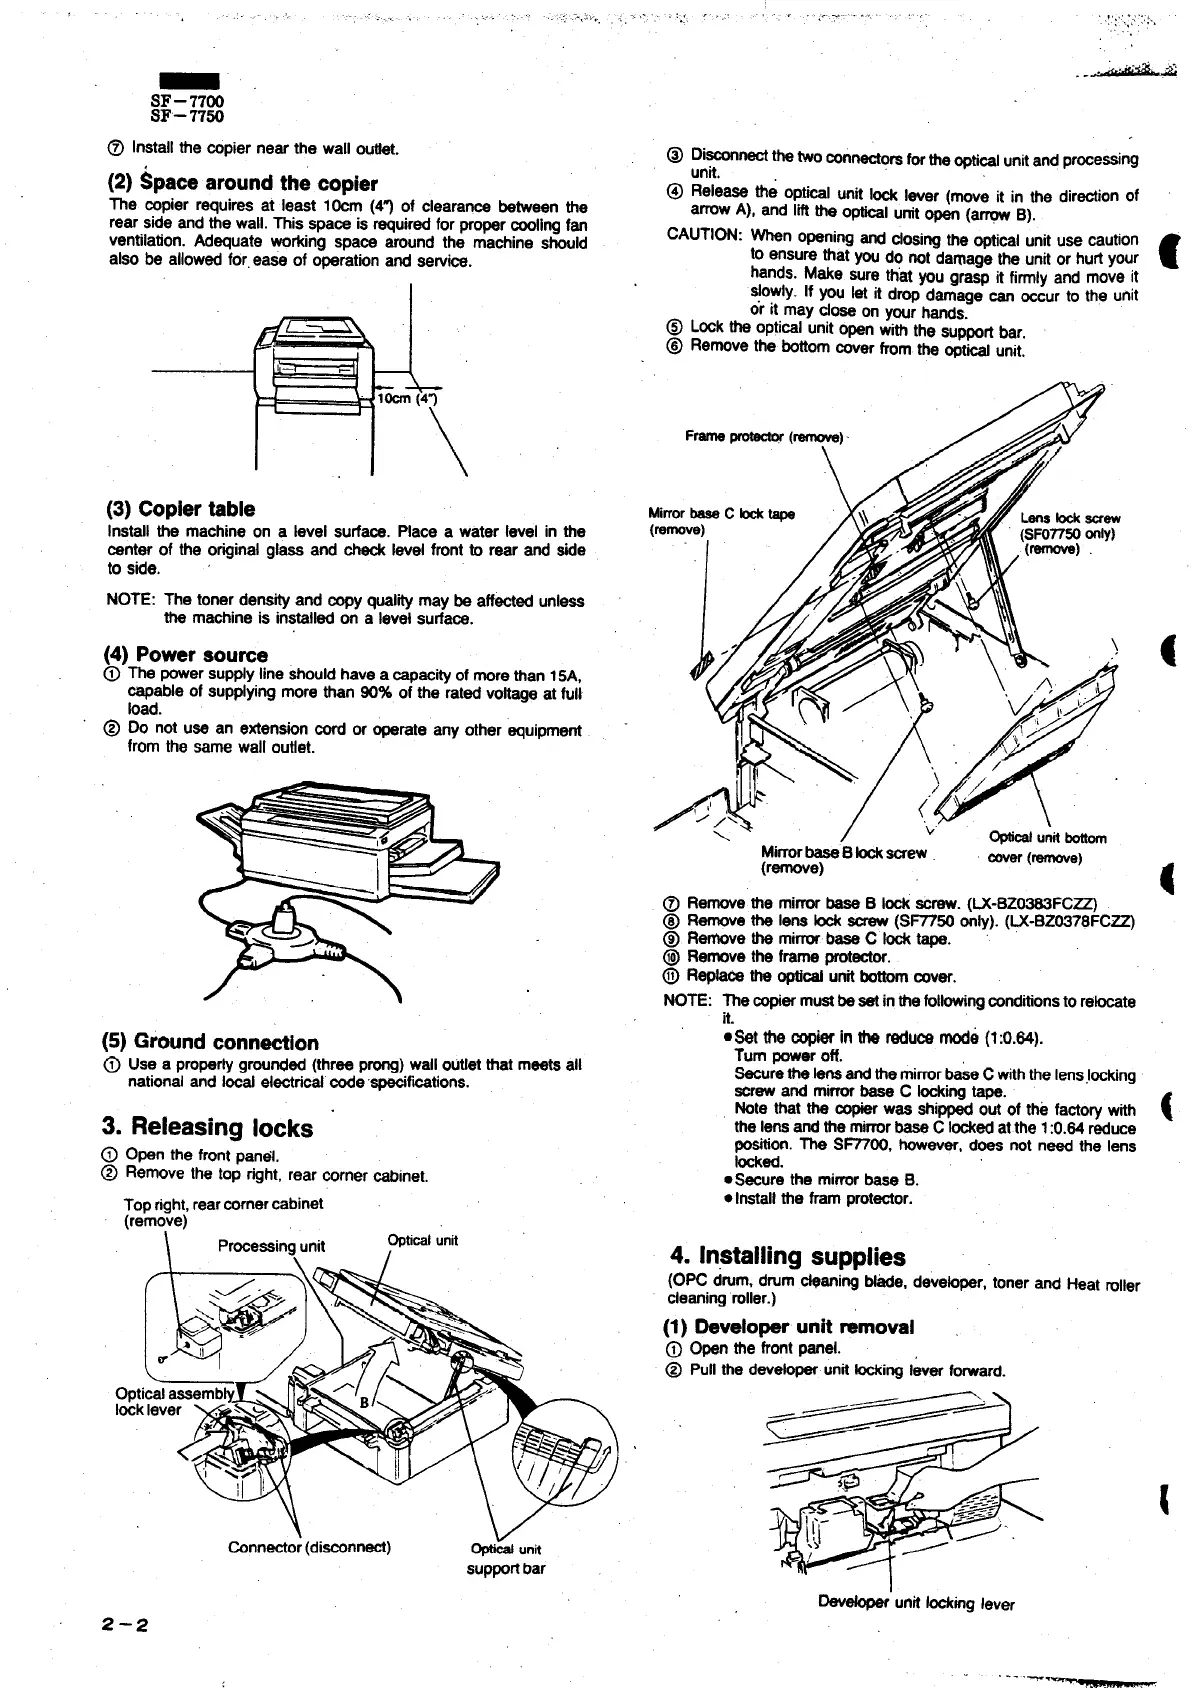
(2) $pace aroundme copier
The mpier requires at least locm (47 of clearance between the
rear side and the wall. This space is requiredforpropercoolingfan
ventilation.Adequate working space around the machine should
also be allowedfor.ease of operationand sewice.
(3) Copiertible
Install the machine on a level surface. Place a water level in the
center of the originalglass and check level frontto rear and side
to stie.
NOTE: The toner densityand copy quafitymaybe affectedunless
the machine is installedon a level surfa~.
(4) Powersoume
@
The powersupplyline shouldhave a~acity of morethan 15A,
capaMe of supplyingmorethan 90% of the rated voftageat full
load.
@ Do not use an etiensfon cord or operate any other ~uipment
from the same wall outiet.
(5) Groundconntiion
@ Use a proper~ grounded(three prong)wdl outietthat meetsall
nationaland loc~ elecfricd’code‘_fmtions.
3. Releasing locks ‘
@ Own the frontpandl.
@ Remove the top right,rear comer ~inet,
Topright,rearcornercabinet
(remove)
\ Processingunit ,
Q-1 unit
Conn@or (di=nnect)
& unit
supportbar
2–2
@ Dimtithetwoconrtectom forthe~ti~i unitand processing
unit.
@ Release the optical unit Id l~er (we it in the directionof
arrowA), and liftthe opticalunftopen (a= B).
CAUTION: Wn opening~ dOSw me ~ical unituse caution
to ensurethat you do not dam~e the unitor hurtyour
c
hands. Make sure ttiat you grasp it firrniyand move it
SiOWiy.[f ~u let it drop d~age ~ aur to the unit
or it may close on yourhands.
@ Lockthe opticalunitopen with the supportbar.
@ Removethe bottomcoverfromthe opw unit.
MirrorbeeeC H ~
(remve)
Y
j“ L
@ Removethe mirrorbase B lock&rew. (W-BZ~FC~
@ Removethe lens fock
screw(SF77W on~). (~-BZW78FC~
@ Re~ve the mim base C W tape.
@ Remove the frame protector.
@ Re- m @- unitbow COVW.
NOTE: The copiermustbesef inthefol~rrg conditionstorehte
it.
●*t the W& in W fadu~ mode (1:0.M).
Turn poweroff.
Sacurethe Iensandthe mirrorbaseC withtheIenslwking
screwand mirrorbase C Ming tape.
Note that the COX was shippedout of the facto~ with
the lensandthe miw base C Wed at the 1:0.84 reduce
position.The S~OO, however,does not need the lens
med.
●Secure the mirrorbase B.
.Irrstall the fram protector.
4. Installing supplies
(OPC drum,drum~aning Ne, deve~r, toner and Heat roller
cleaning‘roller.)
(1) *velo~unR removal
@
Open the frontpanel.
@ Pull the dev@operunitWing lever forward.
Dev*’unif Ming lever