- “-
SF–77W
SF-77m
Mainmotorrotor
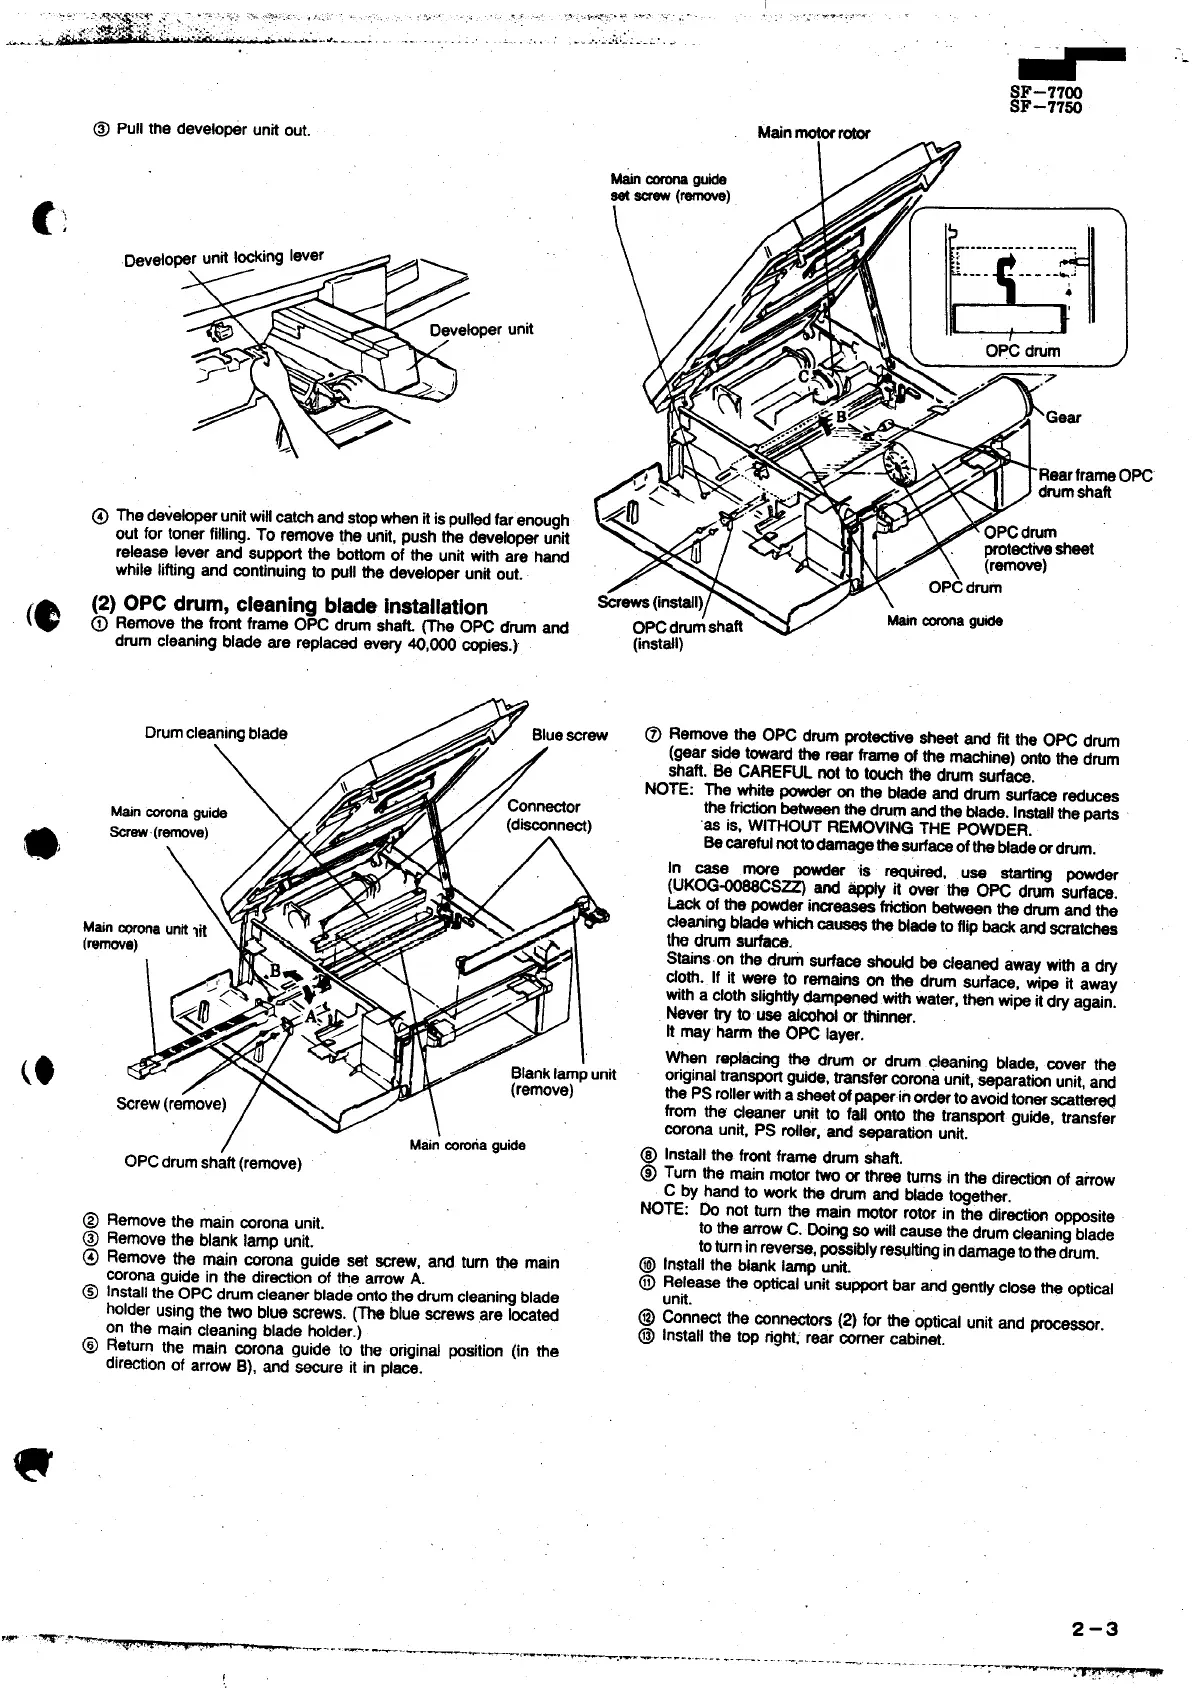
@ Pullthe devebpar unitwt.
1-
‘-””) Y=”
Satscrew(rsrnova
1
t ‘
.
Deve10
per
unit
The devehper unitwiticatchandstopwhenifispulledfarenough
out for toner filling.To removethe unit,pushthe davelo~ unit
release lever and supportthe bottomof the unitwith are hand
while liftingand continuingto pull the developerunit out.
@
(2) OPCdwm, cleaningbladeinstallation
@
Remove the front frame OPC drum shati me OK drumand
drumcleaningblade are replacedevery ~,~ copies.)
(inst@l)
Drumcleaningblade
\
@ Remove the OPC drum protectivesheet and fft the OPC drum
(gear si@ towardthe rear frame of the machine)ontothe drum
shaft, Be CAREFUL not to touchthe drum surfam.
NOTE: The whitepowderon the bfadeand drumsurfacereduces
the frictionbetweenthedrumandthe Made. Instsflthe parts
‘ss is, WITHOUT REMOVING THE POWDER.
Becarafulnottodarrragati~rf~of~ Madeordmm.
In case more powder @ ~uired, use ~ng powder
(UKOGWS~ and ~ it over the OPC dmm sutiaw.
Lack of the powderincr~
frictionbetweenthe drumand the
cleaningMade whichcs~ ~ Nme t. fl@~~ ~ ~at~
tb drumsurfa~.
Stsins.onthe dti surfaceshouti be cleaned away with a dry
cloth. If it ware to remainson the drum sudace, wipe if away
Mth a cloth~ig~y dampenedwithwater,thanwipeitdryagain.
Never try tousa H or thinner.
It may harm the OPC layer.
~en r@a~ng the drum or drum cleaning blade, mer the
originaltranspotiguide,transfercoronaunit,separationunit,and
the PS rollertih asheetofpa~.in Ordertoavoidtonerscatt~~
from the cleaner unit to fal ~~ Me wanspR
gu~e, ~ansfer
coronaunit, PS tiler, and separationunit.
@ Installthe frontframe drum&aft.
@ Turn the mainmotortwoor three turnsin the directionof atiow
C by hand to workthe dmm and fide together.
NOTE: Do not turn the main motorrotorin the dir- opposite
to the arrowC. Doingso till cause the drumcleaningblade
toturninreverse,~ssiblyreWting indamgetothe drum.
@ InStallthe Msnk lamo Mt
//
Connector
(disconnect)
(0
I iy
Blanklarrrpunit
(remove)
‘rew(r’move)/ v\
/
Mai; ~na gutie
OpC drumshaft(remove)
@ Remove the main coronaunit.
@ Remove the blank lamp unit.
@ Remove the main comrra guide set Wrew, and turn @ main
coronaguide in the directionof the arrowA.
@ Installthe OPC drumclesnerblade ontothedrum cleaningblade
holderusingthe two blue screws. (~ blue screwsare located
on the main cleaningblade holder.)
@ Return the main corona guide to the original ~sition (in the
diraotionof arrow B), and secure it in place.
@ ~:~essa the o-l ~nitsupportbar and gentlycIosethe opti~l
@ ~nn~ the connacto~ (2) for the’opticalunitand procs~r.
@ In$talithe top right:rear mrner cabinet.
,W -.m.-:.v~
-.. ...-. --.-.. --—
+--. -,.. .. ....
-.—---.. .-.. ..... -.-—-..
.-.---- ... .
. ... ..=.-. . .-..-—--=:--_
*--m-
2-3