10
SX68JF100
10-1 10-2
NO. Adjustment part Adjusting procedure and conditions Waveform and others
FOCUS ADJUSTMENT
1 Dynamic focus
adjustment
L1680
(in the power
unit)
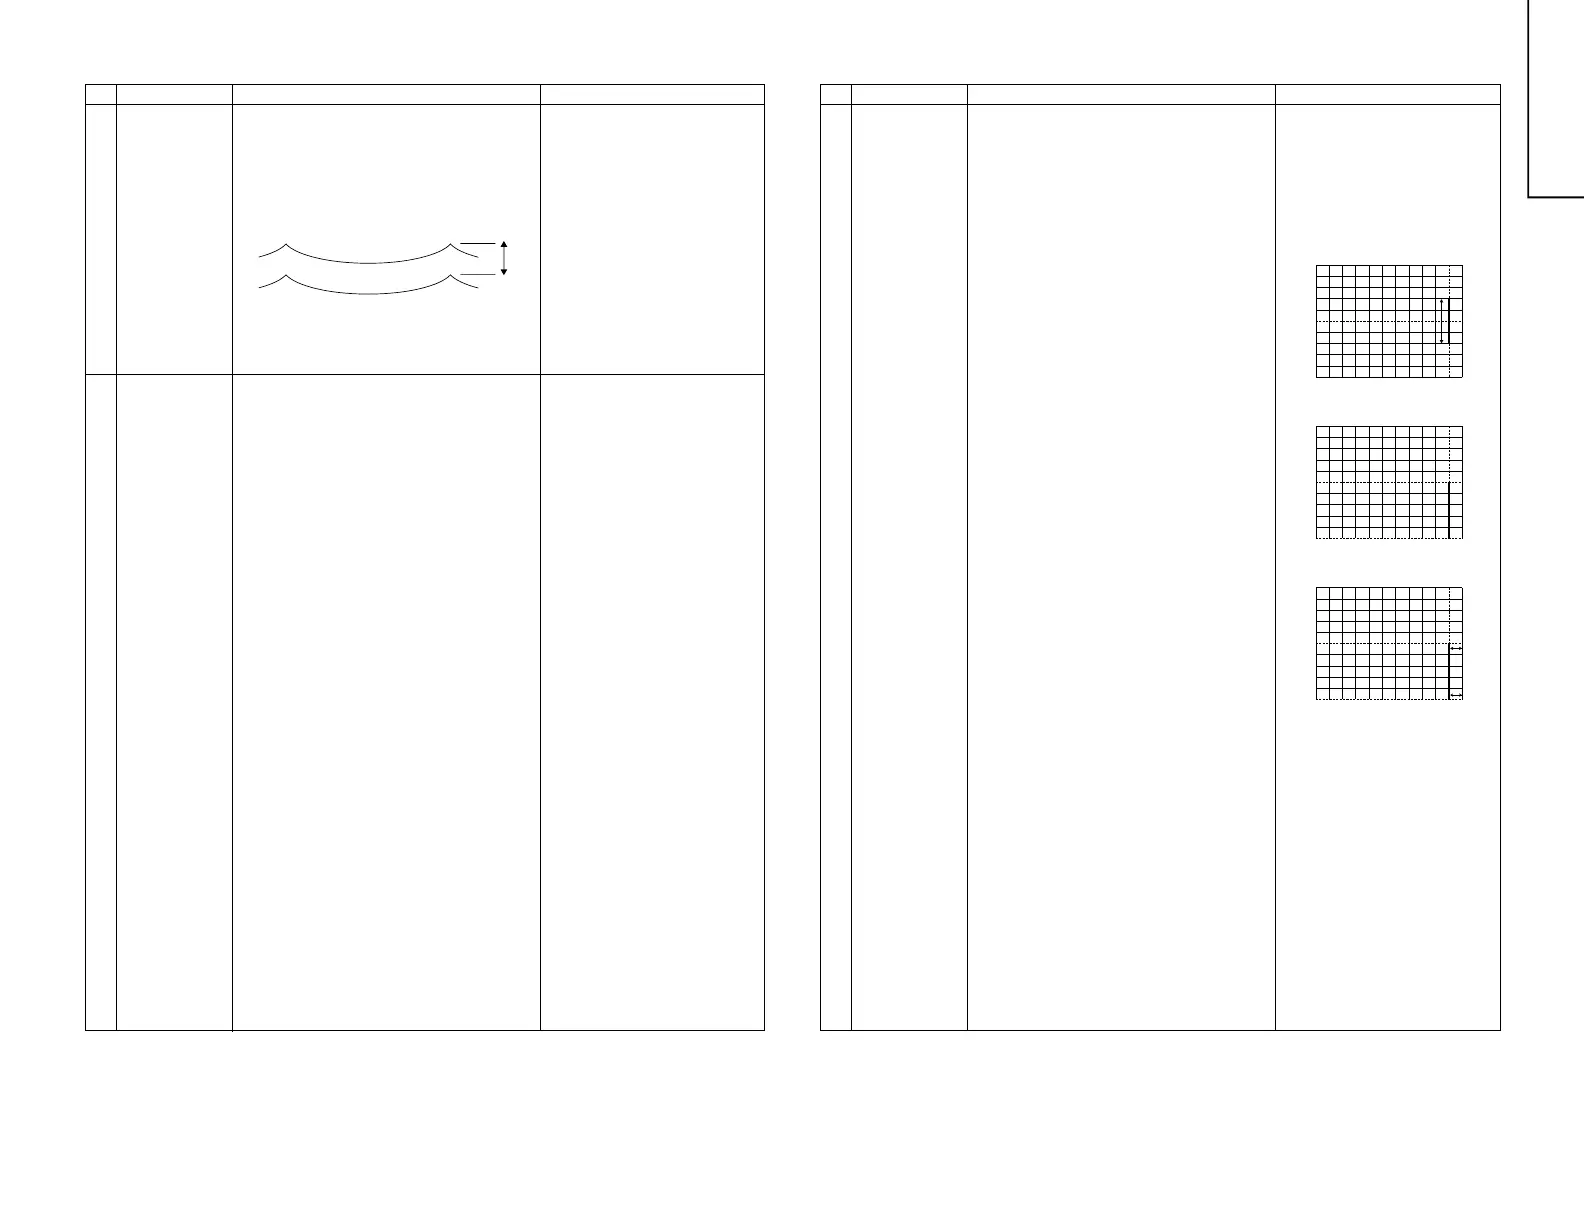
1 Receive E-5CH (Monoscope Pattern).
2 With the remote controller, make it normal.
3 Connect the synchroscope to the eight pins of
T1680.
4 Turning L1680, adjust the amplitude of the hori-
zontal frequency waveform to 600Vp-p.
2 Focus
adjustment
FBT FOCUS-VR
(in the power
unit)
1 Receive E-5CH (Monoscope Pattern).
2 With the remote controller, make the image
normal.
3 Adjust the focus VR-1 to make the horizontal
line around character “325” at left-top position
as fine as possible.
4 Adjust the focus VR-2 to make the vertical line
around character “325” at left-top position as
fine as possible.
5 Repeat Items 3 and 4 once again, adjust the
focus.
600 ± 20Vp-p
NO. Adjustment part Adjusting procedure and conditions Waveform and others
HORIZONTAL/VERTICAL CIRCUIT ADJUSTMENT
1 Main screen
adjustment
V-AMP50
V-LINE50
V-S-CORR50
V-CENT50
H-CENT50
H-SIZE50
E/W-PAR
EW-COR
TRAPE
V-COM
H-COM
V-BIAS
V- COR
OTHER
I
2
C BUS
adjustment
Adjust the overscan to 8.5%. (E-5)
Adjust the linearity to the best.
Already preset. (Adjust this unless the linearity
is achieved.)
Align the center of the screen to the geometric
center of CRT. (E-5)
Align the center of the screen to the geometric
center of CRT. (E-5)
Adjust the overscan to 8.5%. (E-5)
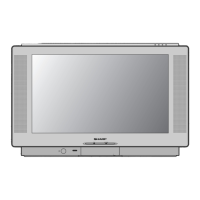
Look at the first vertical line from the right end of
the crosshatch pattern. Adjust the data so that
the four cells just on the left of this vertical line be
straight down. (Fig. 10) (E-2)
Look at the first vertical line from the right end of
the crosshatch pattern. Adjust the data so that
the lower half of this vertical line be straight down.
(Fig. 11) (E-2)
Look at the first vertical line from the right end of
the crosshatch pattern. Adjust the data so that
the distance D1 (between the first line's center
and the screen edge) and the distance D2 (be-
tween the first line's bottom and the screen edge)
be the same. (Fig. 12) (E-2)
Already preset. (Adjust if the quality is specially
poor.)
Already preset. (Adjust if the quality is specially
poor.)
Already preset. (Adjust if the quality is specially
poor.)
Already preset. (Adjust if the quality is specially
poor.)
On the items of V-AMP60, V-LINE60, V S-CORR60,
V-CENT60, H-CENT60 and H-SIZE60, the compen-
sation data is automatically input if the 50Hz mode
adjustment is
done.
The receiving channel in ( ) are
the following signals.
(E-2): Crosshatch (50Hz)
(E-5): Monoscope (50Hz)
However, if it is largely deviated
when it is checked in the 60Hz
mode, readjust it in the 60Hz mode.
D2
D1
Fig. 10
Fig. 11
Fig. 12