EasyManua.ls Logo

Sharp VL-PD3S

Sharp VL-PD3S
152 pages
To Next Page IconTo Next Page
Loading...
VL-PD3S/H/E
VL-PD3S/H/E
SERVICE MANUAL
LIQUID CRYSTAL DIGITAL CAMCORDER
PAL
In the interests of user-safety (Required by safety regula-
tions in some countries) the set should be restored to its
original condition and only parts identical to those specified
be used.
S19B2VL-PD3S/
LIQUID CRYSTAL DIGITAL CAMCORDER PAL
MODELS
MODELS VL-PD3S/H/E
SERVICE MANUAL
Page
1. SPECIFICATIONS ........................................................................................................................... 1-1
2. PART NAMES.................................................................................................................................. 2-1
3. DISASSEMBLY OF THE SET .........................................................................................................3-1
4. MECHANISM ADJUSTMENT JIGS AND PARTS ...........................................................................4-1
5. INSPECTION AND MAINTENANCE
ITEMS AND INTERVALS ................................................................................................................5-1
6. MECHANICAL ADJUSTMENTS AND CHECKS .............................................................................6-1
7. TAPE RUNNING ADJUSTMENT.....................................................................................................7-1
8. MECHANICAL SECTION ASSEMBLY AND PARTS REPLACEMENT
(DISASSEMBLY AND REASSENBLY)...........................................................................................8-1
9. ADJUSTING THE ELECTRICAL CIRCUITS ...................................................................................9-1
10.USEFUL TIPS ................................................................................................................................ 10-1
11.SIGNAL FLOW DIAGRAMS ..........................................................................................................11-1
12.BLOCK DIAGRAMS ...................................................................................................................... 12-1
13.SCHEMATIC DIAGRAMS ..............................................................................................................13-1
14.SEMICONDUCTOR LEAD IDENTIFICATION ...............................................................................14-1
15.PRINTED WIRING BOARD ASSEMBLIES ...................................................................................15-1
16.REPLACEMENT PARTS LIST.......................................................................................................16-1
17.PACKING OF THE SET................................................................................................................. 17-1
SHARP CORPORATION
CONTENTS
VL-PD3S/H/E
VL-PD3S/H/E
Question and Answer IconNeed help?

Do you have a question about the Sharp VL-PD3S and is the answer not in the manual?

Sharp VL-PD3S Specifications

General IconGeneral
Camcorder Media TypeMiniDV
Image SensorCCD
Optical Zoom10x
Digital Zoom500x
Image StabilizerElectronic
MicrophoneBuilt-in
ViewfinderColor
LCD Screen2.5 inches
Audio FormatStereo

Summary

1. Specifications

2. Part Names

Front View

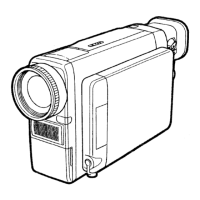
Illustrates and labels components on the front of the camcorder.

Right View

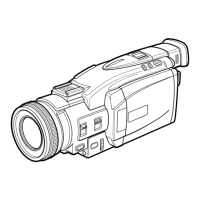
Illustrates and labels components on the right side of the camcorder.

Bottom View

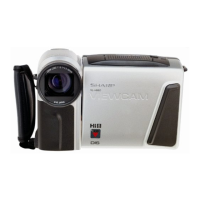
Illustrates and labels components on the bottom of the camcorder.

Camera Mode Controls

Labels controls related to the camera operation mode.

VCR Mode Controls

Labels controls related to the VCR operation mode.

3. Disassembly of the Set

4. Mechanism Adjustment Jigs and Parts

4-1. Mechanism Check Adjustment Jigs

Lists and describes specialized tools for mechanism adjustment and checks.

4-2. Parts for Regular Periodic Inspection and Maintenance

Lists consumables and parts needed for routine inspection and maintenance.

5. Inspection and Maintenance

5-1. List of Inspection and Maintenance Items

Details inspection and maintenance tasks based on usage hours and symptoms.

5-2. Precautions

Provides essential safety and handling precautions for maintenance procedures.

6. Mechanical Adjustments and Checks

6-1. Checking the Playback (Recording) Winding Torque

Procedure to check and adjust winding torque in record/playback mode.

6-2. Checking the Rewinding Playback (VS-REW) Winding Torque

Procedure to check and adjust winding torque in VS-REW mode.

6-3. Checking of Reel Base Height

Procedure to check and adjust reel base height using a master plane.

7. Tape Running Adjustment

7-1. Adjustment Locations

Identifies specific parts and locations requiring tape running adjustment.

7-2. Running Height Adjustment

Details how to adjust the height of T roller or Tu guide for proper tape running.

7-3. Preparation for Tape Running Adjustment

Outlines necessary preparations, tools, and initial setup for tape running adjustments.

8. Mechanical Section Assembly and Parts Replacement

8-1. On the Mechanical Modes

Explains how to operate the mechanism in different modes (EJECT, STANDBY, LOADING, REWINDING).

8-2. Cassette Controller Assembly

Instructions for removing and installing the cassette controller assembly.

8-3. How to Operate with the Circuit Board Without the Cassette Controller Assembly

Procedures for operating the unit without the cassette controller, with safety warnings.

9. Adjusting the Electrical Circuits

Before Starting the Electric Circuit Adjustment

Important precautions and notes before commencing electrical circuit adjustments.

Chip ID as per Digital Interface IEEE1394 Standard

Information on the IEEE1394 standard and specific ID numbers for digital interface.

Writing a Chip ID Number as per Digital Interface IEEE1394 Standard

Step-by-step guide to writing a Chip ID number using the service manual.

10. Useful Tips

11. Signal Flow Diagrams

11-1. EE Mode Flow (Video)

Illustrates the signal path for video in EE mode, including waveform diagrams.

11-2. Flow in Rec Mode (Video)

Shows the video signal flow during recording, with associated waveforms.

12. Block Diagrams

12-1. System Block Diagram

High-level overview of the camcorder's system architecture and component connections.

12-2. Camera Section Block Diagram

Detailed block diagram of the camera section's internal components and signals.

13. Schematic Diagrams

13-1. Overall Schematic Diagram

The main schematic diagram providing an overview of circuit connections.

13-2. Audio IO Circuit Schematic Diagram

Schematic diagram detailing the audio input/output circuitry.

15. Printed Wiring Board Assemblies

MAIN1 P.W.B. Wiring Side SIDE A

Shows the wiring layout on the component side of the Main1 PWB.

MAIN2 P.W.B. Component Side SIDE A

Illustrates component placement on the component side of the Main2 PWB.

LCD P.W.B. Component Side SIDE A

Shows component layout on the component side of the LCD PWB.

16. Replacement Parts ListExploded Views

Electrical Parts List

Lists electrical components including ICs, transistors, diodes, and packaged circuits.

Printed Wiring Board Assemblies

Lists the part numbers for various PWB assemblies.

Integrated Circuits

Detailed list of integrated circuits, their part numbers, and descriptions.

17. Packing of the Set

Related product manuals