EasyManua.ls Logo

Shop fox W1676 - User Manual

Shop fox W1676
39 pages
Print Icon
To Next Page IconTo Next Page
Loading...
Model W1676
COMBINATION SANDER
MANUAL UPDATE
This update covers changes made to the machine after the owner's manual was printed. All page number
references refer to the owner's manual for this machine. Keep this update with your owner's manual for
future reference.
If you have questions, contact Tech Support at (360) 734-3482 or by email at
tech_support@shopfox.biz
.
COPYRIGHT © MARCH, 2008 BY WOODSTOCK INTERNATIONAL, INC.
WARNING: NO PORTION OF THIS MANUAL MAY BE REPRODUCED IN ANY SHAPE OR FORM WITHOUT
THE WRITTEN APPROVAL OF WOODSTOCK INTERNATIONAL, INC.
Printed in Taiwan#10609BL
What Changed?
We added a sleeve guard to the sander to help
reduce the risk of entanglement. The sleeve
guard MUST be installed on the idler roller
guard, using the included lock knobs and flat
washers, as shown in Figure
1.
Install the idler roller guard and sleeve guard
onto the idler roller after belt tension and track
-
ing are properly set, as described in the Model
W1676 Manual on Pages 18 & 19
.
Figure 1. Installing sleeve guard.
Machine Inventory (See Page 11)
The following items have been added. Refer to
the full manual for a description of all other
inventory components.
Box Contents
: Qty
A. Sleeve Guard .................................. 1
B. Lock Knobs ..................................... 2
C. Flat Washers #10 .............................. 2
New Sleeve Guard Parts
REF PART# DESCRIPTION
114A X1676114A IDLERROLLERGUARDV2.03.08
114A-1 X1676114A-1 SLEEVE
GUARD
128 X1676128 LOCK
KNOB
129 PW03 FLAT
WASHER#10






Figure 2. New sleeve guard parts.
Lock Knob
Sleeve Guard
Idler Roller
Guard
#10 Flat
Washer
Question and Answer IconNeed help?

Do you have a question about the Shop fox W1676 and is the answer not in the manual?

Summary

Model W1676 Combination Sander Manual Update

What Changed?

Explains the addition of a sleeve guard for safety and reduced entanglement risk.

Safety First!

Additional Safety Instructions For Sanders

Electrical Requirements and Safety

110 V Operation

Details electrical setup, circuit breaker recommendations, and motor load for 110V.

Grounding Procedures

Explains the importance and method of proper electrical grounding.

220 V Operation and Electrical Safety

220 V Grounding

Grounding requirements and considerations for 220V operation.

Avoiding Potential Injuries

Assembly Instructions: Unpacking

Sanding Unit Installation

Sanding Unit To Base

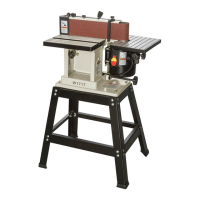
Guides mounting the sanding unit onto the steel stand using hardware.

Table and Quick Release Setup

Working Table Installation

Guides positioning and securing the working table to the sander base.

Adjustments Overview

Belt Tracking and Tension

Adjusting Belt Tracking

Steps for aligning the sanding belt using the tracking knob.

Belt Tension Adjustment

Adjusting Belt Tension

Steps for setting the correct belt tension using eccentric bolts.

Vertical Positioning Adjustments

Belt Sander Arm Vertical Adjustment

Steps to orient the belt sander arm into a vertical position.

Changing Abrasive Disc

Replacing the Sanding Disc

Detailed procedure for removing and applying a new abrasive disc.

Table Tilt Adjustment

Operations: Testing and Initial Run

Sanding Operations

Disc Sanding Operations

Closure, Support, and Safety Reminders

Final Safety Reminders

Reinforces crucial safety precautions for operating the sander.

Wiring Diagrams

110 Volt Wiring Diagram

Diagram illustrating the electrical connection for 110V operation.

220 Volt Wiring Diagram

Diagram illustrating the electrical connection for 220V operation.

Parts List Reference

Component Reference Numbers

Lists all parts with their reference numbers, part numbers, and descriptions.

Shop fox W1676 Specifications

General IconGeneral
BrandShop fox
ModelW1676
CategorySander
LanguageEnglish

Related product manuals