The Footrest: The footrest is located at the end of the carriage. It provides a surface to rest an uninvolved foot and prevents
the body from sliding on the carriage during plyometrics.
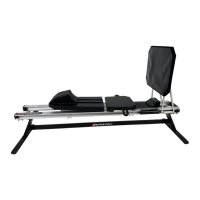
Adjusting the Backrest: The backrest adjusts to supine, 15°, and 30°. To adjust the backrest to 15° or 30°, pull up on the
backrest and locate the desired plate depending on its label. Attached to each tilt plate is an operational strap at the tilt
plate brace near the top of the backrest. These straps have a small grip that can be easily pulled through the brace. As you
pull the chosen strap away from the backrest, the tilt plate will rise into place and the backrest will lower into place,
allowing the tilt plate to catch the brace. To ensure the tilt plate sits snug against the brace, pull the connected strap taut
and latch onto the velcro loop on the back of the carriage.
Warning! Never attempt to adjust the backrest when the machine is in use.
Adjusting the ROM Control: At the head-end of the carriage is a ROM control (Clinical & Clinical Plus models). To adjust the
ROM control, release the silver handle and move to the desired position in the rails. Make sure to secure the ROM control
handle into place before operating the machine. Moving the ROM control down the head-end of rails draws the carriage
head-ward up the rails. This adjustment will decrease the angle of the user.
Warning! Never attempt to move the ROM control rope while the Elasticords are attached or the machine is in use, as it
may move too quickly to control.
Adjusting the Wobble Board: The wobble board (Clinical & Clinical Plus) can be adjusted to three different heights on the
kickplate. This can be done by lifting up on the red wobble board with one hand and holding the wobble board hanger
down onto the kickplate. Once detached from the hanger, reattach the wobble board to any of the three slots in the
hanger, making sure that the bolton the back of the wobble board is secured in the hanger slot.
Warning! Never attempt to adjust the wobble board when the machine is in use. Never attempt to remove or attach the
wobble board to the kickplate.