8 -
TRI
18) Rimontare il coperchio della pedaliera di gonfiaggio.
19) Unire tra di loro i tubi pneumatici di collegamento alla pe-
daliera, utilizzando le fascette fornite nel kit, in modo che non
costituiscano intralcio durante l'uso dello smontagomme.
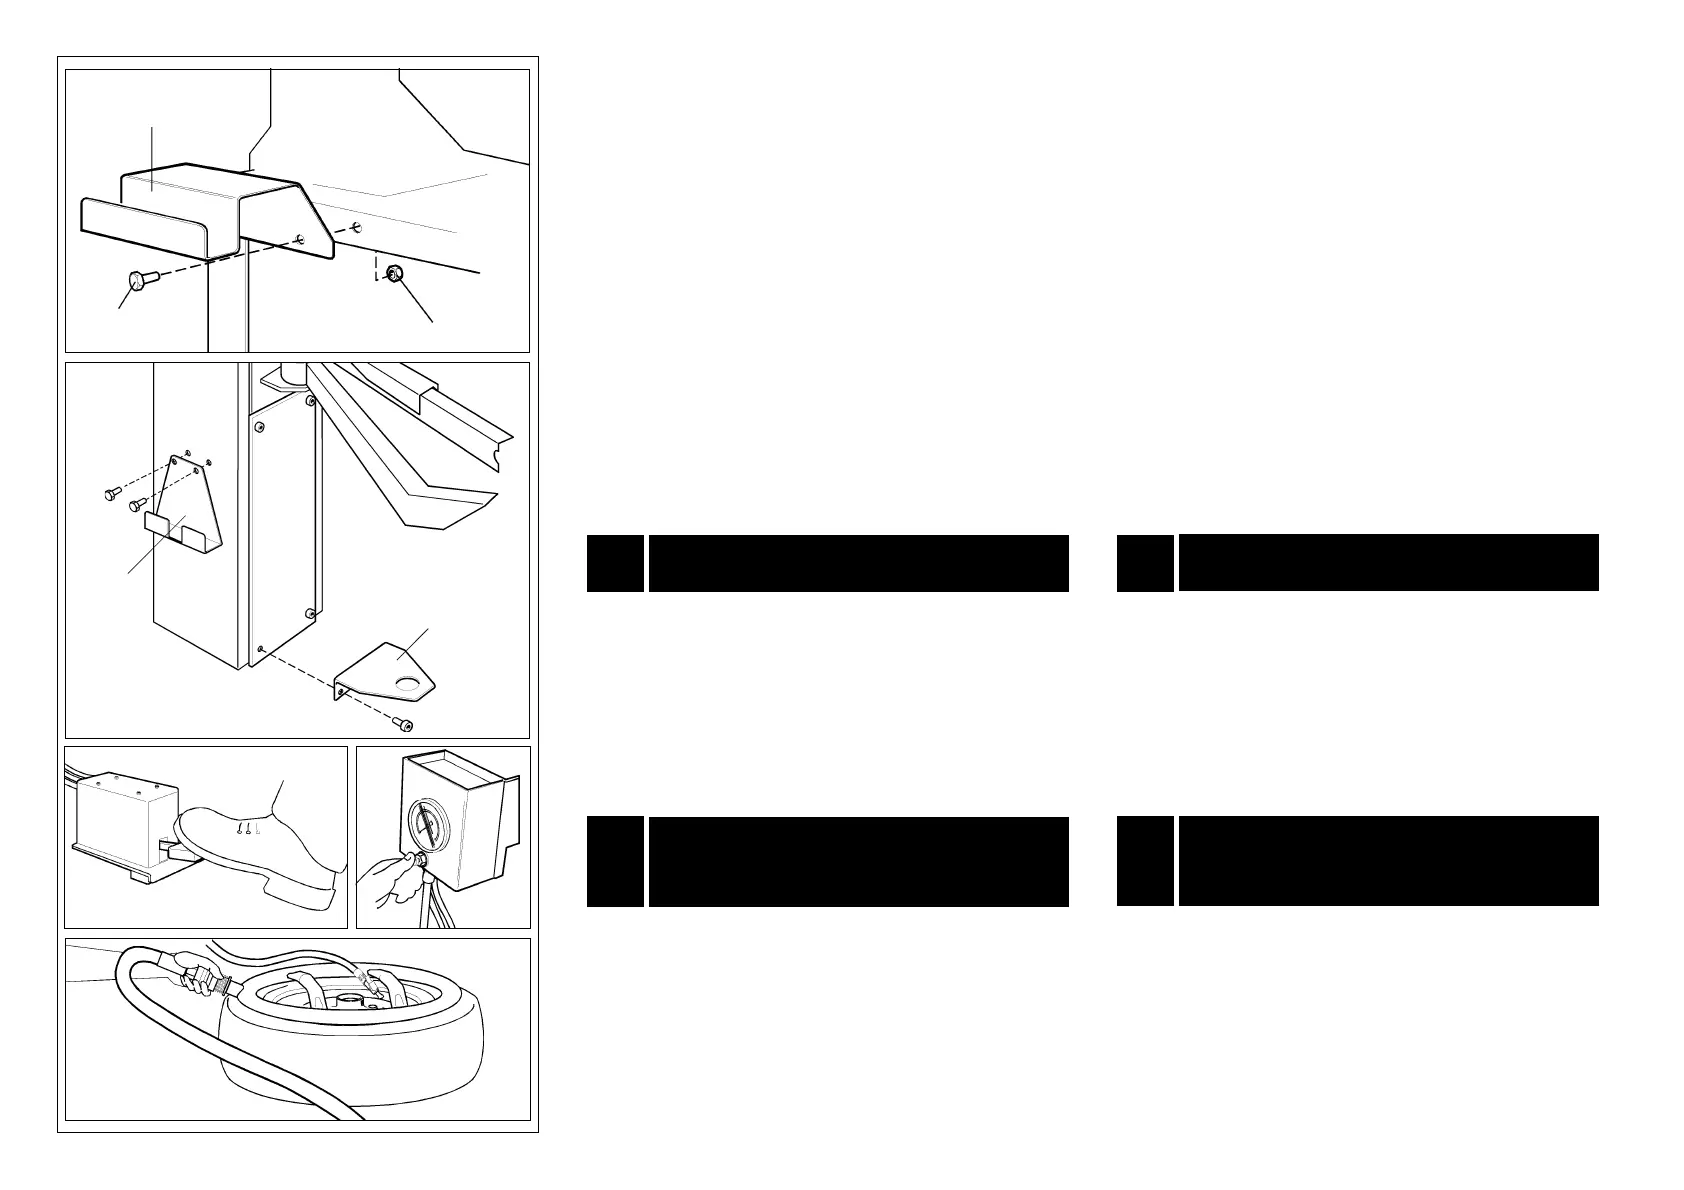
20) Posizionare la staffa di supporto anello (31, Fig. G) in corri-
spondenza degli appositi fori sulla carcassa (vedi Fig. G) e fis-
sarla tramite le viti M 10 x 20 (32, Fig. G) e i dadi M 10 (33, Fig. G)
forniti nel kit.
N.B.: Per smontagomme con montato l'accessorio PT 95 è ne-
cessario disporre dell'apposito kit TRI/PT95 da installare nel modo
seguente:
a) Rimuovere dal PT 95 la staffa portacono e montare al suo
posto la staffa di supporto anello (35, Fig. H) fornita nel kit TRI/
PT95, utilizzando gli stessi fori e le stesse viti di fissaggio.
b) Montare la nuova staffa portacono (34, Fig. H), fornita nel kit
TRI/PT95, nella parte anteriore del PT95 utilizzando i due fori di
fissaggio carter come mostrato in Fig. H.
21) Rimontare la fiancata sinistra dello smontagomme.
1) Azionare il pedale di gonfiaggio: dalla testina di gonfiaggio
deve uscire aria.
2) Avendo cura di tenere ben saldo in mano l'anello di gonfiag-
gio e di non orientare i fori verso il proprio corpo, azionare la
valvola di gonfiaggio: un forte getto d'aria deve uscire dai fori.
3) Collegare la testina di gonfiaggio alla valvola di una ruota
gonfia.Il manometro indicherà la pressione presente nel pneu-
matico. Premere il pulsante di sgonfiaggio: la pressione deve
iniziare a scendere. Rilasciando il pulsante si potrà leggere sul
manometro la pressione ora presente nel pneumatico.
1) Press the inflating pedal. The inflating head should give air.
2) Make sure you hold the inflation ring firmly in position and
check to make sure the air blasts are not aimed towards your
body. Now turn the inflation valve and a power blast of air
should come out of the holes on the ring.
3) Connect the inflator chuck to the valve of an inflated tyre.
The manometer will read the pressure in the tyre.
Push the deflating button: pressure should fall.
Release the button and read the pressure in the tyre indicated
in the manometer.
CONTROLLO CORRETTO
FUNZIONAMENTO
5
5
CORRECT OPERATION
CHECKS
Sul dispositivo TRI sono presenti:
- un pedale di gonfiaggio (Fig. I). Consente di gonfiare i pneu-
matici fino al valore desiderato (la pressione viene visualizzata
dal manometro posto sull'unità di gonfiaggio).
- un pulsante di sgonfiaggio (Fig. L). Consente di sgonfiare i
pneumatici se la pressione supera il valore desiderato.
- una valvola di gonfiaggio (Fig. M). Comanda l'uscita di un
forte getto d'aria (BLAST) dai fori posti sull'anello consentendo
la tallonatura dei pneumatici tubeless.
IDENTIFICAZIONE DEI COMANDI
4
IDENTIFYING CONTROLS
4
31
32
33
G
H
34
35
L
I
M
18) Replace the cover on the inflation pedal unit.
19) Join the two hoses connecting to the pedal unit using the
hose clamps in the installation kit to prevent them getting in
the way when the tyre changer is in used.
20) Position the inflating ring holder bracket (31, Fig. G) at the
pre-drilled holes in the cabinet (See Fig. G) and fix it with the
M10x20 screws (32, Fig. G) and M 10 nuts (33, Fig. G) from the
installation kit.
NB: If the PT 95 accessory has been installed on the tyre changer,
you will need the requisite TRI/PT95 kit.
Follow theses steps:
a) Remove the cone holder rod from the PT 95 and in its place
install the inflation ring holder bracket (35, Fig. H) in the TRI/PT95
kit. Use the same holes and the same fixing screws.
b) Install the new cone holder rod (34, Fig. H) in the TRI/PT95 kit
on the front of the PT95 using the two casing fixing holes as
shown in Fig. H.
21) Reposition and fix the left side panel on the tyre changer.
The TRI inflation device has the following controls:
- inflating pedal (Fig. I). This permits the tyre to be inflated to
the required pressure (shown on the gauge on the inflating de-
vice).
- a deflating button (Fig. L). This permits the tyre to be deflated
if the pressure exceeds the set level.
- an inflating valve (Fig. M). This controls a blast of air from the
holes in the inflation ring to help bead seating of tubeless tyres.
 Loading...