DEVICE PROGRAMMING UNIT USER’S MANUAL | CHAPTER 2
18 PROGRAMMING
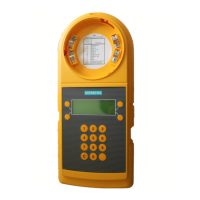
• Connect the device programming cable to the
device to be programmed. (Refer to Figure 2, pages
10-11.) When the DPU has detected the device, the
display will appear similar to the following:
DUAL TRI AL/AL NO/NO
LOOP=012 ADDRESS=41
SETTINGS>
<EXIT PROGRAM>
The top line indicates the device type, the device
usages and the contact state of the inputs. The next
line shows the loop number and the address that
the device will be set to. The TRI-D requires two
consecutive addresses. The lower address will
appear on the screen first; scroll to the higher
address using the NEXT button.
• To change the contact state of the input, the device
usage, the loop number, or the address to which
the device will be set, press the SETTINGS button.
The DPU will show a display similar to the following:
DUAL TRI AL/AL NO/NO
LOOP=012 ADDRESS=41
<LOOP ADDRESS>
<EXIT NEXT>
Press the LOOP or ADDRESS button to move the
cursor over the loop or address number, then use
the keypad to set the number.
The loop number will appear only if the DPU has been
configured for label printing.
Press EXIT to return to the previous Menu.
• To continue changing other settings press NEXT.
The DPU display will appear similar to the following:
TRI-D #1 N/O ALARM
LOOP=012 ADDRESS=41
<TROUBLE N/C>
<EXIT NEXT>