Dyna-Flo Control Valve Services Ltd.
Phone: 780 • 469 • 4000 | Toll Free: 1 • 866 • 396 • 2356 | www.dynafl o.com
P-PS2Q0619A
33
FUNCTIONAL UPGRADE
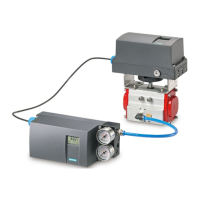
SIEMENS ______________________________________ A5E00201583-02
Functional Upgrade of the SIPART PS2 Electropneumatic Positioner
Dear Customer,
As you may already be aware, the SIPART PS2 Electropneumatic Positioner has a
Sliding Clutch and a switchable Transmission and so can be used universally on
Part-Turn and Linear actuators. This means that the Zero Point on Part-Turn actuators
is not an important consideration, nor is a symmetrical mounting necessary on
linear actuators, as the working range of the positioner can be adjusted at any
time with the help of the Sliding Clutch. The switchable Transmission also enables
you to adjust the positioner to smaller or larger strokes.
Every now and then in the harsh conditions of the process industry the SIPART
PS2 is exposed to extreme acceleration of the valve position (for example when a
wrongly applied or open valve is upstream in the process or from steam pockets)
which exceed the specifi ed load limits of the PS2. This could result in an unwanted
adjustment of the Sliding Clutch or mis-detection of the Gear Ratio position.
For this reason the SIPART PS2 positioner is now equipped with a locking
mechanism for the sliding clutch as standard. You are also now able to lock the
Gear Ratio switch to prevent mis-detection of the position as detailed above.
Both of these locking options are labeled via additional tags inside the device
as detailed in Figures 15 & 16. Please note that these locks are only required if
extreme acceleration (as in the above examples) or strong vibration might be
present within your process.
Procedure
After Mounting and Start Up (including setup) of the PS2 the Sliding Clutch torque
(Figures 15 & 16) can be set as follows:
• Stick a conventional fl at headed screwdriver (approx. 4mm wide) into one of
the slots on the yellow wheel within the unit (Sliding Clutch Lock).
• Turn the yellow wheel to the left with the screwdriver until you hear it “snap”
in. This increases the torque of the Sliding Clutch.
• When the Sliding Clutch is locked into place there should be a gap of
approximately 1mm between the yellow and black wheels within the unit.
• If you have to make a Zero Point Setting, e.g. after changing the drive, the
torque on the sliding clutch must fi rst be reduced by turning the yellow
wheel (Sliding Clutch Lock) as far to the right as it will go. After setting the
Zero Point, you can lock the Sliding Clutch as described above.