11
GB
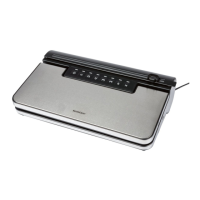
positioned just before the rear reference
ridges|11 and the side reference ridg-
es|13.
4. Ensure again that there are no creases
in the film bag - especially in the area
above the welding wire|15.
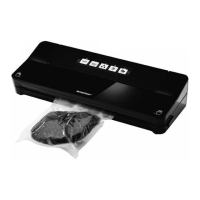
5. Close the lid|10.
6. Use both hands to press firmly on the
edges of the lid|10. They must audibly
click into place.
7. Press the button |3. The LED lights
up. The film bag is first vacuum-packed
and then sealed.
The LED goes out when the process is
complete.
NOTE: if the LED|3 does not go out and the
noise of the vacuum pump does not stop, de-
spite the fact that no further air is being
sucked out of the film bag, cancel the pro-
cess. Check that the film bag is in the correct
position in the device, and check for leaks.
8. Simultaneously, press buttons|7 in order
to release the lock of the lid|10.
9. Open the lid|10 and remove the bag.
10.Check the welding seam. It should be a
smooth creaseless seam.
9. Cleaning and storage
DANGER! Risk of injury
through burning/scalding!
~ Allow the device to cool down com-
pletely before you clean it or put it
away.
~ The welding wire|15 becomes very hot
during operation. Do not touch the hot
welding wire|15.
DANGER! Risk of electric
shock!
~ Prior to cleaning, disconnect the mains
plug|4 of the device.
DANGER! Risk of electric
shock due to moisture!
~ The device and the power cable with
mains plug|4 must not be immersed in
water or other liquids.
WARNING! Risk of material dam-
age!
~ Do not use any sharp or abrasive clean-
ing agents.
9.1 Cleaning
In order to ensure the proper function and
the full capacity of your device, clean it reg-
ularly.
• Wipe down the housing of the device
with a damp cloth.
• Prior to the next use, the device must be
completely dry.
Collector
1. Grasp the centre or both outer ridges
with your fingers and carefully lift the
collector for liquids|16 out upwards.
2. Drain the liquid.
3. Rinse the collector|16 under warm dish-
water or place it in the dishwasher.
Make sure it is dry before inserting it.

 Loading...