EN
6
Vibration Hazards
Exposure to vibration can cause disabling damage to the nerves and blood supply of the hands
and arms. Not all vibration hazards can be eliminated by tool design or construction, and some
residual risks remain. Check the vibration-emission value (obtained using ISO 28927-3) shown in
thespecicationtable.Ensuretheriskitrepresentsisassessedandmanaged.Iftheriskcannotbe
managed so that it falls within acceptable limits, then do not use the tool.
Takethefollowingstepstoreduceriskofvibration-relatedinjury:
a) Wear warm clothing when working in cold conditions. Keep hands warm and dry.
b) Ifnumbness,tingling,painorwhiteningoftheskinofngersorhandsisexperienced,stop
usingthetool,informemployer(whereappropriate)andconsultaqualiedhealthprofessional.
c) Operate and maintain the tool as recommended in the instructions to prevent an unnecessary
increase in vibration levels.
d) Where appropriate, support the weight of the tool in a stand, tensioner or balancer.
e) The risk from vibration is generally greater when the grip force is higher. Hold the tool with a
light but safe grip, taking account of the required hand reaction forces.
f) Ensure the tool and accessories are properly mounted and in good repair: improperly mounted
or damaged tools can cause excessive vibration.
g) Do not allow the inserted tool to chatter on the workpiece, as this is likely to cause a substantial
increase in vibration.
h) Select, maintain and replace the consumable/inserted tool as recommended in the instructions
handbook to prevent an unnecessary increase in vibration levels.
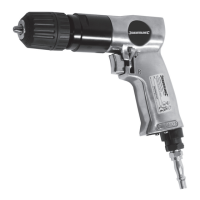
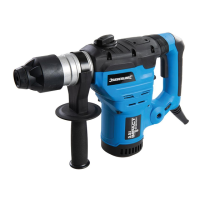
1. Chuck
2. Handle
3. Air Inlet
4. Quick Connector
5. Forward/Reverse Lever
6. Trigger
Product Familiarisation
Intended Use
Single speed drill, powered by compressed air from a compressor, with forward/reverse function.
Uses drill bits and other compatible accessories with a shaft diameter up to 10mm.
This air drill does not feature a torque clutch and must therefore not be used for screw driving or
similar applications. Not intended for commercial use.
The tool must ONLY be used for its intended purpose. Any use other than those mentioned in this
manual will be considered a case of misuse. The operator, and not the manufacturer, shall be liable
foranydamageorinjuryresultingfromsuchcasesofmisuse.Themanufacturershallnotbeliable
foranymodicationsmadetothetool,norforanydamageresultingfromsuchmodications.
Unpacking Your Tool
• Carefully unpack and inspect your tool. Fully familiarise yourself with all its features and
functions
• Ensure that all parts of the tool are present and in good condition. If any parts are missing or
damaged, have such parts replaced before attempting to use this tool
Before Use
WARNING:Alwaysdisconnectthetoolfromtheairsupplybeforeadjustmentormaintenance
is carried out.
Fitting the quick connector
This tool is supplied with two different male airline quick connectors (Fig. I):
EQ-4 – commonly used in Europe
EN-6 – mainly used in the UK
• Please choose the connector that is compatible with the airline system you are using, and install
as outlined below:
1. Apply some PTFE tape (not included) to the screw threads of the Quick Connector (4). This will
help to maintain an air-tight seal.
Note: Apply PTFE tape tightly and in a clockwise direction, so it does not come off when the thread
is screwed into the tool.
2. Remove the protective plug from the Air Inlet (3).
3. Using a spanner (not included) screw the Quick Connector into the Air Inlet located at the base of
the Handle (2).
4. Connect to airline, pressurise carefully and carry out a leak check (e.g. by spraying small amounts
of soapy water on to the outside of the connectors).
• AirlinesttedwithmatchingfemaleQuickConnectorswillnowbeapushttothetool.
WARNING: Do not attach the tool to a hose and the hose to a compressor with only threaded
connections. Always use quick connectors so the tool can be removed from the air supply connection
when needed for safe operation.
WARNING: Nevertafemalequickconnectordirectlytotheleaderhose/whiphoseordirectly
to the tool. The stored pressurised air in the tool, even when detached from the main air supply, can
operate the tool unexpectedly.
Recommended air supply
• This tool should be connected to a clean, dry air supply with inline oiler and water separator.
• Donotallowsupplypressuretoexceedthemaximumstated(see‘Specication’).
• Ensure that water is drained from air system daily.
• Ensure that all parts of the system (hoses, couplers, etc.) are correctly rated for the air pressure
to be used.
Setting tool power
• Thetoolspeed/powercanbeadjustedbydecreasing/increasingtheairsupplypressurewithin
therangespeciedin‘Specication’.
Fitting and removing drill bits and accessories
WARNING: Alwaysdisconnectthetoolfromtheairsupplybeforettingorremovingdrillbits
or other accessories.
WARNING: NEVER run the drill while tightening the Chuck (1) or changing the direction.
WARNING: Never install accessories with a maximum speed rating below the no load speed
of this tool.
1. Open the Chuck by rotating the Chuck collar anticlockwise.
2. Insert the required drill bit or accessory.
3. Close the Chuck by rotating it clockwise. Tighten by hand.
Note: Ensure the drill bit or accessory runs centrally and repeat above steps to correct the position of
the bit in the Chuck if necessary.
Forward/reverse function
• For clockwise rotation (‘forward’) tilt the Forward/Reverse Lever (5) into the position labelled ‘F’.
• For anticlockwise rotation (‘reverse’) tilt the Forward/Reverse Lever into the position labelled ‘R’.
WARNING: DO NOT operate the tool with the Forward/Reverse Lever in a position between ‘F’ or
‘R’, as this may damage the internal mechanisms.
Operation
1. Select direction using the Forward/Reverse Lever (5).
2. HoldthetoolrmlybytheHandle(2).
3. Press the Trigger (6) to operate the drill. Release the Trigger to stop the machine.
Note: The air exhaust is located at the bottom of the Handle. During operation, air will escape
directly next to the Air Inlet (3) connection.
WARNING: Be aware that air tools may hold residual pressure after use. Always bleed air
pressure from the tool after shutting off air supply.
Accessories
• Accessories for this tool, including drill and countersink bits, wire cup brushes and more, are
available from your Silverline stockist. Spare parts can be obtained from your Silverline dealer or
www.toolsparesonline.com.
793759_OwnerManual.indd 6793759_OwnerManual.indd 6 19/04/2024 08:5019/04/2024 08:50