HOOK
LUBRICATION
(Cont'd)
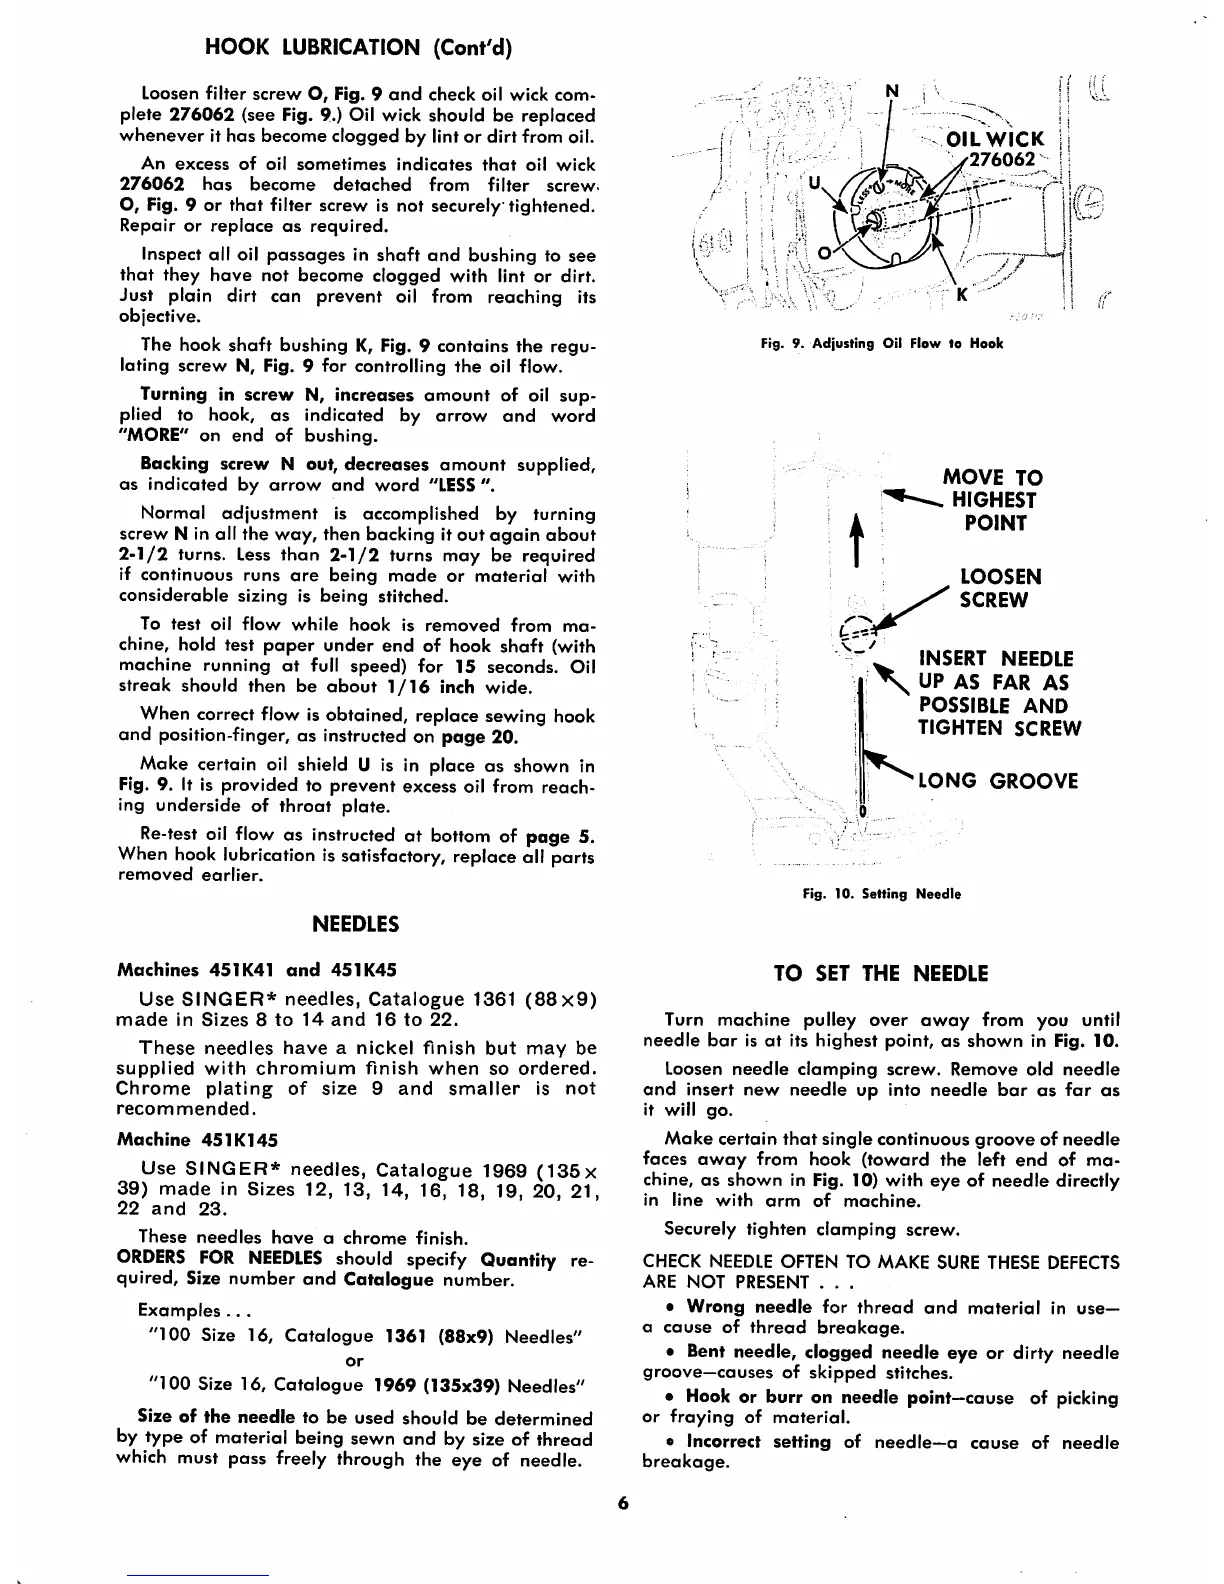
Loosen
filter
screw
O, Fig. 9
and
check oil wick
com
plete 276062 (see Fig. 90 Oil wick should be replaced
whenever
it has become clogged by lint or dirt from oil.
An
excess
of
oil
sometimes
indicates
that
oil
wick
276062
has
become
detached
from
filter
screw.
O, Fig. 9 or
that
filter screw is not
securely
tightened.
Repair
or
replace
as
required.
Inspect
all
oil
passages
in
shaft
and
bushing
to
see
that
they
have
not
become
clogged
with
lint
or
dirt.
Just plain dirt can prevent oil from reaching its
objective.
The hook
shaft
bushing K, Fig. 9 contains
the
regu
lating
screw
N, Fig. 9 for controlling
the
oil flow.
Turning in screw N, increases
amount
of oil
sup
plied to hook,
OS
indicated by
arrow
and
word
"MORE" on
end
of
bushing.
Backing screw N out, decreases amount supplied,
OS
indicated
by
arrow
and
word
"LESS
".
Normal adjustment is accomplished by turning
screw
N in all
the
way,
then
backing
it
out
again
about
2-1/2
turns.
Less
than
2-1/2
turns may be required
if continuous runs
are
being
made
or
material
with
considerable
sizing is
being
stitched.
To
test
oil
flow
while
hook
is
removed
from
ma
chine, hold test
paper
under
end
of hook
shaft
(with
machine running
at
full speed) for 15 seconds. Oil
streak
should
then
be
about
1/16
inch
wide.
When correct flow is obtained, replace sewing hook
and position-finger, as instructed on page 20.
Moke certain oil shield U is in place as shown in
Fig. 9. It is provided to prevent excess oil from reach
ing
underside
of
throat
plate.
Re-test oil flow as instructed at bottom of page 5.
When hook lubrication is satisfactory, replace all parts
removed
earlier.
NEEDLES
Machines
451K41
and
451K45
LJse
SINGER*
needles,
Catalogue
1361
(88x9)
made
in
Sizes
8
to
14
and
16
to
22.
These
needles
have
a
nickel
finish
but
may
be
supplied
with
chromium
finish
when
so
ordered.
Chrome
plating
of
size
9
and
smaller
is
not
recommended.
Machine
451K145
Use
SINGER*
needles,
Catalogue
1969
(135x
39)
made
in Sizes 12, 13, 14, 16, 18, 19, 20, 21,
22
and
23.
These
needles
have
a
chrome
finish.
ORDERS
FOR
NEEDLES
should specify Quantity re
quired, Size number
and
Catalogue number.
Examples
..
.
"ICQ Size 16,
Catalogue
1361 (88x9)
Needles"
or
"100
Size 16,
Catalogue
1969 (135x39) Needles"
Size
of
the
needle
to
be
used
should
be
determined
by type of material being sewn and by size of thread
which
must pass freely through the eye of needle.
OILWICK
276062
• I 1
1"'^
Fig. 9.
Adjusting
Oil Flow to
Hook
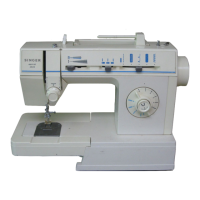
t
MOVE
TO
.
HIGHEST
POINT
LOOSEN
SCREW
INSERT
NEEDLE
UP
AS
FAR
AS
POSSIBLE
AND
TIGHTEN
SCREW
LONG
GROOVE
Fig. 10.
Setting
Needle
TO
SET
THE
NEEDLE
Turn machine pulley
over
away
from you until
needle
bar
is
at
its
highest
point,
as
shown
in Fig.
10.
Loosen
needle
clamping
screw.
Remove
old
needle
and
insert
new
needle
up into
needle
bar
as
far
as
it will
go.
Moke
certain
that
single
continuous
groove
of
needle
faces
away
from hook
(toward
the left
end
of ma
chine, as shown in Fig. 10) with eye of
needle
directly
in
line
with
arm
of
machine.
Securely
tighten
clamping
screw.
CHECK
NEEDLE
OFTEN
TO
MAKE
SURE
THESE
DEFECTS
ARE
NOT
PRESENT
. . .
•
Wrong
needle
for
thread
and
material
in use—
a
cause
of
thread
breakage.
• Bent needle, clogged needle
eye
or dirty needle
groove—causes
of
skipped
stitches.
• Hook or burr on needle point—cause of picking
or
fraying
of
material.
•
Incorrect
setting
of
needle—a
cause
of
needle
breakage.