Do you have a question about the Skydio X2E and is the answer not in the manual?
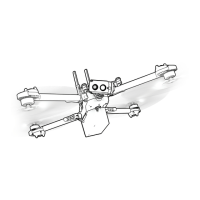
Identification of parts and components of the Skydio X2E drone.
Identification of buttons, joysticks, and other parts of the Enterprise Controller.
Essential safety advice, precautions, and operational restrictions for drone use.
Instructions for charging the drone batteries and the Enterprise Controller.
Steps to prepare the drone for flight, including unfolding and inserting components.
Guide to opening, powering on, and activating the Skydio Enterprise Controller.
Instructions for connecting the Skydio X2E to its Enterprise Controller via USB-C.
Critical checks to perform on the drone and propellers before each flight.
Explanation of how the controller joysticks control the drone's movement.
Step-by-step guide on how to safely launch the drone.
Instructions for initiating the Return to Home (RTH) function.
Step-by-step instructions for safely landing the drone.
Details on the drone's 360° obstacle detection and avoidance capabilities.
Precautions and guidance for flying the drone in low-light or night conditions.
Procedures for handling low battery and lost connection emergencies.
Step-by-step instructions for removing and installing Skydio X2E propeller blades.
Links to official websites for more product information, safety guides, and legal details.
The Skydio X2E is an advanced drone designed for various operational needs, available in both a Color variant and a Color/Thermal variant. It is controlled by the Skydio Enterprise Controller, offering a comprehensive and intuitive flight experience.
The Skydio X2E is a high-performance drone equipped with advanced navigation and imaging capabilities. Its primary function is to provide aerial surveillance, data collection, and situational awareness. The Color variant is ideal for general visual inspections and data capture, while the Color/Thermal variant adds thermal imaging capabilities, making it suitable for applications requiring heat detection, such as search and rescue, industrial inspection, or security monitoring.
The drone utilizes six 4K navigation cameras and a main subject camera for visual navigation, enabling unparalleled 360° obstacle avoidance. This allows the Skydio X2E to operate safely in complex environments, maintaining a distance of 34 inches (86 cm) from objects (measured from the propeller to the obstacle). For specialized tasks, an Autonomy Enterprise Foundation software add-on can be purchased to reduce the obstacle margin, allowing for closer object inspection.
The Skydio Enterprise Controller serves as the central interface for operating the drone. It features a user interface screen that displays flight information and allows for interaction with the drone's systems. The controller is designed for precise control, with left and right joysticks governing height, rotation, and forward/backward/side-to-side motion. Customizable C1 and C2 buttons, along with dedicated Launch/Land, Pause, and Return to Home (RTH) buttons, enhance operational flexibility. The controller also includes R1 and L1 buttons for shutter/record and boost functions, respectively, and wheels for zoom and gimbal tilt control.
The Skydio X2E offers a streamlined pre-flight and flight experience. Before deployment, users must unfold the drone's arms by releasing the arm clamps, lifting the motor arms until they click into place, and then securing the clamps. It's crucial to ensure that the blue marks on the arms align for proper assembly. The drone requires two UHS Speed Class 3 (or faster) microSD memory cards: one for logs (supporting future software offerings) and one for media capture. The battery is inserted by sliding it onto rails towards the camera until magnets engage, ensuring a secure connection. Antennas are released by gently pushing them inward and guiding them into a vertical position. Powering on the Skydio X2E involves pressing and holding the power button on the battery for 3 seconds.
The Skydio Enterprise Controller also requires activation through the Skydio Enterprise app, which involves connecting to the internet, entering an email address, and an activation code. A device password must be set to unlock the controller upon power-on or wake-up from sleep. Pairing the controller with the X2E involves powering on both devices, connecting them with a USB-C cable, and waiting approximately 15 seconds for the pairing to complete. The drone's name will then appear under "PAIRED DRONE" in the INFO section.
Flight controls are intuitive, with Mode 2 joystick configuration. The left stick controls ascent, descent, and yaw (rotation), while the right stick manages pitch (forward/backward) and roll (side-to-side) movement. Launching the drone involves finding a clear area, placing the X2E on a flat, stable surface, and either selecting the launch button on the Fly screen or pressing and holding the Launch/Land button on the Controller. The X2E will then arm and ascend to 10 ft (3 m) and hover.
Returning the drone to its launch point, controller location, or a pre-set Home Point can be done by selecting the Home button on the Fly screen or pressing and holding the Return button on the Controller. Landing requires piloting the X2E over a safe, obstacle-free location and selecting the Land button on the screen or pressing and holding the Launch/Land button on the Controller. The drone will descend with full obstacle avoidance until 10 ft (3 m) above ground level, after which obstacle avoidance is disabled. Users can nudge the drone during the final descent or cancel the landing by pushing the left joystick forward.
The drone incorporates emergency behaviors for low battery and lost connection scenarios. In a low battery situation, the X2E will assess its altitude and distance from the Home Point and alert the user when it's time to return. It provides a two-minute warning to fly to a safe location and land, after which it will automatically land, though users can still nudge it to avoid obstacles. For lost connections, users can configure a "Wait before Return" time, allowing the drone to wait for reconnection before initiating a return flight. The "Land Once Returned" feature can be enabled (default) for the drone to return, hover for a specified time, and then land, or disabled for it to hover in place until the battery depletes. A "Wait Before Land" time can also be set when "Land Once Returned" is enabled.
Routine maintenance is crucial for the Skydio X2E's optimal performance and longevity. A pre-flight checklist includes inspecting the chassis for damage, motor arms for proper assembly and damage, and the battery for debris and secure seating. Propellers should be inspected for nicks, cracks, or damage, and replaced if necessary. It is recommended to replace propellers after 100 hours of flight time or upon any damage, replacing all three propellers in a hub from the same replacement kit to maintain balance and performance.
Replacing propellers involves holding the motor hub to stabilize it, unscrewing the old propeller, and sliding it out. New propellers are then slid into the hub, ensuring the markings on the propeller match those on the hub and face upwards for correct direction and orientation. New screws must be used, fastened clockwise with a torque driver until a click is heard. After installation, propellers should rotate smoothly without binding on the hub spokes.
All camera lenses must be cleaned with a microfiber cloth before every flight to ensure clear vision for the drone's navigation system. Motor hubs should also be inspected for damage and debris, and the gimbal should move freely.
The Skydio X2E is not weatherproof and should not be operated in precipitation, including rain, fog, snow, or similar environments. The Skydio Enterprise Controller is also not weatherproof and should not be exposed to such conditions or rested in fine sand, dirt, or similar terrain where particles could trap in the fan. Proper battery storage in extreme hot or cold temperatures is also emphasized in the X2E Operator Manual.
For comprehensive safety information, users are directed to the Skydio Safety and Operating Guide and to visit www.skydio.com/safety. The Skydio X2E Operator Manual, available at www.skydio.com/getstartedX2E, provides detailed instructions and warnings. Failure to follow instructions in the Quick Reference Guide or the X2E Operator Manual can void the limited warranty.
| Battery Life | 35 minutes |
|---|---|
| Obstacle Avoidance | 360° obstacle avoidance |
| Aircraft Type | Quadcopter |
| GNSS Support | GPS, GLONASS |
| IP Rating | IP54 |
| Range | 6.2 miles (10 km) |
| Maximum Ascent Speed | 11 mph (5 m/s) |
| Maximum Descent Speed | 4 m/s |
| Maximum Wind Resistance | 40 km/h |
| Camera Resolution | 4K |
| Gimbal | 3-axis |
| Max Range | 6.2 miles (10 km) |
| Sensors | 6x 4K cameras |
| Connectivity | Wi-Fi |
| Weight | 1.3 kg (2.9 lbs) |