4342
8. Press the programming button d to enter the settings menu.
9. Press the steaming function button l to enter the lter settings.
10. Press the single cup extraction button j to set the lter setting to YES.
11. Place a container (min. 500 ml) underneath the brewing head 4.
12. Press the programming button d to exit the settings menu. The rinsing process starts
automatically.
V MAKING AN ESPRESSO
To make an espresso with freshly ground coee:
1. Choose if you want to make one or two espressos.
2. Place empty cups on the cup tray 2 to preheat the cups.
3. Check if the water level in the water tank is in between the MIN and MAX indicator.
4. If not, ll the water tank up to the MAX indicator.
4
Refresh the water at least once a day.
5. Fill the bean container 1 with whole coee beans (max 250 g).
6. Close the bean container 1 with the lid.
7. Make sure the hopper gate at the back of the bean container 1 is open.
8. Place the corresponding cup lter p a in the portalter s.
4
When the appliance isn’t used recently, we recommend rinsing the appliance and the portalter
(chapter Daily maintenance).
9. Press the lter size selection button f to switch to the corresponding lter size.
10. If needed, adjust the grind size with the grind size selector g. Start with grind setting 12 and then
experience to nd your personal favourite.
11. Place the portalter s into the portalter holder 3.
12. Rotate the grind time knob c to adjust the grinding time. The grind time is shown on the display
x.
4
The maximum grind time is 30 seconds. To save the grinding time for the selected lter size, press
and hold the lter size button. The lter size button blinks and the appliance beeps twice when the
setting is saved.
13. Press the grind time knob c or the portalter button v to start the grinding process. The
display shows the remaining grind time.
4
If you need to stop the process before it is nished, press the grind time knob or portalter button
again.
4
If you need to resume the grinding process, press the grind time knob or portalter button again
within 20 seconds.
4
To grind without using the grind time presets, you can also press and hold the grind time knob or
the portalter button. The grinder starts grinding and stops when the grind time knob is released.
14. Shake and pull out the portalter s of the portalter holder 3.
15. Gently tap the portalter s against the counter to spread out the coee ground.
16. Tamp the coee ground with the tamper o.
6 Do not overll the portalter. The coee ground should not make contact
with the brewing head when placed to ensure a proper seal.
17. Remove any coee ground from the edge of the portalter s.
18. Pull the steaming wand 5 to the side.
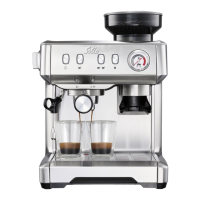
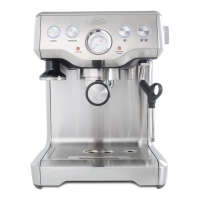
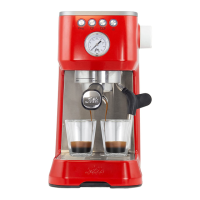
V APPLIANCE DESCRIPTION (SEE IMAGE A)
1 Bean container
2 Cup tray
3 Portalter holder
4 Brewing head
5 Steaming wand
6 Drip tray
7 Grinder unlock button
8 Water tank
9 Water lter cartridge
q Accessories storage
w Power button
e Power cable
r Milk jug
t Test strip
y Cleaning brush
u Cleaning tool
i Rubber insert for cleaning
o Tamper
p Double cup lter
a Single cup lter
s Portalter
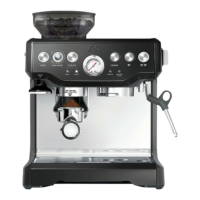
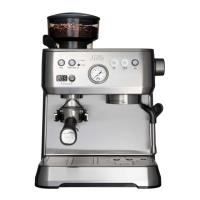
V CONTROL BUTTONS (SEE IMAGE B)
d Programming button
f Filter size selection button
g Grind size selector
h Filter size indicator
j Single cup extraction button
k Double cup extraction button
l Steaming function button
z Steaming knob
x Display
c Grind time knob
v Portalter button
b Manometer
V INSTALLATION
1. Place the appliance on a stable, at, and heat and moisture resistant surface.
2. Place the bean container 1 on the appliance. Rotate until the bean container locks in place.
3. Plug the power cable e into a power outlet.
4. Press the power button w to switch on the appliance.
The appliance is ready for use when the cup extraction buttons j k constantly light up white.
V BEFORE FIRST USE (WATER FILTER CARTRIDGE)
Before rst use, clean the appliance as described in the chapter Daily maintenance.
4
If you don’t want to use a water lter, you can leave the appliance on default settings. You can skip
the following steps in this chapter.
To place and congurate the water lter:
1. Hold the test strip t briey in a glass of tap water.
2. Read the measured water quality on the test strip t.
3. Rotate the selector at the bottom of the water lter cartridge 9 to the optimal position.
Position A For use with soft water.
Position B For use with medium hard water.
Position C For use with hard water.
4. Hold the water lter cartridge 9 in a container with water.
5. Gently squeeze the water lter cartridge 9 to remove air bubbles from the lter.
6. Insert the water lter cartridge 9 into the bracket in the water tank 8 with the selector facing
downwards.
7. Fill the water tank 8 with water up to the MAX marking.
 Loading...