DISTRIBUTION: INTERNAL + SOLOPROTECT CUSTOMERS
SoloProtect ID US: User Guide
US SoloProtect ID User Guide v2.0 d1909189
© SoloProtect Ltd, 2018 Page 9 of 31
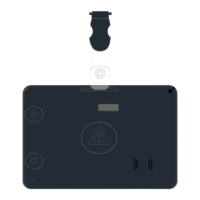
Figure 3: Lanyard PIN
If you do not want to use the lanyard, you can attach a lapel clip as per Figure 2. If you are not using
the lanyard, you must still insert the pin into the socket in the corner circled to prevent dust or dirt from
entering the socket and to ensure the Rip Alert is not activated.
The lanyard is made of one long piece and one short piece joined by a clip. The lanyard pin must be
attached to the long piece. Thread the fine loop at one end of the lanyard part way through the
attachment hole in the pin.
Thread the other end of the lanyard through the loop of cord that has passed through the hole in the
pin. Pull the lanyard tight so that the loop of cord is snug around the pin.
Insert the lanyard pin into its socket highlighted in Figure 2 and Figure 3.
3.1.3 Initial Charge of your SoloProtect ID
Your SoloProtect ID must be fully charged before you attempt to use it to condition the battery fully.
We recommend leaving the device on charge for a minimum of 2 hours the first time it is charged
using the SoloProtect supplied charger.
3.1.4 Inserting your ID Card
Fit your ID card into the slot at the right side of your SoloProtect ID (as you look at the front) and slide
it in until it is fully inserted. To remove your card, slide the ID card towards the exit slot. You may
initially feel a slight resistance until the card starts to slide out.
The front of your SoloProtect ID is shown below. With the ID card slid out, you can see the
multifunction user buttons.