1-10
41
Viewing Photo Files
Playing a slideshow
a After step 3 of “Viewing All Folders” above,
press < and select “All Photos” from the
Browse menu.
b Select the file you want to start from, and
press ENTER to turn on the “Options”
menu.
c Select “Slideshow,” and press ENTER.
Slideshow starts.
You can apply other playback settings to the selected
file using the “Options” menu (see below).
To use the “Options” menu
Available “Options” menu settings differ depending on the
situation. In the above example of the use of the “Options”
menu, the following items are available.
To play in other play mode
During playback, press PLAY MODE repeatedly. The selected
item changes with each press:
“Repeat All” — “Random” — “Repeat Off”
See page 25 for details.
z Hints
•See page 24 for the remote’s operations.
•Even after stopping playback, the player resumes playback from the
last file you played.
Note
The photos may appear slowly depending on the size and the number of
files.
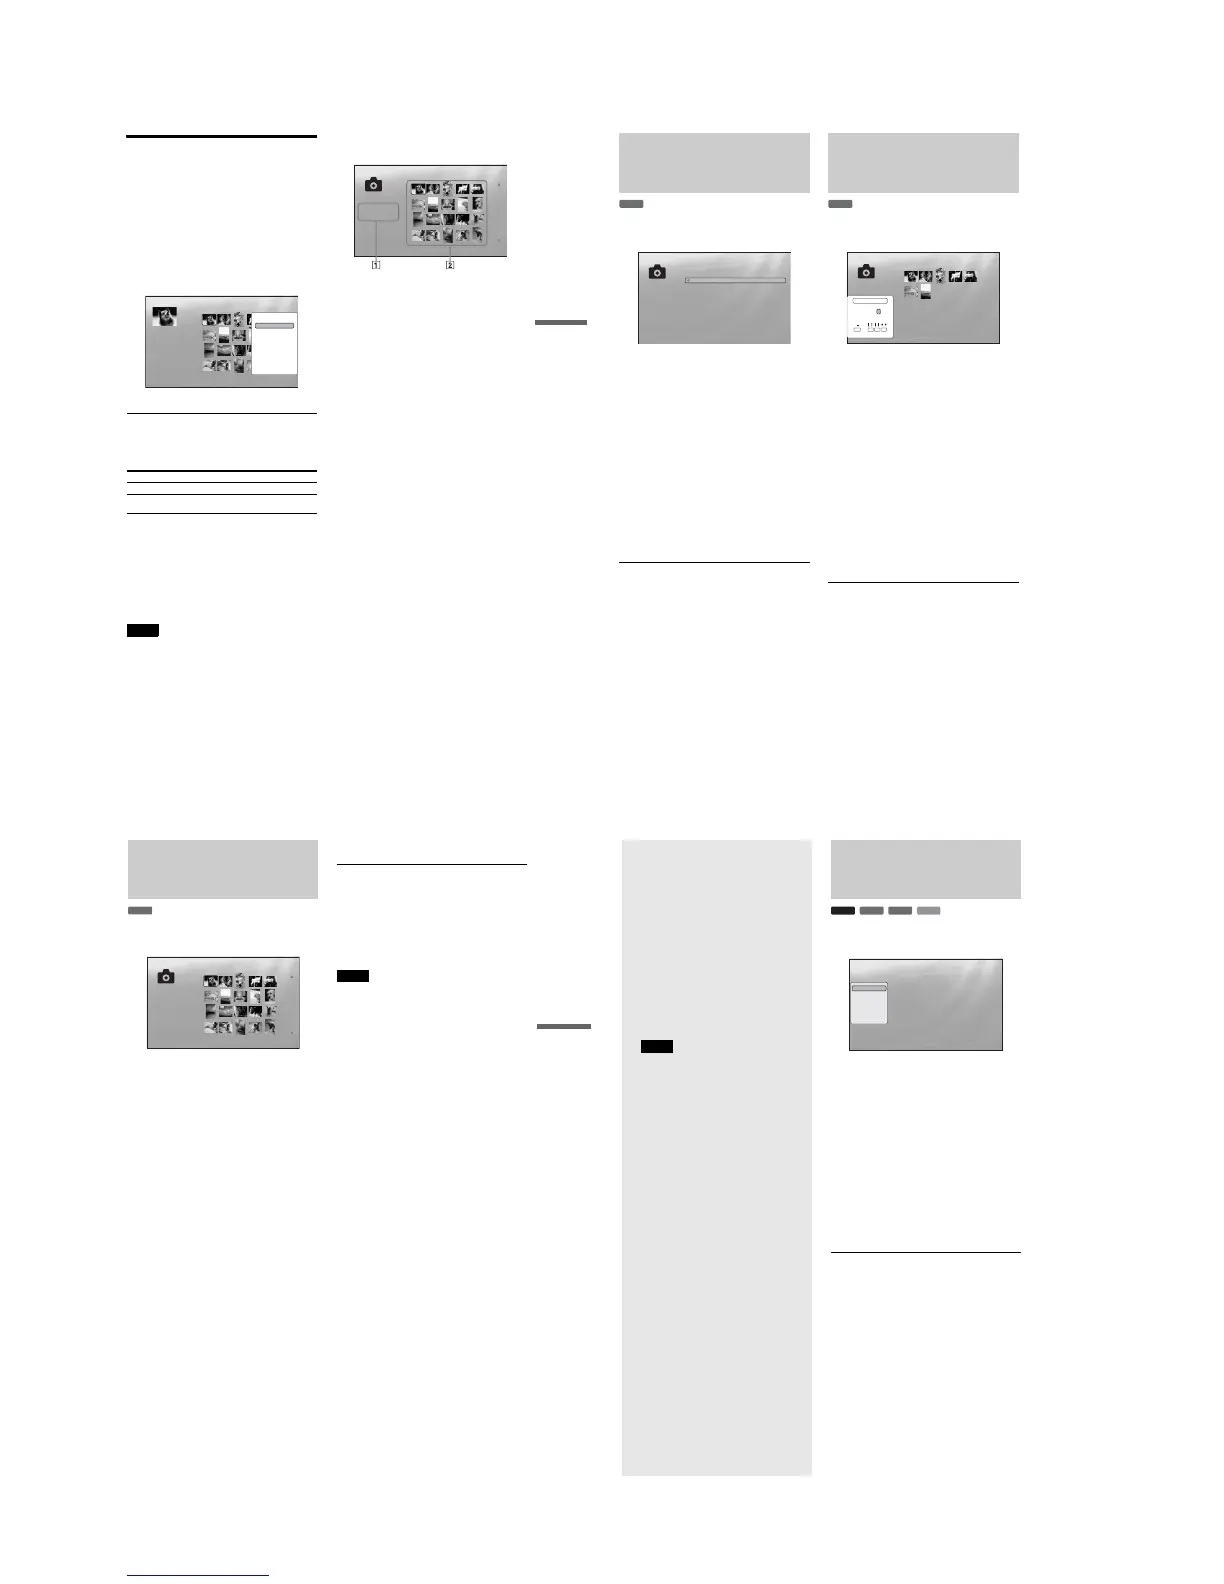
About the “Photos” (All Photos) Title List
display
1 Detailed information
Displays details about the selected file.
•File: Displays the file name.
•Date: Displays the shooting date.
•Resolution: Displays the picture resolution in width ×
height.
•Format: Displays the recording format.
2 List area
Displays overall photo content in thumbnail.
About unplayable photo files
The player does not play the file if:
–The DATA DVD is not recorded in a JPEG format that
conforms to UDF (Universal Disk Format).
–The photo file is not recorded in a format that conforms to the
DCF*.
–The file has an extension other than “.JPEG.”
–The image is larger than 4,096 (width) × 4,096 (height) in
normal mode, or progressive JPEG.
–The image does not fit the screen (the image is reduced).
–The file name contains characters other than numbers and
English alphabet.
•Even when the above are not applicable, some files may not
play depending on the recording condition or the method (e.g.,
writer software).
•Files may not play on this player if edited on a PC.
*“Design rule for Camera File system”: Image standards for digital
cameras regulated by JEITA (Japan Electronics and Information
Technology Industries Association).
Items Details
Slideshow Starts playing a slideshow as above.
Add to Quicklist Adds the selected file to the Quicklist for
later slideshow playback.
ExitConfirm
SYSTEM MENU
1214 items
All Photos
File : DSC00434.jpg
Date : 7/23/2006
Resolution: 293 x 196
Format: JPEG
Slideshow
Add to Quicklist
Options
The “Options” menu appears when you select a file and
press ENTER
ExitConfirm
SYSTEM MENU
File:Summer of '06.jpg
Date:July/23/2006
Resolution:196x298 pixels
Format:JPEG
1214 items
All Photos
File : DSC00434.jpg
Date : 7/23/2006
Resolution: 293 x 196
Format: JPEG
42
Browsing by Date,
Quicklist, or Folder
Narrow down the list of files by selecting the category type (e.g.,
“Date”), then the category.
a
Press SYSTEM MENU.
b
Select “Title List,” and press ENTER.
c
Select “Photos,” and press ENTER.
d
Press < to turn on the Browse menu.
e
Select “Browse,” and press ENTER.
f
Select the list you want to view from “Date,”
“Quicklist,” or “Folders” and press ENTER.
The list of date/Quicklist/folders appears as above.
For details about the Quicklist, see “Programming a
Slideshow Playback (Quicklist)” (page 43).
g
Select the date/Quicklist/folder you want to
view, and press ENTER.
z
Hint
You can select a file and start slideshow by using “Options” menu (press
,).
Searching for a Photo
You can find the exact file, or files with a similar name.
a
Press SYSTEM MENU.
b
Select “Title List,” and press ENTER.
c
Select “Photos,” and press ENTER.
d
Press < to turn on the Browse menu.
e
Select “All Photos,” and press ENTER.
f
Move the highlight to the leftmost row, and
press < to turn on the Browse menu.
g
Select “Search,” and press ENTER to turn on
the above display.
h
Enter the file name using the on-screen
keyboard (see page 23).
z
Hint
You can select a file and start slideshow by using “Options” menu (press
,).
DATA DVD
ExitConfirm
SYSTEM MENU
File:Summer of '06.jpg
Date:July/23/2006
Resolution:196x298 pixels
Format:JPEG
10 items
Year
2007
2006
2005
2004
2003
2002
2001
2000
1999
1998
DATA DVD
Exit
SYSTEM MENU
Select
7 items
Search Results
AB
SHFT
DONE CANCEL
SPC DEL CLR
CDEFGH I J
KLMNOPQRST
UVWXYZ ,.:;
123456
7890
_()
R_
Search results are narrowed down as more characters
are entered
43
Viewing Photo Files
Programming a Slideshow
Playback (Quicklist)
Play a slideshow in the order you like by making your own
“Quicklist.”
a Press SYSTEM MENU.
b Select “Title List,” and press ENTER.
c Select “Photos,” and press ENTER.
d Press < to turn on the Browse menu.
e Select “All Photos,” and press ENTER.
f When the “All Photos” Title List appears,
select the file you want to add to the top of the
“Quicklist,” and press ENTER.
g Select “Add to Quicklist” from the “Options”
menu, and press ENTER.
h Repeat step 6 and 7 to select all the desired
files.
Select in the order you want to play. You can add the
same file multiple times.
The “Quicklist” can contain up to 25 files.
i Move the highlight to the leftmost row, and
press < to turn on the Browse menu.
j Select “Browse,” and press ENTER.
k Select “Quicklist,” and press ENTER to turn
on the above display.
The “Quicklist” Title List appears with the
programmed content.
l Select the file you want to start playback, and
press ENTER.
m Select “Slideshow” from the “Options”
menu, and press ENTER.
To remove from the “Quicklist”
1 Select the file you want to remove from the
displayed “Quicklist,” and press ENTER.
2 Select “Remove,” and press ENTER.
z
Hint
You can play the “Quicklist” content in other play modes by pressing
PLAY MODE (page 25).
Note
The “Quicklist” may be cleared after some operations (e.g., opening the
disc tray, or turning off the player etc.).
DATA DVD
The “Quicklist” does not affect the original recording on
the disc
ExitConfirm
SYSTEM MENU
22 items
Quicklist
File : DSC00434.jpg
Date : 7/23/2006
Resolution: 293 x 196
Format: JPEG
44
Changing the
Initial Settings
Select “Setup” from the “System Menu”
when you need to change the settings of the
player (e.g., when changing the connected
device or the audio/video output, etc.).
The last part of this section explains how to
return all of these settings to their factory
defaults.
Note
Playback settings described in this section may not work
when there is any preset playback setting in the disc. The
disc’s playback settings take priority over the player’s
playback settings.
Using the Setup Displays
From the “System Menu,” enter the “Setup” displays to change
the settings of the player.
a Press SYSTEM MENU while the player is
stopped.
b Select “Setup,” and press ENTER.
c Select the “Setup” display you want to use,
from “Video Setup,” “Audio Setup,”
“Language,” “Parental Control,”
“Speakers,” or “Options,” and press
ENTER.
The “Setup” display appears with the related items.
Note that the display switches to the screen saver if
you do not operate for 15 minutes.
d
Select the item you want to change, and press
ENTER.
Refer to the explanations in the following sections.
To return to the previous display
Press RETURN.
BD
DVD
DATA DVD
CD
Use to select an item, then press [RR] or
ENTER.
Confirm Exit
SYSTEM MENU
Setup
Video Setup
Audio Setup
Language
Parental Control
Speakers
Options
TV Type
4:3 Video Out
DVD Aspect Ratio
YC
b
C
r
/RGBPC(HDMI)
24p Output
16:9
Normal
Letter Box
Y, C
b
, C
r
Off
• Using the Setup Displays . . . . . . . . . . . . . . . . 44
• Video Setup . . . . . . . . . . . . . . . . . . . . . . . . . . 45
• Audio Setup . . . . . . . . . . . . . . . . . . . . . . . . . . 47
• Language . . . . . . . . . . . . . . . . . . . . . . . . . . . . 49
• Parental Control . . . . . . . . . . . . . . . . . . . . . . . 50
• Speakers. . . . . . . . . . . . . . . . . . . . . . . . . . . . . 51
• Options. . . . . . . . . . . . . . . . . . . . . . . . . . . . . . 52
• Resetting the Player . . . . . . . . . . . . . . . . . . . . 53
 Loading...