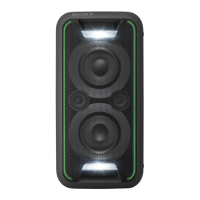
GTK-XB90
14
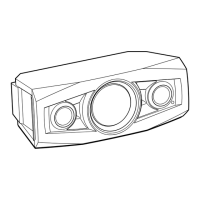
2-14. BOTTOM PANEL ASSY
Note 1:
When removing the bottom panel assy, move the bottom
panel assy slowly and remove the six bosses.
(The six bosses are fixed with bond)
Note 2:
When removing the bottom panel assy, please remove
carefully so as not to damage the six bosses.
bottom side
2 screw
(M4 u 20)
four
bosses
8 bottom panel assy
Note 3:
When installing the
bottom panel assy,
remove the used bond on bosses and use
a new bond to fix the bottom panel assy.
top side
front side
bottom panel assy
front panel aasy
bottom side
front side
3 screw
(M3 u 10)
1 two foot pads
2 two screws
(M4 u 20)
5 six bosses
(with bond)
4
4
6 two
claws
1 two foot pads
3 screw
(M3 u 10)
2 screw
(M4 u 20)
7 Remove the bottom panel assy
in the direction of the arrow.
boss
boss
SYSSET
2020/08/2022:42:53(GMT+09:00)

 Loading...