GTK-XB90
16
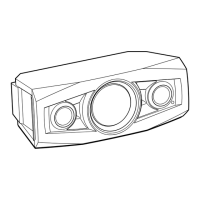
2-16. FRONT PANEL BLOCK-2
bottom side
left side
right side
front panel block
1 Insert a thick screwdriver into the left side
and widen the gap (perform at two places).
Note 2: A screwdriver is inserted too far in, the
speaker unit (WF) may get damaged.
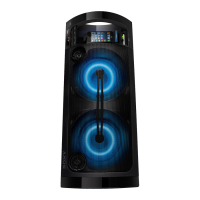
3 While removing the
ten bosses, remove
the front panel block
in the direction of
the arrow.
box unit
front panel block
– Top view –
Note 4:
When installing the front panel block,
be careful not to pinch the two cables
and a FFC.
tweeter cable
woofer cable
2 Insert a thick screwdriver into the right side
and widen the gap (perform at two places).
Note 2: A screwdriver is inserted too far in, the
speaker unit (WF) may get damaged.
Note 1:
Make sure to do this work after doing the work of
“2-15. FRONT PANEL SECTION-1” on page 15.
woofer cable
tweeter cable
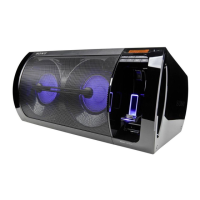
4 front panel block
Note 3:
When installing the
front panel block
remove the used bond on bosses and use
a new bond to fix the front panel block.
top side
front side
FFC
(TOP LED-MAIN)
FFC
(TOP LED-MAIN)
Note about installing the front panel block
Note 5:
This boss excludes US
and CND models.
Note 5:
This boss US
and CND models.
– Front view –
Note 6:
The position of the boss hole varies depending
on the destination.
top side
No
boss
hole.
With
boss
hole.
Except US, CNDUS, CND
bottom side
box unit
No
boss
hole.
With
boss
hole.
total ten bosses
(with bond)
SYSSET
2020/08/2022:42:53(GMT+09:00)

 Loading...