Do you have a question about the SpaceraiL LEVEL 1 and is the answer not in the manual?
Lists all arm-related parts for the rollercoaster, including clips, sheaths, holders, and locks.
Lists all base-related parts for the rollercoaster, including base blocks and holders.
Lists track pieces like loops, corners, and splitters, along with their stands and clips.
Lists parts for the marble elevator mechanism, including power box, shafts, helix, rings, and guards.
Lists essential rail connection parts and the main rail itself.
Lists necessary tools and items not supplied with the kit, such as cutters and batteries.
Instructions for assembling arm components, clips, locks, loops, turns, and the rail splitter.
Steps for interlocking base blocks and assembling shafts with specific length illustrations.
Detailed steps for assembling the marble elevator mechanism, including helix and guards.
Instructions and measurements for cutting rail sections to specific lengths for the track.
Steps to install major components like shafts, loop, and elevator onto the base.
Guidance for improving stability, connections, and marble flow during assembly.
Instructions for connecting specific rail sections (A, G, I) to the coaster structure.
Instructions for connecting specific rail sections (J, B, H) to the coaster structure.
Instructions for connecting specific rail sections (D, E, F, C) to the coaster structure.
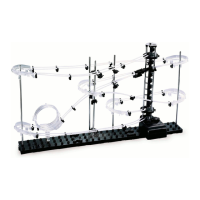
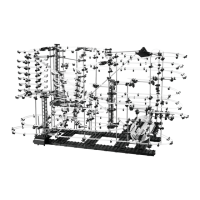
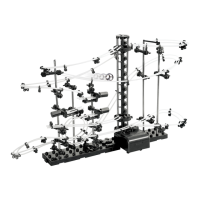
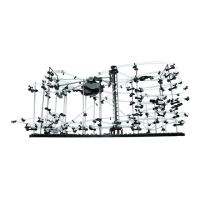
The SpaceRail Level 1 is a captivating and intricate marble run designed for users aged 8 and older, offering an engaging experience in construction and observation. This product is not merely a toy but a sophisticated kinetic sculpture that challenges users to assemble a complex system of rails, loops, and an elevator to guide marbles through a thrilling journey.
The primary function of the SpaceRail Level 1 is to create a continuous, gravity-powered marble rollercoaster. Marbles are lifted to the highest point of the structure by a motorized elevator, then released to travel down a meticulously designed track. This track incorporates various elements such as loops, turns, and straight sections, all engineered to demonstrate principles of physics, including gravity, momentum, and centrifugal force. The goal is to ensure the marbles complete the entire circuit smoothly and return to the elevator for another ascent, creating an endless cycle of motion.
The SpaceRail Level 1 offers a rich set of usage features, starting with its detailed assembly process. The manual breaks down construction into manageable steps, beginning with the preparation of individual components.
Component Preparation: The assembly starts by preparing the "arms," which are crucial for supporting the rails. Each arm consists of an Arm Holder A, an Arm Holder B, an Arm Sheath, and an Arm Clip. Users attach the holders with the sheath, then insert and secure the Arm Clip using an Arm Lock. This locking mechanism is designed to hold the rail clips firmly in place, but also allows for adjustment by turning the lock clockwise to release and counter-clockwise to secure. This feature is vital for fine-tuning the rail's position and angle during construction.
Next, the "loops and turns" are prepared. The loop assembly requires two rail clips to be pressed onto its sides, and a loop stand attached to its bottom for stability. The six corner pieces, which form the turns, each receive two rail clips. The "rail splitter" also gets a rail clip attached to each of its posts, preparing it to divide the marble's path.
Base and Shaft Assembly: The foundation of the SpaceRail is built by interlocking base block tabs, creating a sturdy platform. Base Holder A and Base Holder B pieces are then pressed into the base blocks, providing secure points for the vertical shafts. The shafts are critical for establishing the different elevations of the track. The manual provides precise measurements for the various shaft lengths (e.g., 63mm, 264mm, 204mm, 159mm, 47mm, 261mm, 194mm, 101mm, 240mm, 199mm, 129mm, 238mm), which are essential for creating the multi-tiered structure.
Elevator Assembly: The elevator is the heart of the SpaceRail, responsible for continuously lifting the marbles. This assembly begins by placing a shaft into a designated hole on the power box. Elevator helix pieces are then connected, male side up, and rotated until they engage with the driver at the base of the power box, forming a corkscrew mechanism. Three support shafts are attached to the power box to provide stability for the elevator. Rail clips are connected to elevator rings, which are then installed over the support shafts with their tabs facing up. Finally, an elevator cap is placed on top, and elevator guards are attached to the elevator rings and rail clips, ensuring marbles are safely contained within the elevator mechanism. The power box requires one C battery (not included) to operate the elevator.
Rail Cutting and Installation: A significant aspect of the SpaceRail experience is cutting the rails to the correct lengths. The manual provides illustrations of various rail lengths (e.g., 26mm, 73mm, 79mm, 162mm, 174mm, 275mm, 313mm, 416mm, 420mm, 487mm) and advises users to measure and mark cutting points with a pen before cutting at a 90-degree angle using wire cutters or utility scissors. A helpful tip suggests cutting generously (slightly longer than required) to avoid mistakes, as excess rail can always be trimmed.
The installation of the rails is guided by a series of steps that connect different sections of the track to the shafts, loops, turns, and the elevator. The manual provides detailed instructions for connecting rails A, G, I, J, B, H, D, E, F, and C, specifying their start and end points on the structure. For example, A Rail sections connect between the loop and the back bottom corner of Shaft A, while G Rail sections connect between the entrance of the loop and the front section of the splitter. These instructions are crucial for building the specific Level 1 track design.
Assembly Tips & Tricks: To enhance the building and operational experience, the manual includes several tips:
While the SpaceRail Level 1 is primarily an assembly and play device, some aspects contribute to its longevity and performance, which can be considered maintenance-related:
In summary, the SpaceRail Level 1 is an engaging construction kit that transforms into a dynamic marble rollercoaster. Its usage features emphasize a step-by-step assembly process, precise rail cutting, and strategic placement of components, all supported by practical tips. Maintenance primarily involves careful handling, precise adjustments, and adherence to guidelines regarding marble and battery usage to ensure the longevity and smooth operation of this fascinating kinetic toy.
| Category | Toy |
|---|---|
| Name | SpaceraiL LEVEL 1 |
| Difficulty Level | Beginner |
| Track Length | 5 meters |
| Estimated Build Time | 1-2 hours |