Servicing the Fluid Section
Use the following procedures to service the valves and repack
the fluid section.
1. Perform the Pressure Relief Procedure and unplug the
unit.
Before proceeding, follow the Pressure Relief Procedure
outlined previously in this manual. Additionally, follow all
other warnings to reduce the risk of an injection injury,
injury from moving parts or electric shock. Always unplug
the sprayer before servicing!
2. For Upright cart units, remove the return hose from the
clamp on the siphon tube. Unscrew the siphon tube from
the inlet valve housing.
3. For Low Boy cart units, remove the retaining ring from the
bottom of the inlet valve housing using a snap ring pliers.
Remove the suction set assembly.
4. Loosen and remove the high-pressure hose from the
nipple on the back of the cylinder of the fluid section.
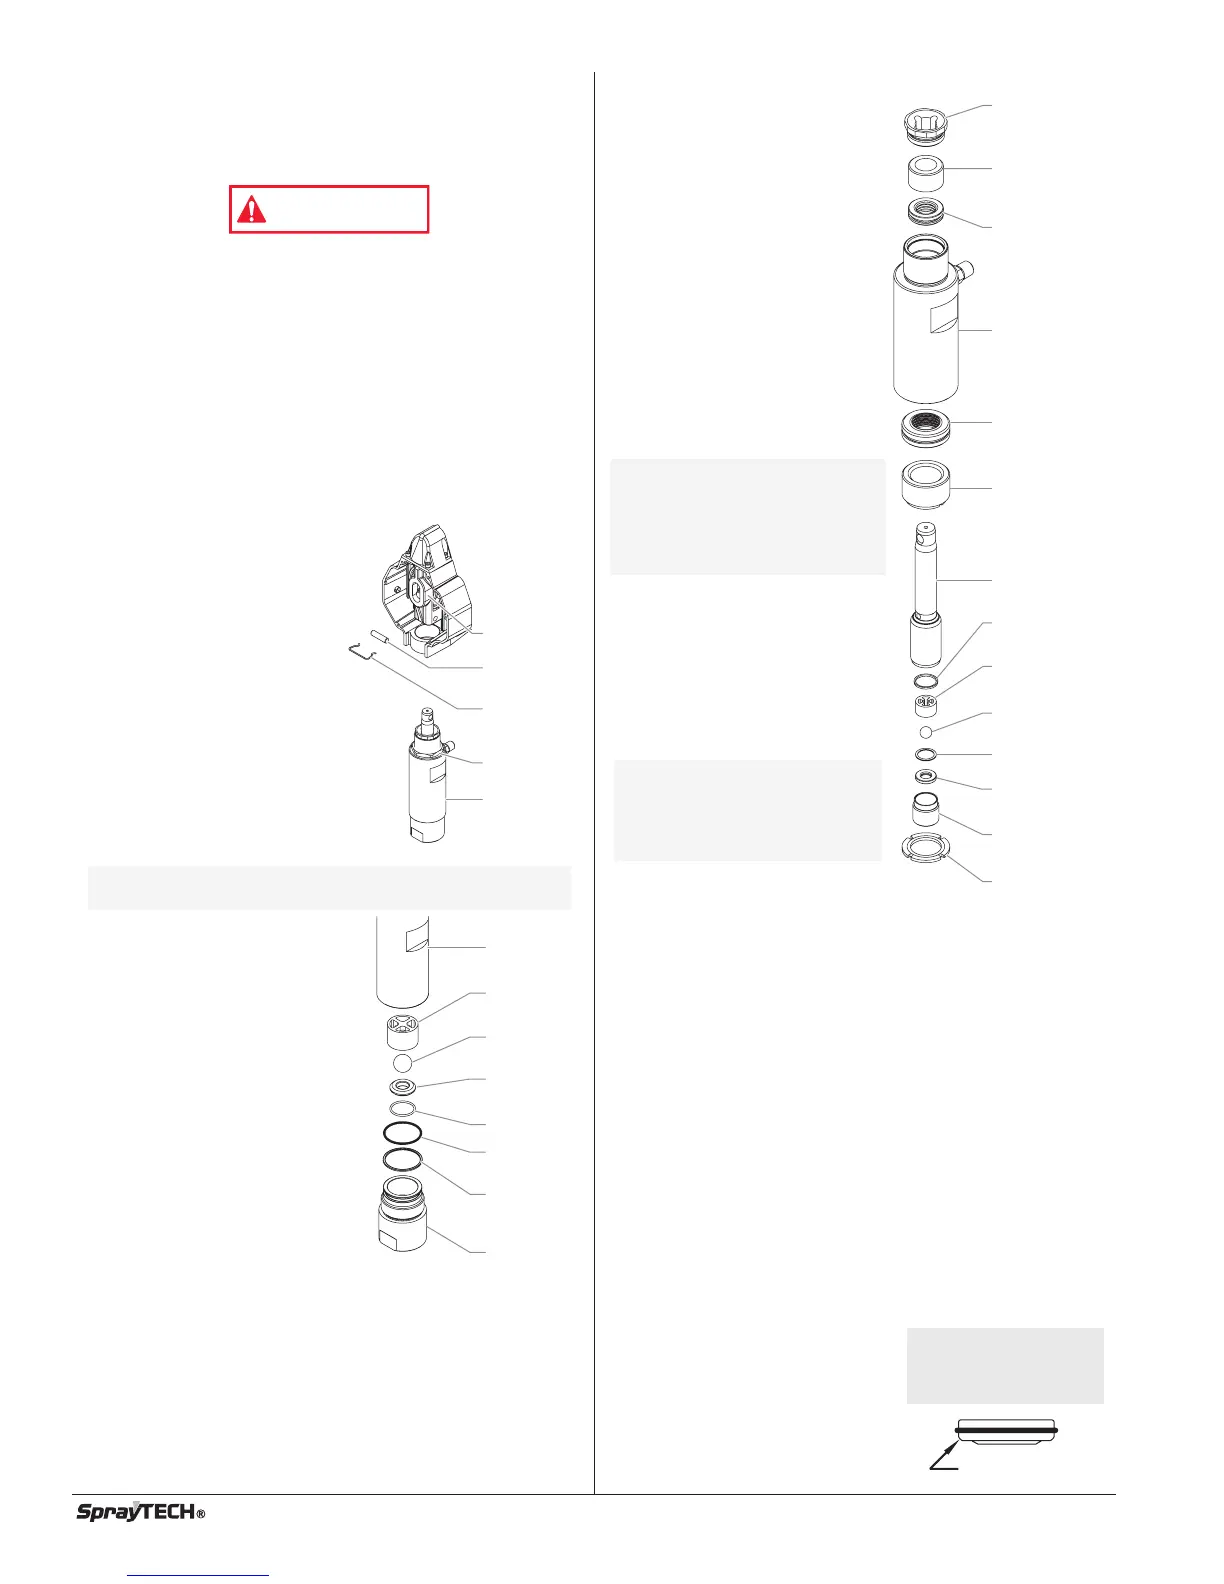
5. Loosen and remove the six front cover screws. Remove
the front cover.
6. Pull the retaining clip from
the yoke and connecting pin.
7. Push the connecting pin out
of the piston and yoke. Use
the short end of a hex
wrench if necessary.
8. Using a wrench, turn the jam
nut counterclockwise to
loosen it from the gear box
housing.
9. Turn the fluid section
counterclockwise to remove
it from the gear box housing.
10. Place the fluid section
cylinder upright in a vise by
clamping on the wrench
flats.
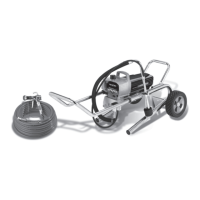
11. Loosen and remove the inlet
valve housing from the
cylinder.
12. Remove the inlet valve cage,
inlet valve ball, inlet valve seat,
and o-ring from the inlet valve.
13. Clean out any debris in the
inlet valve housing and
examine the housing and the
inlet valve seat. If the seat is
damaged, reverse or replace
the seat.
Inlet Valve
Housing
Viton
O-Ring
O-ring
PTFE
Back-Up
Ring
Inlet Valve
Seat
Inlet Valve
Ball
Inlet Valve
Cage
Cylinder
NOTE: Do not over-tighten the vise. Damage to the
cylinder may occur.
Yo k e
Connecting
Pin
Retaining
Clip
Jam Nut
Cylinder
10 © SprayTECH. All rights reserved.
14. Using a wrench, remove the
upper seal retainer.
15. Remove the support washer
from inside the bottom of the
cylinder.
16. Slide the piston rod out
through the bottom of the
cylinder.
17. Inspect the piston rod for
wear and replace if
necessary.
18. Remove the upper support
ring and upper packing
assembly from the top of the
cylinder.
19. Remove the lower support
ring and lower packing
assembly from the bottom of
the cylinder.
20. Remove the cylinder from the
vise.
21. Insert the connection pin
through the hole at the top of
the piston rod and clamp each
end of the connecting pin in
the vise. This will hold the
piston rod in position for
disassembly.
22. Using a 3/8” hex wrench,
loosen and remove the outlet
valve retainer from the piston
rod.
23. Remove the outlet valve seal, outlet valve cage, outlet
valve ball, nylon washer, and outlet valve seat from the
outlet valve retainer.
24. Clean out any debris and examine the retainer and outlet
valve seat. If the seat is damaged, reverse or replace the
seat.
25. Clean and inspect the outlet valve cage and outlet valve
ball. Replace if they are worn or damaged.
26. Reassemble the outlet valve assembly into the piston rod
in the reverse order of how it was disassembled. Torque
the outlet valve retainer to 12 ft. lbs.
27. Remove the piston rod from the vise.
28. Clean the cylinder. Inspect the cylinder for damage and
replace if necessary.
29. Place the cylinder upright in a vise by clamping on the
wrench flats.
30. Locate the new upper and lower packing assemblies and
pack the areas between the packing lips with grease.
Lubricate the o-rings on the exterior of the packings with
grease.
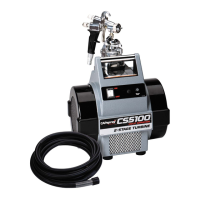
31. Insert the upper packing
assembly into the top of the
cylinder with the large beveled
edge facing down.
32. Insert the upper support ring on
top of the upper packing
assembly.
Install upper packing
with large beveled
edge facing down.
Large Beveled Edge
NOTE: Do not clamp the
piston rod directly
in the vise. Damage
to the piston rod will
occur.
NOTE: Be careful not to
scratch, score, or
otherwise damage
the cylinder during
removal of the
packing assemblies.
Piston Rod
Cylinder
Upper
Seal
Retainer
Upper
Packing
Assembly
Lower
Packing
Assembly
Outlet Valve
Seat
Nylon Washer
Outlet Valve
Cage
Outlet Valve
Ball
Outlet Valve
Seal
Outlet Valve
Retainer
Support
Washer
Upper
Support
Ring
Lower
Support
Ring