6
SPYPOINT website
Follow these steps:
1. On the SPYPOINT website, select "MY ACCOUNT" in the top navigation menu. On
the
displayed page, select "Register," ll out the required elds, then log in.
2. Select the + sign on the far right of the page; in the list, select "CELL-LINK" then
follow the steps.
3. When complete, a conrmation email will be sent to you with a generated password.
4. On the website, log in to your account using your email and password.
New settings take eect every time the CELL-LINK connects with the SPYPOINT app
or website. Below are the most basic settings you will congure.
First transfer time: Allows you to choose the time when the CELL-LINK makes its
rst transfer of the day.
Transfer frequency: Allows you to choose the number of daily transfers.
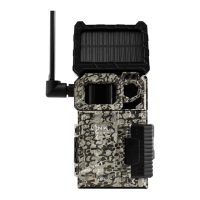
ACTIVATING YOUR CELL-LINK
CONFIGURING YOUR CELL-LINK
NOTE:
You can activate additional CELL-LINK’s for other cameras
and switch between them in the SPYPOINT app or the
"MY ACCOUNT" section of the SPYPOINT website.
CHOOSING A PHOTO TRANSMISSION
PLAN FOR YOUR CELL-LINK
Select a photo transmission plan via the SPYPOINT app or website
1. Upon activating your CELL-LINK, you will automatically benet
from our FREE monthly plan.
2. After your 30 days are up, you can select a new plan better suited
to your needs among the ones we oer or;
3. Keep your FREE monthly plan and continue receiving up to 100
photo transfers per month.
NOTE:
Photo transfers are set by default to every 4 hours from midnight.