EasyManua.ls Logo

Stack-On PDS-1500-B - User Manual

Stack-On PDS-1500-B
12 pages
Print Icon
To Next Page IconTo Next Page
Loading...
40634-1510
1
12
®
NOTE: You can store your Key # and your Serial
# on Stack-On’s SECURE web site –
www.stack-on.com under Customer Service.
Storing your Key # will provide instant access to
this important information should you ever lose
your keys.
Only you will have access to this information.
Instructions
Serial #:
PDS-1500-B
Tools Required:
Drill
in Bladed Flat Head Screwdriver
Phillips Screwdriver
10 mm Wrench
1/4” (7 mm) drill bit
Hardware Included:
(2) M6 x 15 mm (5/8” long) Screws
(2) M6 Nylock Nuts
Locate the baeries inside the safe. Open the
baery compartment on the back of the door by
pushing the tab in the direction of the arrow and
install the baeries.
GETTING STARTED
When you rst receive your safe you will need to
open the door with the key in order to install the
baeries. Baeries are included and are located
inside the safe.
To open the door with the key, rst remove the
lock cover from the front of the faceplate using a
thin bladed athead screwdriver as shown. Insert
the key and turn clockwise. Hold the key in the
open position and turn the knob to the right to
open the door.
Lock Cover
IMPORTANT
Record the serial number from the tag on the door
front.
Keep keys in a secure place away from children.
DO NOT STORE KEYS INSIDE SAFE.
NOTE: is key has also been provided in case the
baeries run low. If you lose your key, you may
purchase a replacement key by referencing the serial
number located under the removable lock cover
plate. See section at the boom of this instruction
regarding replacement keys.
NOTE: e reset buon located on the inside
of the door, is covered with a removable cap.
When you use the reset buon while recording
your ngerprint, remove the cap to access the
buon. Use a pen tip to push the reset buon.
Replace the cap securely over the reset buon
aer recording your ngerprint. Failure to do
so will compromise the safety and security of
the safe.
Question and Answer IconNeed help?

Do you have a question about the Stack-On PDS-1500-B and is the answer not in the manual?

Overview

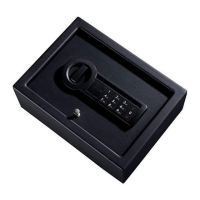
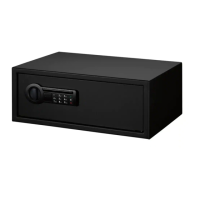
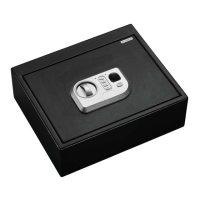
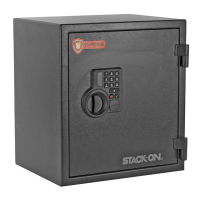
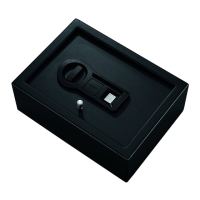
This document describes the Stack-On PDS-1500-B, a steel safe designed for securing valuables. The safe features a fingerprint recognition system for access, along with a traditional key lock for backup. It is designed to be mounted in a drawer or other secure location.

Function Description

The primary function of the Stack-On PDS-1500-B is to provide secure storage for valuables. Access to the safe is primarily granted through a fingerprint recognition system, allowing for quick and convenient entry without the need for keys or combinations. A traditional key lock is also provided as a backup access method in case of battery failure or issues with the fingerprint scanner. The safe is designed to be mounted to a secure surface, such as inside a drawer, to prevent unauthorized removal.

Important Technical Specifications

  • Model Number: PDS-1500-B
  • Locking Mechanism: Fingerprint recognition system with a backup key lock.
  • Power Source: 4 AA batteries.
  • Battery Life: Approximately 1 year under normal use.
  • Fingerprint Capacity: Up to 20 different fingerprints can be registered.
  • Mounting Hardware Included:
    • (2) M6 x 15 mm (5/8") long Screws
    • (2) M6 Nylock Nuts
  • Tools Required for Installation:
    • Phillips Head Flat Blade Screwdriver
    • Phillips Screwdriver
    • 10 mm Wrench
    • 1/4" (7 mm) drill bit
  • Warranty: Limited Three Year Warranty for Steel Safes, covering defects in material and workmanship.

Usage Features

Getting Started

  1. Battery Installation: Upon first receiving the safe, you will need to open the door with the key in order to install the batteries. Batteries are included and are located inside the safe.
  2. Opening with Key: To open the door with the key, first remove the lock cover from the front of the faceplate using a thin bladed flathead screwdriver as shown in the manual. Insert the key and turn clockwise. Hold the key in the open position and turn the knob to the right to open the door.
  3. Key Number and Serial Number Storage: It is recommended to store your Key # and Serial # on Stack-On's SECURE web site (www.stack-on.com) under Customer Service. This provides instant access to this important information should you ever lose your keys. Only you will have access to this information.

Fingerprint Registration

  1. Initiating Registration: To register a fingerprint, first press the Reset Button on the inside of the safe's door. The scanner will turn blue with two beeps (if sound is turned on) and the blue light will flash twice.
  2. Scanning Fingerprint (First Time): Press the scanner with the selected finger until there is one beep (if sound is turned on) and the green light flashes once. Lift your finger from the scanner.
  3. Scanning Fingerprint (Second Time): Press the scanner a second time with the same finger (holding the finger in a slightly different position) until there is one beep (if sound is turned on) and the green light flashes once. Lift your finger from the scanner.
  4. Scanning Fingerprint (Third Time): Press the scanner a third time with the same finger (holding the finger in a slightly different position) until there are two beeps (if sound is turned on) and the green light flashes twice. Lift your finger from the scanner.
  5. Confirmation: Your fingerprint is now registered. If the red light flashes three times with three beeps, your fingerprint was not registered, and you will need to start over.
  6. Multiple Fingerprints: You can register up to 20 different fingerprints. If you attempt to register more than 20 fingerprints, the red light will flash 5 times and there will be 5 beeps. For convenience, it is recommended to register several different fingers and to record the most used finger several times.

Opening the Safe Using Fingerprints

  1. Scanning Fingerprint: To open the safe, press the scanner with a registered fingerprint. The blue light will come on with one beep (if sound is turned on) and the scan will begin.
  2. Successful Scan: If the green light flashes twice with two beeps (if sound is turned on), the scan has been accepted, and you will have 5 seconds to turn the handle to open the door.
  3. Unsuccessful Scan: If the red light flashes once, the scanner did not read your fingerprint, and you need to try again. If the red light flashes 3 times, the scanner read your fingerprint but did not accept it.
  4. Lockout Feature:
    • If there are 3 rejected scans (red light flashes 5 times with 5 beeps), you will have an automatic lockout for 60 seconds before you can try a new scan. The safe will beep once and the green light will flash once when the lockout period is over.
    • If there are 1 or more additional rejected scans (red light flashes 5 times with 5 beeps), you will have an automatic lockout for 5 minutes before you can try a new scan. The safe will beep once and the green light will flash once when the lockout period is over.

Locking the Safe

To lock the safe, close the door and turn the knob to the left to the 12:00 position. Important Note on Locking: Because the locking mechanism is deactivated for approximately 3 to 6 seconds after the fingerprint is entered, wait a minimum of 6 seconds from the time you have successfully scanned your finger to lock the safe. Always ensure the knob is turned completely to the left to the 12:00 position during the locking process; otherwise, the locking mechanism will not engage.

Selecting a Location

This safe must be mounted into a drawer. For optimal safety and security, the safe should be installed in an isolated, dry, and secure area. Warning: The safe should always be kept out of the reach of children.

Securing the Safe

This safe must be mounted into a drawer. Failure to do so will compromise the safety and security of the safe.

  1. Select an appropriate sized drawer for your safe. Place the safe in the drawer and try opening and closing the safe and drawer. Do not attempt to close the drawer with the safe open.
  2. Place the safe in the desired drawer and mark the mounting holes with a pencil. Remove the safe and drill the pilot holes for the screws. Replace the safe in the drawer and insert the screws through the mounting holes and drawer bottom. Secure the bolt by tightening the Nylock nut on the screws.

Maintenance Features

Clearing the Memory

To clear the memory of all recorded fingerprints, locate the reset button on the inside of the door and press this button for about 5 seconds until the green light flashes 10 times with 10 beeps (if the sound is turned on). All recorded scans will be erased. Important Note: For security, you must record a fingerprint after clearing the memory. Failure to do so will compromise the safety and security of the safe.

Battery Replacement

  • Battery Type: This safe uses 4 AA batteries. Do not mix old and new batteries, or alkaline, standard, or rechargeable batteries.
  • Battery Life Indicator: If the batteries are low, the yellow light will flash when you press the scanner.
  • Replacement Procedure: To replace the batteries, open the battery compartment on the back of the door by pushing the tab in the direction of the arrow and install all new batteries.

Cleaning

The biometric scanner may be cleaned with household glass cleaner and a cotton cloth.

Key Replacement

In the event of lost keys, a replacement key can be requested. Verification of ownership is required. Procedure for Key Replacement:

  1. Complete the Key Request form provided in the manual.
  2. Send a copy of your valid driver's license.
  3. Send a copy of the receipt showing the original purchase.
  4. The security product owner must sign the form.
  5. The owner's signature must be notarized.
  6. Send $10.00 for replacement key (Personal Check, MasterCard, or Visa accepted).
  7. Send all completed information to: Stack-On Products Company 1360 N. Old Rand Road P.O. Box 489 Wauconda, IL 60084

Important Information

Keep keys in a secure place, away from children. Keep this record of your serial number in a secure place separate from your safe. To order a replacement key set, follow the instructions on the attached form.

Stack-On PDS-1500-B Specifications

General IconGeneral
BrandStack-On
ModelPDS-1500-B
CategorySafes
LanguageEnglish

Related product manuals