3
1.4 Important information
The heat pump manager must only
be installed and maintained by quali-
ed contractors.
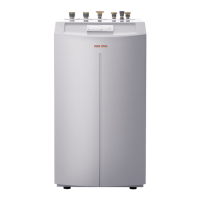
Heat pump types
The description of individual functions vari-
es between the different heat pump types.
Therefore, three types of heat pump are
determined, which are identied in this do-
cument as HP type 1, 2 or 3.
HP type 1:
Heat pump with ammable refrigerant and
without internal secondary heater.
HP type 2:
Heat pumps with safety refrigerant and in-
ternal secondary heater.
WPF 5, 7, 10, 13
WPW 7, 10, 13, 18
WPL 13, 18, 23, 33
HP type 3:
Heat pumps with safety refrigerant and ex-
ternal secondary heater.
WPF-M 10, 13, 18
WPL 13, 18, 23, 33
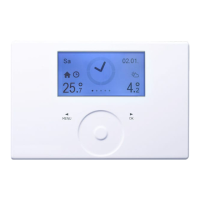
1.5 Operation
The operation is split over three control levels.
Control levels 1 and 2 are accessible to user
and contractor alike. Control level 3 is only
designed for qualified contractors.
Control level 1 (control ap closed)
This enables the adjustment of operating
modes, such as standby mode, programmed
operation, constant day or setback mode, etc.
(see section 2.1).
Control level 2 (control ap open)
This enables system parameter, such as room
temperatures, DHW temperatures, heating
programs, etc. to be adjusted (see section 2.2).
Control level 3 (for contractors only)
This level is protected by a code and should
only be used by contractors. At this level,
heat pump and system-specific details are
determined (see chapter 5 of the installation
instructions).
Vital facts in brief
Adjustments
All adjustments follow the same pattern:
Opening the control ap toggles the manag-
er into the programming mode. An indicator
symbol is shown at the bottom of the
display at system parameter room temp. 1.
Turning the rotary selector allows you to
move the indicator to that system param-
eter which you want to change. To change
the system parameter, press . Whenever
the red indicator above illuminates, you
can modify the current value by turning the
rotary selector . Press again ; the il-
luminator then goes out and the new set
value has been saved. You can modify further
values for this parameter by pressing , if
the red indicator has not been extinguished
above . The programming step can only
be terminated when the red indicator has
gone out.
Terminating programming
You can terminate the programming proc-
ess after entering and saving the require
parameter changes by closing the control
ap. However, if you want to make further
changes, turn the rotary selector until
the display shows BACK, then press . This
will return you to the previous level. Closing
the control ap with illuminated indicator
above returns the manager into its original
position, The modied value will not have
been saved.
During initial start-up, a system
check will be implemented, e.g.
all sensors are currently connected are
displayed. Sensors not connected before
the system went ‚live‘ are not registered
by the manager and are therefore not
displayed. The indicator symbol skips the
system parameter..
Example: The system parameters DHW temp.
and DHW prog. will be skipped if, at the initial
start-up, the DHW cylinder sensor was not
connected. Values for these parameters can
therefore not be programmed.
 Loading...