EN - 6
The cutting means assembly is connected to the socket
(16:A).
• Tyre pressure
For tyre pressure see “0 TABLE OF TECHNICAL DATA”.
•
NOTE This machine can be used to mow lawns in a number
of different ways; before starting, prepare the machine based on
how the lawn is to be mowed.
5.2.
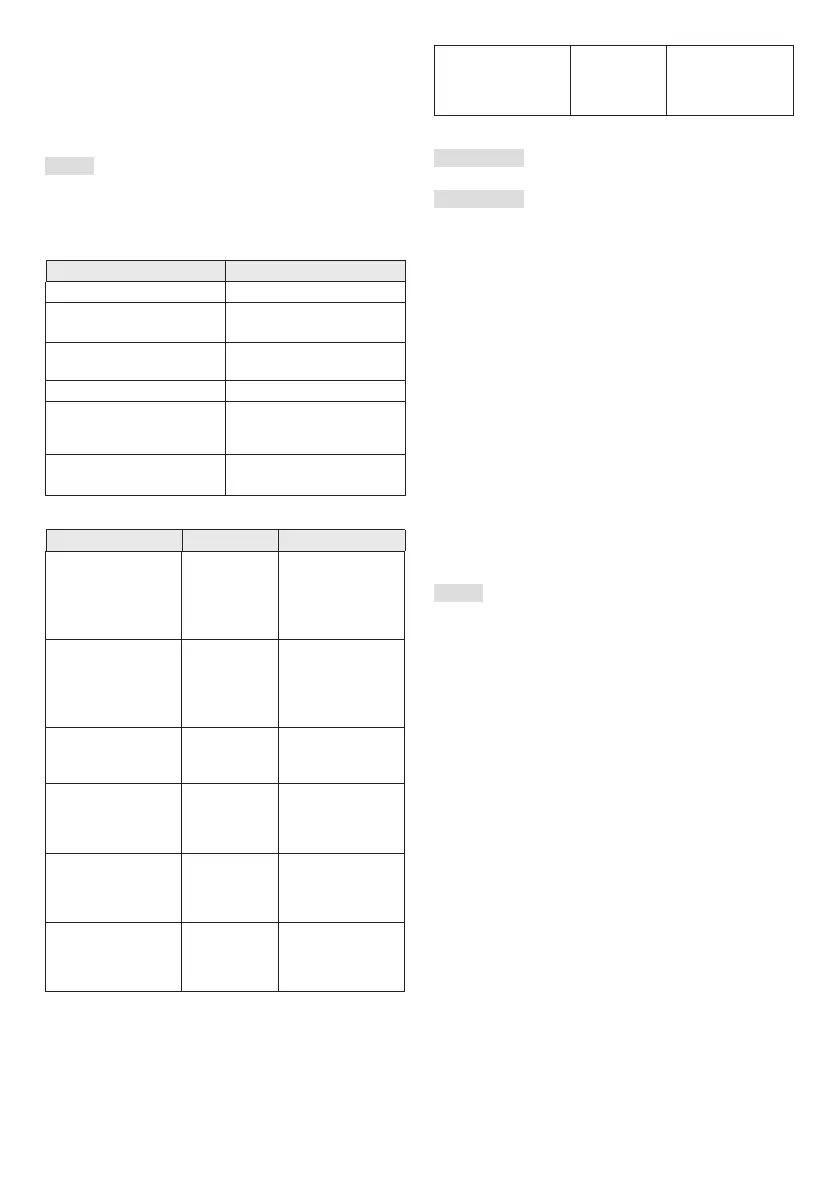
•
Result
Fuel lines and connections. No leaks.
Electrical cables. All insulation intact.
No mechanical damage.
Exhaust system. No leaks at connection
points. All screws tightened.
Oil lines No leaks. No damage.
Operate the machine with a
forwards/reverse movement
and release the drive pedal.
The machine stops.
Test driving No abnormal vibrations.
No abnormal sound.
•
Status Action Result
Driver not seated.
Hand brake
engaged.
Try starting
the engine.
The engine does
not start.
“SIT DOWN”
appears in the
display (if present).
Driver seated.
Hand brake
released.
Try starting
the engine.
The engine does
not start.
“PRESS BRAKE”
appears in the
display (if present).
Driver seated.
Hand brake
engaged.
Try starting
the engine.
The engine starts.
Engine on, cutting
device disengaged,
parking brake
engaged.
The driver
stands up
from the seat.
Engine remains
switched on.
Engine on, cutting
device disengaged,
parking brake
disengaged.
The driver
stands up
from the seat.
The engine stops.
Engine on, cutting
device engaged,
parking brake
disengaged.
The driver
stands up
from the seat.
The engine stops.
Engine on, cutting
device engaged,
parking brake
engaged.
The driver
stands up
from the seat.
The engine stops.
5.3. USING ON SLOPES
The machine must not be used on slopes
above 10°, regardless of the mowing direction.
Reduce speed on slopes and in tight bends to
avoid tipping over or losing control of the machine.
5.4. STARTING AND OPERATION
• Start-up
1. Open the petrol tap (17:B).
2. Insert the key into the main switch (8:A).
3. Engage transmission (12) - (lever out).
4. Insert the key in the switch (10:C).
5. Do not keep the foot on the drive pedal (9:C).
If cold starting:
1. Activate the parking brake (9:A).
2. Turn the throttle to full on (10:A).
3. Pull the choke control fully out (10:B).
4. Turn the switch key to position “I” and press the START
button (10:P).
If hot starting:
5. Activate the parking brake (9:A).
6. Turn the throttle to full on (10:A).
7. The choke control (10:B) must be lowered.
8. Turn the switch key to position “I” and press the START
button.
NOTE If there are engine starting problems, do not persist
as you can risk running the battery flat and flooding the engine.
Turn the key to the Off position, wait for a few seconds and then
repeat the operation. If the malfunction persists, refer to the en-
gine owner's manual and chapter 8 in this manual.
• Ready
1. Depress the pedal fully (9:A) and release it.
2. Actuate the pedal (9:C) to make the machine move.
3. Go to the work area.
4. If front attachments have been tted, activate the power
take-o (10:F).
5. Start working.
5.5. STOP
To stop the machine:
1. Depress the parking brake pedal (9:A) fully.
2. Pull the lever (9:B) upwards.
3. Release the pedal (9:A).
4. Let the engine idle for one or two minutes.
5. Press the STOP button (10:P) to switch o the machine.
6. Turn the key of the switch (10:C) to position “0” and
pull it out.
7. Close the petrol tap. This indication is particularly important
if the machine is to be transported on a trailer or similar.
8. Pull the key out of the main switch.



 To Next Page