Section 4
INSTALLATION
18
nects etc. Customer wiring is very minimal. Sullair
provides a wiring diagram for use by the installer.
A few electrical checks should be made for a trou-
ble-free start-up.
1. Check incoming voltage. Be sure that the incom-
ing voltage is the same voltage that the com-
pressor was wired for.
2. Check starter and overload heater sizes (see
electrical parts in Parts Manual).
3. Check all electrical connections for tightness.
4. "DRY RUN" the electrical controls by disconnect-
ing the three (3) motor leads from the starter.
Energize the control circuits by pushing the
START button and check all protective devices
to be sure that they will de-energize the starter
coil when activated.
5. Re-connect the three (3) motor leads and jog the
motor for a direction of rotation check, as
explained in Section 4.7.
4.7 MOTOR ROTATION DIRECTION CHECK
After the electrical wiring has been done, it is nec-
essary to check the direction of the motor rotation.
This can be done by jogging the START and STOP
buttons on the instrument panel. When looking at
the motor from the end opposite the compressor
unit, the shaft should be turning clockwise. If the
motor shaft is not turning in the proper direction,
disconnect the power to the starter and exchange
any two of the three power input leads, then re-
check rotation. A "Direction of Rotation" decal is
located on the coupling guard between the motor
and compressor to show proper motor/compressor
rotation.
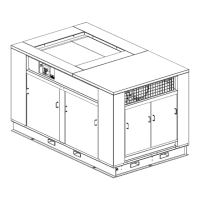
Figure 4-1 Service Air Piping (Typical Installation)
Lethal shock hazard inside. Disconnect all power
at source before opening or servicing starter or
control panel.
 Loading...