EasyManua.ls Logo

Suncast BMS8125 - User Manual

Suncast BMS8125
28 pages
Print Icon
To Next Page IconTo Next Page
Loading...
Blow Molded Resin Storage Shed
ASSEMBLY INSTRUCTIONS
© 2021 Suncast Corporation, Batavia, IL 0361334F
Tools Needed for Installation
Assistance is required
during entire assembly.
Thank you for your purchase. Please go to Suncast.com to register your product for warranty.
Question and Answer IconNeed help?

Do you have a question about the Suncast BMS8125 and is the answer not in the manual?

Summary

Shed Assembly Preparation and Safety

Tools Needed for Installation

Lists all essential tools required for the proper assembly of the Suncast storage shed.

Before You Begin Assembly

Key preparatory steps and considerations before starting shed construction, including permits and site assessment.

Shed Safety and Care Guidelines

Important safety precautions and maintenance advice for the storage shed to ensure longevity and user safety.

Assembly Day Best Practices

Tips and recommendations for a smooth and efficient shed assembly process on the day of construction.

Suncast Shed Parts Identification

Walls and Floors Components

Detailed breakdown of all wall panels, corner pieces, and floor sections included in the shed kit.

Shed Doors and Windows Parts

Identification of shed door panels, window frames, and associated sealing components.

Headers and Ridge Beams

Listing of header beams, ridge beams, and joiner pieces for the shed's structural framework.

Truss System Components

Identification of truss legs, brackets, cross beams, and straps for roof support.

Roof Panels and Skylights

Overview of roof panels, extensions, skylights, and sealing gaskets for the shed roof.

Hardware and Fasteners

Comprehensive list of all screws, bolts, nuts, washers, and hinges required for assembly.

Door Handle Kit Components

Details of the specific kit required for installing the shed's door handles.

Site Preparation and Foundation Construction

Foundation Options and Site Prep

Guidance on preparing the building site and constructing either a concrete slab or wood platform foundation.

Wood Platform Design Details

Critical spacing measurements and material list for constructing a stable wood platform foundation.

Shed Assembly Steps

Door Pre-Assembly Process

Instructions for assembling shed doors, attaching windows, gaskets, and D-ring slide bolts.

Header Beam Pre-Assembly

Steps for assembling front and rear headers, including vent screen and bracket attachments.

Ridge Beam Assembly

Procedure for connecting the 3' and 7' ridge beams using joiners and hardware.

Roof Truss System Assembly

Steps for assembling truss legs, beams, brackets, and attaching roof panels with skylights.

Shed Wall Panel Installation

Guidance on attaching and securing wall panels to the floor, ensuring proper alignment and fit.

Shed Header and Truss Installation

Instructions for fitting and securing front/rear headers and sliding truss assemblies into place.

Shed Roof Panel Installation

Steps for laying out, aligning, and securing the roof panels to the shed structure.

Shed Door Hinge and Handle Installation

Procedure for attaching door hinges, installing door handles, and securing the doors.

Overview

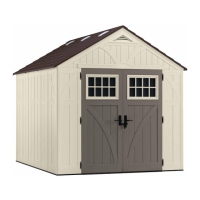
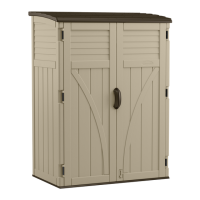
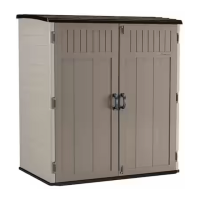
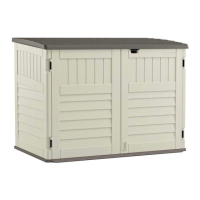
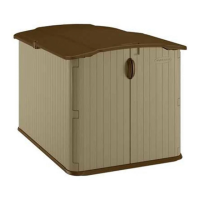
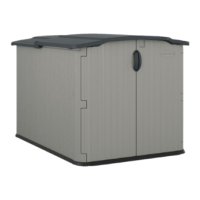
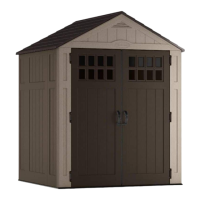
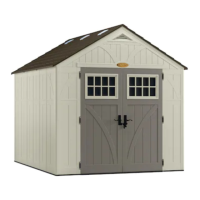
This document serves as an assembly and maintenance guide for a blow-molded resin storage shed, emphasizing proper installation and care to ensure longevity and functionality. The shed is designed for outdoor storage, providing a secure and organized space for various items, though specific limitations apply regarding its use and contents.

Function Description

The primary function of this device is to provide a durable, weather-resistant storage solution for outdoor environments. It is constructed from blow-molded resin, a material known for its resilience and low maintenance. The shed offers an enclosed space to protect stored items from the elements, such as rain, sun, and wind, and to deter unauthorized access when secured with a lock. Its design incorporates features like a sloped roof for water runoff, doors for access, and internal structures for stability. The assembly process involves constructing the floor, walls, headers, trusses, and roof, culminating in the installation of doors and optional shelving.

Usage Features

The shed is designed with several features to enhance its usability and durability:

  • Foundation Requirement: A level and sturdy foundation is crucial for the shed's stability and to prevent distortion or damage over time. The manual provides detailed instructions for constructing either a concrete slab or a wood platform foundation, highlighting the importance of proper site preparation. This ensures the shed remains level and structurally sound, preventing issues like uneven doors or wall panels.
  • Modular Assembly: The shed is assembled from various pre-fabricated resin panels and structural components. This modular design simplifies the assembly process, allowing users to build the shed step-by-step by following the provided instructions. Each part is clearly identified, and the instructions guide the user through the correct sequence of assembly, from the floor panels to the roof and doors.
  • Easy Bolt System: The assembly utilizes an "Easy Bolt" system, which includes specific bolts and a dedicated "Easy Driver" tool (010210410). This system is designed for hand-tightening, with a clear warning against using power tools or over-tightening, which could damage the resin components. The Easy Bolts are designed to seat flush when properly tightened, often with an audible click, ensuring a secure connection without stripping threads.
  • Door Design: The shed features double doors for wide access, facilitating the storage of larger items. The doors are pre-assembled with windows, gaskets, and frames, which are then integrated into the shed structure. D-ring slide bolts are used to secure the doors, allowing them to be locked for added security. The door hinges are designed for smooth operation and are secured with screws and nuts.
  • Skylights and Ventilation: The roof design incorporates skylights (HH) to allow natural light into the shed, reducing the need for artificial lighting during the day. These skylights are sealed with gaskets (YY) to prevent water intrusion. A vent screen (Y) is also included in the front header, promoting air circulation within the shed and helping to prevent condensation and stale air.
  • Internal Support Structure: The shed's roof is supported by a truss system, including truss legs (AA), extension brackets (BB), truss brackets (CC), roof support brackets (DD), truss cross beams (EE), side adaptor brackets (FF), and truss straps (GG). This robust internal framework ensures the roof's structural integrity, especially under environmental loads like snow or wind. The ridge beam (V/EEE) connects the front and rear headers, forming the apex of the roof.
  • Optional Shelving: The shed includes optional shelving (YY) that can be installed in any of the four corners. This feature allows users to customize the internal storage space, providing elevated surfaces for smaller items and helping to keep the shed organized. The shelving is secured with screws, offering a stable platform for various goods.
  • Security Features: The D-ring slide bolts on the doors are designed to accommodate a 5/16" lock (not provided), allowing users to secure the shed and its contents. This feature is essential for protecting valuable items stored within the shed.
  • Weather Resistance: The blow-molded resin construction is inherently weather-resistant, designed to withstand outdoor conditions. The roof panels are sealed with rubber washers (QQ) and sealing screws (PP) along the ridge to prevent water leaks. The overall design aims to create a dry and protected environment for stored items.

Maintenance Features

Proper maintenance is crucial for extending the life of the shed and ensuring its continued performance. The manual outlines several key maintenance practices:

  • Annual Cleaning: The shed's textured exterior, similar to vinyl siding, can accumulate dust, which, when combined with moisture, may lead to moss or mold growth. Annual cleaning with mild soap and water is recommended to maintain its appearance. It is explicitly advised not to use bleach, ammonia, other caustic cleaners, or stiff bristle brushes, as these can permanently stain the plastic. This regular cleaning prevents aesthetic degradation and preserves the material's integrity.
  • Inspection of Assembly Integrity: At regular intervals, users should inspect the shed to ensure that its assembly integrity has been maintained. This includes checking for loose fasteners, damaged panels, or any signs of structural compromise. Prompt repair or replacement of broken parts is recommended to prevent further damage or safety hazards.
  • Foundation Level Check: Periodically checking that the chosen location for the shed is still level is important. Ground settling can affect the shed's alignment, potentially causing distortion or issues with door operation. Addressing any leveling issues early can prevent more significant structural problems.
  • Roof Cleaning: Keeping the roof clean of snow and leaves is essential. Accumulations can add significant weight, potentially stressing the roof structure, and leaves can trap moisture, encouraging mold or mildew growth. Regular removal of debris helps maintain the roof's load-bearing capacity and prevents water damage.
  • Care in Extreme Temperatures: The resin material should be treated carefully in extreme temperatures. While designed for outdoor use, sudden impacts or excessive stress in very cold conditions could potentially make the material more brittle.
  • Proper Storage Practices: To maintain the shed's structure and prevent damage, heavy items should be stored near the bottom. Leaning heavy articles against the walls is discouraged, as this can cause panel distortion and permanent damage. The shed is not intended for storage of flammable or caustic chemicals, nor for use by children, and standing or sitting on the roof is prohibited.
  • Hardware Check: The manual advises against over-tightening screws during assembly to prevent damage. However, it is implied that periodic checks of fasteners might be beneficial to ensure they remain secure, especially after initial settling or exposure to strong winds. The "Easy Bolt" system is designed to provide a secure fit, but environmental factors can sometimes affect fastener integrity.

By adhering to these usage and maintenance guidelines, owners can ensure their Suncast resin storage shed remains a functional, durable, and aesthetically pleasing addition to their outdoor space for many years.

Suncast BMS8125 Specifications

General IconGeneral
Product NameSuncast BMS8125
CategoryOutdoor Storage
Model NumberBMS8125
MaterialResin
Locking MechanismPadlockable
Floor IncludedYes
Weather ResistanceYes
Assembly RequiredYes
Weather ResistantYes
Door TypeDouble doors

Related product manuals