EasyManua.ls Logo

Supermicro X11SSH-CTF User Manual

Supermicro X11SSH-CTF
122 pages
To Next Page IconTo Next Page
To Previous Page IconTo Previous Page
Page #66 background image
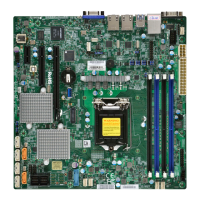
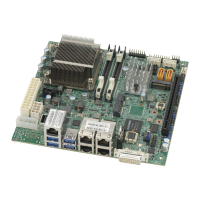
X11SSH-CTF/TF User's Manual
66
3. Using the minimum conguration for troubleshooting: Remove all unnecessary
components (starting with add-on cards rst), and use the minimum conguration (but
with a CPU and a memory module installed) to identify the trouble areas. Refer to the
steps listed in Section A above for proper troubleshooting procedures.
4. Identifying bad components by isolating them: If necessary, remove a component in
question from the chassis, and test it in isolation to make sure that it works properly.
Replace a bad component with a good one.
5. Check and change one component at a time instead of changing several items at the
same time. This will help isolate and identify the problem.
6. To nd out if a component is good, swap this component with a new one to see if the
system will work properly. If so, then the old component is bad. You can also install the
component in question in another system. If the new system works, the component is
good and the old system has problems.

Table of Contents

Other manuals for Supermicro X11SSH-CTF

Question and Answer IconNeed help?

Do you have a question about the Supermicro X11SSH-CTF and is the answer not in the manual?

Supermicro X11SSH-CTF Specifications

General IconGeneral
BrandSupermicro
ModelX11SSH-CTF
CategoryMotherboard
LanguageEnglish

Summary

Chapter 2 Installation

2.1 Static-Sensitive Devices

Provides precautions for handling static-sensitive components to prevent damage.

2.2 Motherboard Installation

Guides on how to install the motherboard into the chassis, including tools and mounting holes.

2.3 Processor and Heatsink Installation

Step-by-step instructions for installing the CPU and heatsink.

2.4 Memory Support and Installation

Information on memory support, population configuration, and installation.

2.8 Jumper Settings

Explains how to use jumpers and details specific jumper configurations.

Chapter 3 Troubleshooting

3.1 Troubleshooting Procedures

Provides systematic steps to diagnose and resolve common system issues.

3.2 Technical Support Procedures

Outlines steps for contacting technical support and information to provide.

3.3 Frequently Asked Questions

Answers common questions regarding memory support and BIOS updates.

3.4 Battery Removal and Installation

Instructions for safely removing and installing the onboard CMOS battery.

Chapter 4 BIOS

4.3 Advanced Setup Configurations

Details various advanced BIOS settings for system configuration.

Appendix C Standardized Warning Statements

Battery Handling

Provides warnings and instructions for handling and replacing batteries.

Product Disposal

Information on the proper disposal of the product according to national laws.

Appendix D UEFI BIOS Recovery

D.3 Recovering the BIOS Block with a USB Device

Step-by-step guide to recovering the BIOS using a USB device.

Related product manuals