Do you have a question about the Supermicro X11SPM-F and is the answer not in the manual?
COM ports quantity | 2 |
---|---|
USB 2.0 ports quantity | 6 |
USB 3.2 Gen 1 (3.1 Gen 1) Type-A ports quantity | 5 |
Maximum LRDIMM memory | 384 GB |
Supported RDIMM clock speeds | 1600, 1866, 2133, 2400, 2666 MHz |
Supported RDIMM module capacity | 4GB, 8GB, 16GB, 32GB |
Supported DIMM module capacities | 4GB, 8GB, 16GB, 32GB, 64GB, 128MB |
Supported LRDIMM module capacity | 32GB, 64GB |
ECC | Yes |
Memory voltage | 1.2 V |
Maximum RDIMM memory | 192 GB |
Supported memory types | DDR4-SDRAM |
Maximum internal memory | 768 GB |
BIOS type | UEFI AMI |
ACPI version | 6.0 |
RAID levels | 0, 1, 5, 10 |
Supported storage drive interfaces | SATA III |
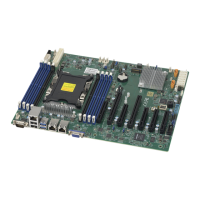
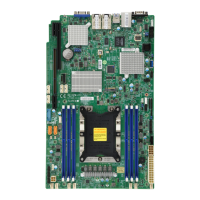
On-board graphics card model | Aspeed AST2500 |
Storage temperature (T-T) | -20 - 60 °C |
Operating temperature (T-T) | 0 - 60 °C |
Storage relative humidity (H-H) | 10 - 95 % |
Operating relative humidity (H-H) | 10 - 85 % |
Processor socket | LGA 3647 (Socket P) |
Processor manufacturer | Intel |
Processor thermal power (max) | 165 W |
Processor number of cores supported | 28 |
Wi-Fi | No |
Number of SATA III connectors | 12 |
PCI Express x16 (Gen 2.x) slots | 0 |
Sustainability certificates | RoHS |
Motherboard chipset | Intel® C621 |
Motherboard form factor | micro ATX |
Harmonized System (HS) code | 84733020 |
Width | 243.8 mm |
---|
Provides information for the installation and use of the X11SPL-F motherboard.
Details the features and capabilities of the X11SPL-F motherboard, including CPU, memory, and expansion slots.
Explains symbols like Warning and Important used for safety and operational guidance.
Provides contact information for Supermicro's main office in the USA.
Provides contact details for Supermicro's European branch.
Lists contact information for Supermicro's Asia-Pacific operations.
Lists the main parts included in the retail box for the X11SPL-F motherboard.
Introduces the Intel Xeon processor and Intel PCH C621 chipset used on the motherboard.
Covers specific functionalities like Recovery from AC Power Loss.
Details how the system monitors voltage, temperature, and fan status for overall health.
Explains the Advanced Configuration and Power Interface (ACPI) specification and its role in power management.
Specifies the power supply requirements and connectors for the motherboard.
Describes the two serial communication connections (COM Ports) available on the motherboard.
Provides precautions to protect components from electrostatic discharge (ESD) during handling.
Guides users through the process of installing the CPU and heatsink module correctly.
Details the steps and considerations for mounting the motherboard into a computer chassis.
Explains memory module compatibility, capacity, speed, and the installation procedure.
Identifies and describes the various ports located on the motherboard's rear I/O panel.
Describes the connectors for front chassis buttons and indicators like power and reset.
Details the various internal connectors on the motherboard, including power and headers.
Explains how jumpers are used to modify motherboard operations and specific settings.
Describes the function of various LEDs on the motherboard for status indication.
Introduces the AMIBIOS Setup utility and how to navigate it.
Details the supported Intel Xeon processor series, core count, and TDP.
Specifies the supported DDR4 ECC memory types, capacity, and speeds.
Indicates the maximum DIMM capacity supported at a specific voltage.
Identifies the Intel PCH C621 chipset used on the motherboard.
Lists the types and quantities of PCI-Express slots available on the motherboard.
Describes the network controllers and ports, including dual 1G Base-T and dedicated IPMI LAN.
Identifies the ASpeed AST2500 BMC and its role in system management.
Mentions the graphics controller utilized via the ASpeed AST2500 BMC.
Lists and describes various I/O devices like Serial Ports, SATA 3.0, and VGA Port.
Details the number and types of USB ports and headers on the motherboard.
Describes the BIOS chip size and key features like ACPI and Plug and Play support.
Outlines features like ACPI power management, Wake-On-LAN, and power supply monitoring.
Covers voltage monitoring, temperature sensing, and fan control mechanisms.
Explains fan status monitoring via IPMI and fan speed control features.
Details support for TPM, SuperDoctor 5, and chassis intrusion detection.
Lists and describes the function of various LEDs on the motherboard.
Specifies the physical dimensions of the motherboard in ATX form factor.
Describes how the system responds to power interruptions and restores operation.
Details the monitoring of onboard voltages for stability and error reporting.
Explains how the BMC chip monitors fan RPM and controls cooling via IPMI.
Describes how system temperature sensors manage cooling fans to prevent overheating.
Covers notifications for system events using SuperDoctor 5, such as temperature or fan speed thresholds.
Explains the Advanced Configuration and Power Interface (ACPI) specification and its role in power management.
Provides precautions to protect components from electrostatic discharge (ESD) during handling.
Identifies the components of the processor socket assembly: processor, clip, dust cover, and socket.
Details the components of the Processor Heatsink Module (PHM): heatsink, clip, and processor.
Step-by-step instructions for correctly seating the CPU into its processor clip.
Instructions for mounting the processor carrier assembly onto the heatsink to form the PHM.
Explains the pre-assembled CPU socket components and preparation for installation.
Guides on safely removing the CPU socket dust cover without touching pins.
Provides detailed steps for securely mounting the assembled PHM into the CPU socket.
Outlines the procedure for safely removing the PHM from the CPU socket.
Lists the necessary tools for installing the motherboard, like screwdrivers and standoffs.
Explains how to align motherboard mounting holes with chassis standoffs for proper installation.
Step-by-step guide for physically installing the motherboard into the chassis.
Details the types, capacities, speeds, and configurations of supported memory modules.
Specifies the correct order for installing memory modules into the DIMM slots for optimal performance.
Provides visual instructions on how to insert DIMM modules into the slots correctly.
Explains the procedure for safely removing DIMM modules from the motherboard slots.
Describes the location and pin definitions for the motherboard's serial ports (COM1, COM2).
Identifies the location of the onboard VGA port on the rear I/O panel.
Details the Gigabit Ethernet ports (LAN1, LAN2) and the dedicated IPMI LAN port.
Lists and describes all USB 2.0 and USB 3.0 ports and headers on the motherboard.
Explains the function of the UID switch and LED for system identification.
Details the connection and function of the power button header on JF1.
Explains the connection and function of the reset button header on JF1.
Describes the pin definition and function of the Power Fail LED indicator.
Explains the connection for the Overheat/Fan Fail LED and its status indications.
Details the pin definitions for the LAN activity LEDs (NIC1 and NIC2).
Describes the connection and function of the HDD activity LED indicator.
Explains the pin definition and function of the onboard Power LED.
Describes the NMI button header and its connection.
Details the 24-pin ATX power supply connector requirements.
Specifies the pin definitions for the 24-pin ATX power connector.
Specifies the 8-pin 12V DC power input connector for the CPU.
Introduces the various pin headers on the motherboard.
Describes the seven 4-pin fan headers and their pin definitions for fan control.
Explains the Serial Link General Purpose Input/Output (SGPIO) headers for SATA use.
Details the connectors for SATA DOM power support.
Describes the Trusted Platform Module (TPM) and Port 80 header for security and data.
Explains the M.2 slot for internal SSD devices, supporting PCIe 3.0 x4 and SATA.
Details the standby power header and its pin definitions for using compatible cards.
Explains the purpose of the internal speaker/buzzer for beep codes and its pin definitions.
Describes the Power System Management Bus (I2C) connector for monitoring power supply and temperature.
Details the BMC external I2C header for IPMI 2.0 connection.
Explains the chassis intrusion header for detecting unauthorized chassis opening.
Identifies the management header for Supermicro AOC NVMe PCI-E peripheral cards.
Describes the Voltage Regulator Module (VRM) SMBus header for programming controllers.
Details the pin definitions for power LED indication and the onboard speaker.
Explains the connection for overheat and fan failure LED indicators.
Lists the eight SATA 3.0 ports, their RAID support, and pin definitions.
Describes the JRK1 header used to enable RAID functions.
Explains the basic principle of how jumpers are used to modify motherboard operations.
Details the procedure for clearing CMOS settings and passwords using the JBT1 jumper.
Explains the Watch Dog timer function for system monitoring and rebooting, including jumper settings.
Describes the JPG1 jumper used to enable or disable the onboard VGA connector.
Explains the JPME2 jumper for bypassing SPI flash security for manufacturing mode.
Describes the JPL1 and JPL2 jumpers for enabling or disabling LAN ports 1 and 2.
Explains the function of the activity and link LEDs for the LAN ports.
Describes the LED indicator for the M.2 slot and its function.
Details the IPMI LAN LEDs indicating link status and activity.
Explains the BMC heartbeat LED at LEDBMC for indicating normal BMC operation.
Describes the onboard power LED at LEDPWR to indicate system status.
Explains the function of the Unit ID LED for system identification.
Provides guidance for diagnosing and resolving system issues.
Steps to diagnose and resolve issues where there is no video output.
Procedures for troubleshooting POST failures and system boot issues.
Guidance on identifying and resolving issues related to memory module installation or compatibility.
Explains potential causes for losing BIOS setup information and how to address them.
Steps to diagnose and fix system instability issues during or after OS installation.
Step-by-step instructions for safely removing the motherboard battery.
Important warnings and guidelines for the correct disposal of used batteries.
Instructions for correctly installing a new CMOS battery into the motherboard holder.
Configuration options related to boot behavior, such as Quiet Boot and Option ROM Messages.
Settings to control the display mode for Option ROM messages during boot.
Option to set the initial state of the NumLock key when the system powers on.
Feature to pause boot process on error until F1 key is pressed.
Controls how the BIOS handles the INT19 interrupt for bootable device detection.
Enables automatic system reboot on initial boot failure from a specified device.
Feature to enable USB keyboard/mouse support during Windows 7 installation.
Enables emulation of Port 61h bit-4 toggling in SMM for compatibility.
Settings related to power management, including Watch Dog and AC power loss recovery.
Configures how the system responds to power button presses (instant off or 4-sec override).
Reduces system power by throttling CPU frequency when a power supply fails.
Displays detailed CPU information and allows configuration of CPU features like Hyper-Threading.
Enables Execute-Disable Bit for security against malicious code execution.
Enables Vanderpool Technology for running multiple operating systems simultaneously.
Allows use of the Protected-Processor Inventory Number (PPIN) in the system.
Improves CPU performance by prefetching data/instructions to the L2 cache.
Configures cache line prefetching size to optimize CPU performance.
Enhances data processing by streaming data to the L1 cache.
Improves network connectivity by prefetching IP addresses.
Improves CPU performance by prefetching data/instructions to the L3 cache.
Enables support for the Advanced Programmable Interrupt Controller (APIC).
Enables Intel Advanced Encryption Standard (AES) New Instructions for data security.
Settings for configuring CPU power states, SpeedStep, and EIST functions.
Allows selection between OS and hardware-controlled CPU P-States.
Manages CPU power consumption by controlling C-states (Autonomous Core, C6 Report, Enhanced Halt).
Sets the limit on the C State package register for power management.
Enables Software Controlled T-States for fine-tuning CPU power efficiency.
Allows configuration of various chipset settings, including North Bridge options.
Settings related to UPI (Ultra Path Interconnect) configuration, including link speeds and MMIO bases.
Sets precedence for degrading features or topology when system settings conflict.
Enables the QPI L0p state for power saving.
Enables the QPI L1 state for power saving.
Manages IO Directory Cache to lower cache-to-cache transfer latencies.
Prioritizes time-sensitive processes by enabling Isochronous (Isoc) mode.
Controls memory settings like frequency, data scrambling, and refresh rates.
Displays information about the detected onboard memory modules.
Settings for Reliability, Availability, and Serviceability (RAS) of memory, including lockstep mode.
Allows memory mirroring between channels for redundancy.
Supports UEFI-based address range mirroring for memory configuration.
Enables memory rank sparing to improve memory performance and reliability.
Sets the threshold for correctable memory error logging events.
Organizes data for single device data correction (+1) to correct corrupted bits.
Detects correctable errors and copies failing DIMM contents to spare memory.
Allows the CPU to correct memory errors by reading/writing cache lines.
Sets the waiting time before the next patrol scrub is performed.
Settings for the Integrated I/O (IIO) controller, including PCIe port bifurcation.
Configuration options for CPU1, including IOU settings and PCIe slot link speeds.
Configures link speed and payload size for various CPU PCIe slots.
Settings for the I/O Acceleration Technology (IOAT), including TPH and Relaxed Ordering.
Enables Intel Virtualization Technology for I/O (VT-d) for secure resource sharing.
Manages Intel Volume Management Device (VMD) technology for storage devices.
Configuration options for the South Bridge, including USB support and hand-off settings.
Enables legacy I/O support for USB devices like mice and keyboards.
Displays and allows configuration of Management Engine (ME) firmware versions and status.
Settings for configuring the SATA controller, drive modes (AHCI/RAID), and power management.
Settings for the onboard sSATA controller, including drive modes and hot plug support.
Configuration options for PCIe and PCI devices, including decoding, support, and base addresses.
Selects the primary VGA device when multiple VGA devices are detected.
Selects firmware type for add-on cards in PCH SLOT1.
Selects firmware type for add-on cards in CPU SLOT2.
Selects firmware type for add-on cards in CPU SLOT3.
Selects firmware type for add-on cards in CPU SLOT4.
Selects firmware type for add-on cards in CPU SLOT5.
Selects firmware type for add-on cards in CPU SLOT6.
Selects firmware type for add-on cards in CPU SLOT7.
Selects firmware type for add-on cards in the M.2 slot.
Enables Option ROM support for booting from network devices.
Selects firmware function for LAN Port 1 boot.
Selects firmware function for LAN Port 2 boot.
Selects the type of Onboard Video Option ROM.
Configures settings for network stack support, including PXE and HTTP boot.
Sets the wait time to abort PXE boot by pressing ESC.
Specifies the number of times media will be checked for boot.
Provides information on the Super IO Chip AST2500.
Configures settings for Serial Port 1, including I/O address and IRQ.
Configures settings for Serial Port 2, including its attribute (SOL/COM).
Enables and configures serial port console redirection for remote management.
Sets flow control for COM1 console redirection to prevent data loss.
Enables VT-UTF8 key support for ANSI/VT100 terminals.
Captures terminal data and sends it as text messages to a remote server.
Enables extended terminal resolution support for COM1.
Selects rows and columns for console redirection in legacy OS.
Selects settings for Function Keys and KeyPad for Putty terminal emulator.
Enables or disables legacy console redirection after BIOS POST.
Enables or configures console redirection using the SOL port for COM2.
Specifies how the host computer exchanges data with the client computer for console redirection.
Captures terminal data for COM2 and sends it as text messages to a remote server.
Enables extended terminal resolution support for COM2.
Selects rows and columns for console redirection in legacy OS for COM2.
Selects Function Keys and KeyPad settings for Putty terminal emulator for COM2.
Enables or disables legacy console redirection after BIOS POST for COM2.
Selects a COM port for displaying Legacy OS and OPROM messages.
Enables or configures console redirection for Emergency Management Services using a COM port.
Selects a serial port for Microsoft EMS to communicate with a remote host server.
Selects the target terminal emulation type for console redirection.
Sets the transmission speed for serial port console redirection.
Sets flow control for console redirection to prevent data loss.
Configures ACPI settings related to Windows Hardware Error Architecture (WHEA) and High Precision Event Timer (HPET).
Enables onboard security devices for TPM support to enhance data integrity and network security.
Allows configuration of iSCSI initiator name and other related settings.
Displays RAID volume and Intel VMD Controller information if detected.
Controls the enabling/disabling and erasing of SMBIOS Event Logging features.
Toggles System Boot Event logging and defines MECI and METW parameters.
Defines the Multiple Event Count Increment threshold for duplicate events.
Sets the time window for counting duplicate log events.
Allows viewing the contents of the SMBIOS event log with categories like Date, Time, and Severity.
Displays the version of the IPMI firmware used in the system.
Indicates the current status of the IPMI firmware installed on the motherboard.
Enables and configures the System Event Log (SEL) for logging system events.
Determines the action to take when the System Event Log becomes full.
Configures network settings for the BMC, including IPV4 support and LAN selection.
Displays the MAC address of the computer.
Displays the default gateway IP address for network access.
Enables or disables Virtual LAN settings.
Configures IPV6 support and address source settings.
Allows setting or changing the administrator password for BIOS access.
Allows setting or changing a user password for BIOS access.
Configures when the system checks for passwords (setup or bootup).
Enables or disables the Secure Boot feature for enhanced system security.
Configures Secure Boot variables between Standard and Custom modes.
Enables Compatibility Support Module (CSM) for legacy BIOS boot compatibility.
Manages cryptographic keys for secure boot, including factory defaults and EFI images.
Manages Key Exchange Keys (KEK) for secure boot, including loading from defaults or files.
Manages authorized signatures (DB) for secure boot, including loading from defaults or files.
Manages forbidden signatures (DBX) for secure boot, including loading from defaults or files.
Manages authorized timestamps (DBT) for secure boot, including loading from defaults or files.
Uploads and installs an OS Recovery Signature for secure boot.
Selects the system boot mode (Legacy, UEFI, or Dual).
Enables EFI OS support after Legacy boot order has failed.
Sets the priority order for bootable devices.
Allows deletion of boot devices from the boot priority list.
Sets the boot order for detected network devices.
Specifies which UEFI devices are bootable.
Allows adding new boot options with specified names and file paths.
Options for saving changes or exiting without saving.
Saves configuration changes and resets the system.
Saves configuration changes and exits the BIOS setup utility.
Discards all changes and returns to the AMI BIOS utility.
Restores optimized or user-defined default BIOS settings.
Allows selecting a specific boot option for the current startup.
Explains beep codes indicating non-fatal and fatal errors during the Power-On Self-Test.
Provides information on additional checkpoint codes documented online for AMI BIOS.
Instructions for downloading and installing drivers and utilities, including creating a CD/DVD.
Details the SuperDoctor 5 hardware monitoring program for system health information and alerts.
Crucial warnings regarding the danger of battery explosion if replaced incorrectly.
Explains the Unified Extensible Firmware Interface (UEFI) as a software-based interface.
Details the process of recovering the UEFI BIOS image from a recovery block or after corruption.
Provides instructions for recovering the BIOS using a USB-attached device and the "Super.ROM" file.